
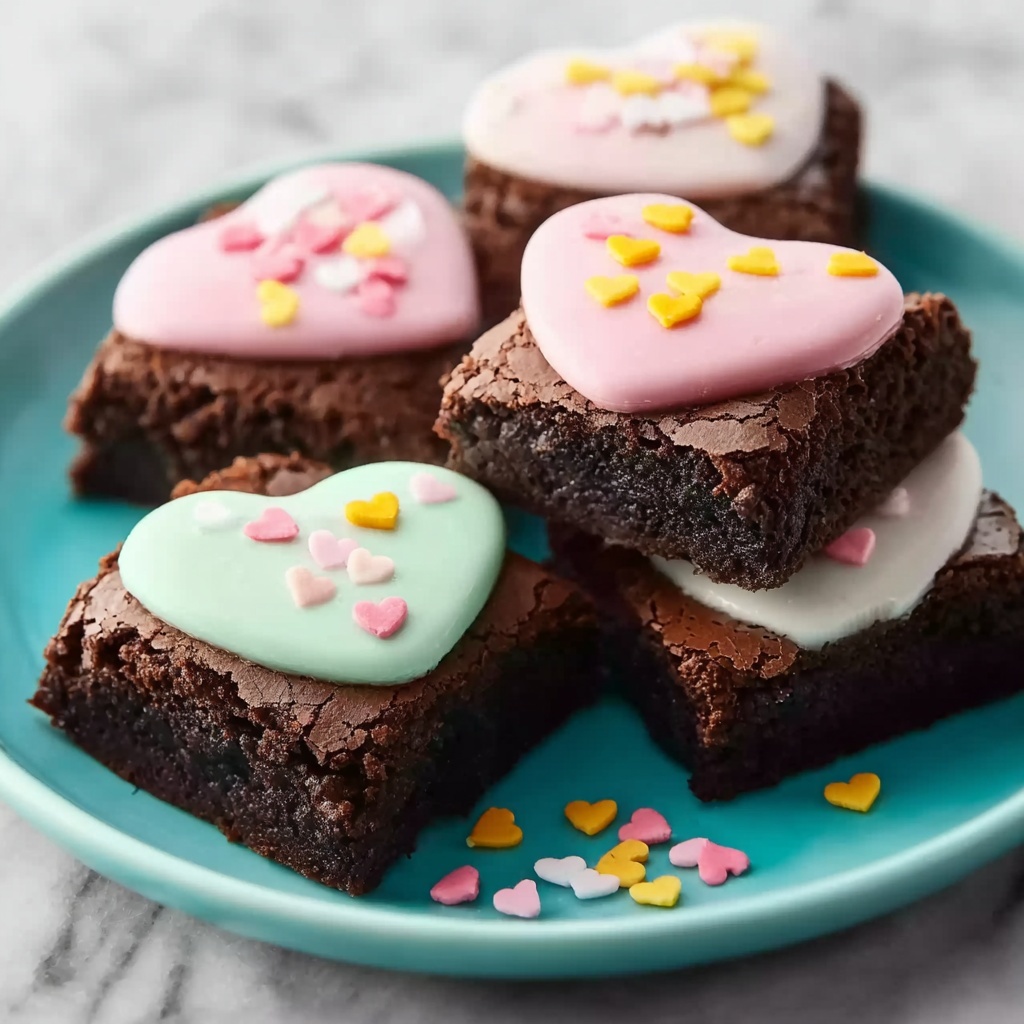
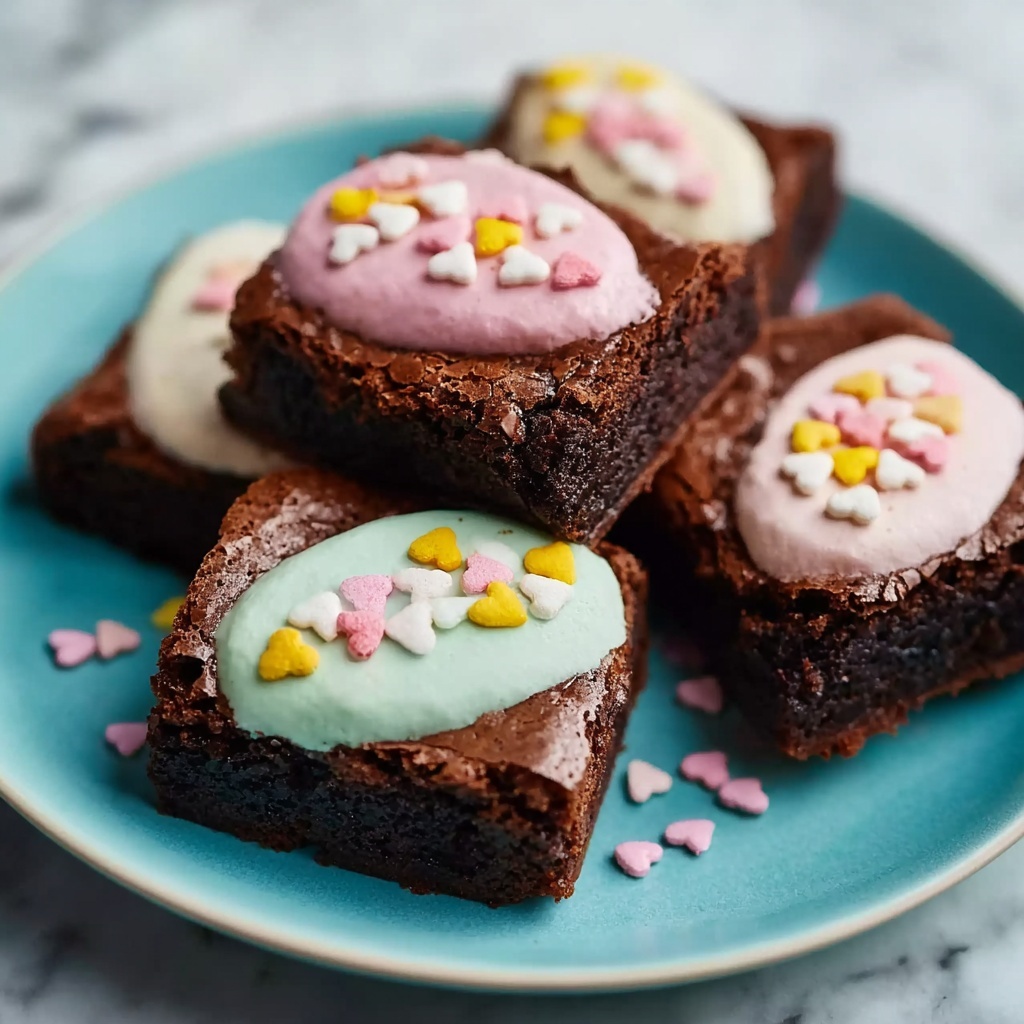
If you’re looking to add a delightful twist to your Easter baking repertoire, look no further than this Mini Egg Brownies (Gluten-Free, Easter Baking) Recipe. Rich, fudgy, and bursting with the crunchy surprise of mini eggs throughout, these brownies are both irresistibly chocolatey and beautifully festive. Perfect for sharing with family and friends, these gluten-free treats bring together simple ingredients that create layers of texture and flavor, making them an absolute must for your holiday celebrations.
Ingredients You’ll Need
Gathering the right ingredients for these Mini Egg Brownies (Gluten-Free, Easter Baking) Recipe is straightforward but crucial. Each component plays its part in ensuring a fudgy, moist brownie enhanced by the crunch and color of the mini eggs—making every bite a balanced delight.
- 90 g plain gluten-free flour: Provides structure while keeping the brownies light and gluten-free.
- 50 g cocoa powder: Delivers rich chocolate flavor with just the right bitterness.
- 200 g butter: Adds moisture and a velvety texture to the brownie base.
- 200 g milk or dark chocolate: Intensifies the chocolate goodness and melts smoothly into the batter.
- 3 large eggs: Bind the ingredients together and contribute to the fudgy texture.
- 280 g caster sugar: Sweetens the batter with a fine texture that blends perfectly.
- 180 g crushed mini eggs: Infuse crunchy, colorful surprises within the brownie.
- 80 g whole mini eggs for decorating: Make for a festive finishing touch on top of the brownie.
How to Make Mini Egg Brownies (Gluten-Free, Easter Baking) Recipe
Step 1: Prepare Your Oven and Tin
Start by preheating your oven to 160C fan or 180C conventional. Line a 9×9 inch square baking tin with non-stick baking paper so your brownies don’t stick and come out perfectly intact after baking.
Step 2: Melt Butter and Chocolate
Gently melt the butter and milk or dark chocolate together using either a microwave in short bursts or a bain marie. Stir until completely smooth and then let the mixture cool to room temperature, keeping it warm but not hot to avoid cooking the eggs later.
Step 3: Combine Dry Ingredients
Sift together the gluten-free plain flour and cocoa powder into a bowl to ensure no lumps and an even chocolatey base. Set this aside for the next step.
Step 4: Beat Eggs and Sugar
In a separate bowl, crack in your eggs and add the caster sugar. Use an electric whisk to beat them until the mixture turns lighter in color and develops a slightly frothy texture, which helps make the brownies beautifully airy yet dense.
Step 5: Fold in Chocolate Mixture
Gradually pour the cooled chocolate and butter into the egg and sugar mixture. Fold them in gently with a spatula at first to avoid deflating the air, then steadily combine until the mixture looks marbled before it blends into a luscious dark chocolate batter.
Step 6: Add Dry Ingredients
Next, fold in your flour and cocoa powder blend until there are no streaks of dry flour. The batter should be fudgy and glossy, ready for the fun part—the mini eggs.
Step 7: Incorporate Crushed Mini Eggs
Fold in the crushed mini eggs gently. These candy bits create delightful textural contrast and bursts of sweetness inside each brownie bite.
Step 8: Bake Your Brownies
Pour the batter into your prepared tin and smooth the surface evenly. Bake for approximately 25 minutes—it’s okay if the center still wobbles slightly when you take it out, since it will firm up as it cools. For gooier brownies, bake for 5 minutes less; for a firmer texture, add a few extra minutes.
Step 9: Decorate With Whole Mini Eggs
Right after removing from the oven, carefully press whole mini eggs into the warm brownies to create a beautiful, colorful topping that will set as they cool.
Step 10: Cool and Serve
Allow the brownies to cool completely in the tin before lifting them out and slicing into squares. If you want, sprinkle extra crushed mini eggs on top for an added festive touch.
How to Serve Mini Egg Brownies (Gluten-Free, Easter Baking) Recipe
Garnishes
These brownies shine with just a scattering of crushed or whole mini eggs on top, but you can also add a dusting of cocoa powder or a drizzle of melted white chocolate to enhance their festive appearance. A dollop of whipped cream or a scoop of vanilla ice cream on the side also pairs wonderfully.
Side Dishes
Serve these brownies with fresh berries or a zesty berry compote to cut through the richness. A warm cup of coffee, tea, or even a glass of cold milk complements their gooey texture perfectly and rounds out the dessert experience.
Creative Ways to Present
For Easter parties, arrange the brownies on a pastel-colored platter, surrounded by dyed eggs or edible flowers to create a holiday centerpiece. You could also package them individually in small clear bags tied with ribbons, making perfect gifts or party favors.
Make Ahead and Storage
Storing Leftovers
These brownies keep well in an airtight container at room temperature for up to 3 days. The mini eggs inside stay crunchy, and the fudgy texture remains indulgently moist throughout.
Freezing
If you want to save some for later, wrap the brownies tightly in cling film and then place them in a freezer-safe container. They freeze beautifully for up to 3 months and thaw easily at room temperature when you’re ready to enjoy.
Reheating
To bring back that just-baked warmth, briefly microwave your brownie squares for 10 to 15 seconds. Avoid overheating to keep the gooey texture intact, as too much heat can dry them out.
FAQs
Can I use regular flour instead of gluten-free flour?
Yes, you can substitute with regular plain flour if gluten is not a concern. The texture may be a little different but still deliciously fudgy and moist.
What type of chocolate is best for this recipe?
Milk or dark chocolate both work wonderfully. Using dark chocolate will make your brownies richer and less sweet, while milk chocolate offers a creamier, sweeter bite.
Can I make these Mini Egg Brownies ahead of time for a party?
Absolutely! They hold up well and can be made a day or two in advance. Just store them properly in an airtight container to keep freshness intact.
How crushed should the mini eggs be for folding in?
There’s no exact size—mix crushed bits of varying sizes to get that wonderful mix of crunch and melted pockets. Just avoid powdering them completely; some chunkiness is part of the fun!
Are these brownies suitable for kids?
Definitely! Kids love the colorful mini eggs and the rich, chocolatey flavor. Just be mindful of potential allergies and adjust ingredients if needed.
Final Thoughts
There’s something truly special about the joy these Mini Egg Brownies (Gluten-Free, Easter Baking) Recipe brings to any Easter gathering. They’re easy to make, delightfully indulgent, and bursting with festive fun. Give this recipe a try and watch smiles light up as everyone enjoys these chocolaty, crunchy treats that celebrate the season in the most delicious way possible.
Print
Mini Egg Brownies (Gluten-Free, Easter Baking) Recipe
- Prep Time: 15 minutes
- Cook Time: 25 minutes
- Total Time: 40 minutes
- Yield: 9 servings
- Category: Dessert
- Method: Baking
- Cuisine: British
- Diet: Gluten Free
Description
These Mini Egg Brownies are a delightful gluten-free treat perfect for Easter or any chocolate craving. Rich, fudgy, and studded with colorful crushed mini eggs inside and whole mini eggs on top, these brownies combine a deep chocolate flavor with festive candy crunch. Easy to make and baked to perfection, they offer a gooey center with a slightly firm crust, making them an irresistible snack or dessert.
Ingredients
Dry Ingredients
- 90 g plain flour (gluten-free)
- 50 g cocoa powder
Wet Ingredients
- 200 g butter
- 200 g milk or dark chocolate
- 3 large eggs
- 280 g caster sugar
Add-Ins
- 180 g mini eggs (crushed, various sizes)
- Approximately 80 g mini eggs (whole, for decorating)
Instructions
- Preheat Oven: Preheat your oven to 160°C fan (180°C conventional) and line a 9×9 inch square baking tin with non-stick baking paper to prevent sticking and for easy removal of brownies.
- Melt Chocolate and Butter: Gently melt the butter and chocolate together using a microwave in short bursts or a bain marie until fully combined and smooth. Set aside to cool to room temperature or just warm to avoid curdling the eggs later.
- Combine Dry Ingredients: Sieve the cocoa powder and gluten-free plain flour together into a bowl to remove lumps, then mix briefly to combine. Set this mixture aside.
- Beat Eggs and Sugar: In a separate bowl, crack the eggs and add the caster sugar. Using an electric hand whisk, beat until the mixture is paler in color and slightly frothy, which aerates and lightens the base.
- Mix Chocolate with Eggs: Once the chocolate and butter mixture has cooled, gradually pour it into the egg and sugar mixture. Fold gently with a spatula; the batter will first appear marbled but will quickly become uniformly chocolatey.
- Incorporate Dry Ingredients: Fold the sieved flour and cocoa powder mixture carefully into the wet ingredients, ensuring there are no streaks left and the batter is smooth.
- Add Crushed Mini Eggs: Gently fold in the crushed mini eggs to evenly distribute them throughout the brownie batter for bursts of candy crunch.
- Prepare for Baking: Pour the batter into the prepared tin and smooth the top evenly to ensure uniform baking.
- Bake the Brownies: Bake in the preheated oven for about 25 minutes. The brownies will still wobble lightly when done; reducing baking time by 5 minutes results in gooier brownies, while slightly longer baking yields a firmer texture.
- Add Topping Mini Eggs: Immediately after removing from the oven, carefully press whole mini eggs into the surface to decorate and embed them before the brownies cool and harden.
- Cool and Serve: Allow the brownies to cool completely in the tin before removing and cutting them into squares. Optionally, decorate with additional crushed mini eggs for extra festive flair. Enjoy your rich, chocolatey gluten-free Easter treat!
Notes
- Use gluten-free plain flour to keep the recipe safe for gluten intolerant guests.
- Adjust baking time depending on your preferred brownie texture—from fudgy to firm.
- Ensure the chocolate and butter mixture is cool before mixing with eggs to prevent scrambling.
- You may substitute milk chocolate with dark chocolate for a richer flavor.
- Store brownies in an airtight container at room temperature for up to 3 days or refrigerate to prolong freshness.


