If you have a flair for thrilling desserts and want to impress friends at your next Halloween bash, this Zombie Brain Cake Recipe is your ultimate treat. It’s not just a cake; it’s an experience—a spooky yet delicious masterpiece that combines rich chocolate flavor with eerie pink and purple swirls mimicking the eerie appearance of a brain. Whether you’re a seasoned baker or just love to wow guests with creative sweets, this recipe turns simple ingredients into a chillingly delightful centerpiece.
Ingredients You’ll Need
These ingredients are straightforward but key to creating the perfect balance of flavor and spooky aesthetics. Each plays an important role, from the rich chocolate base to the creamy frosting that brings the whole zombie brain illusion to life.
- 2 cups all-purpose flour: The foundation of your cake providing structure and texture.
- 1 ½ cups granulated sugar: Adds essential sweetness to balance the cocoa’s bitterness.
- ½ cup unsweetened cocoa powder: Gives the cake its deep chocolate flavor and dark color.
- 1 tablespoon baking powder: Helps the cake rise to create a light crumb.
- 1 teaspoon baking soda: Enhances leavening with a slight tang.
- ½ teaspoon salt: Elevates flavors and balances the sweetness.
- 1 cup buttermilk: Adds moistness and tenderizes the crumb.
- ½ cup vegetable oil: Keeps the cake moist and adds richness.
- 2 large eggs: Binds ingredients and contributes to texture.
- 2 teaspoons vanilla extract: Infuses a warm, aromatic note.
- 1 cup boiling water: Intensifies the cocoa flavor and creates a smooth batter.
- Pink and purple food coloring: Essential for bringing that classic zombie brain color to the frosting.
- 1 cup unsalted butter, softened (for frosting): Forms the creamy base of the frosting.
- 4 cups powdered sugar: Sweetens and thickens the frosting.
- ¼ cup heavy cream (for ganache): Adds silky richness to the chocolate drizzle.
- 1 cup dark chocolate chips: Melts into luscious ganache for decoration and flavor contrast.
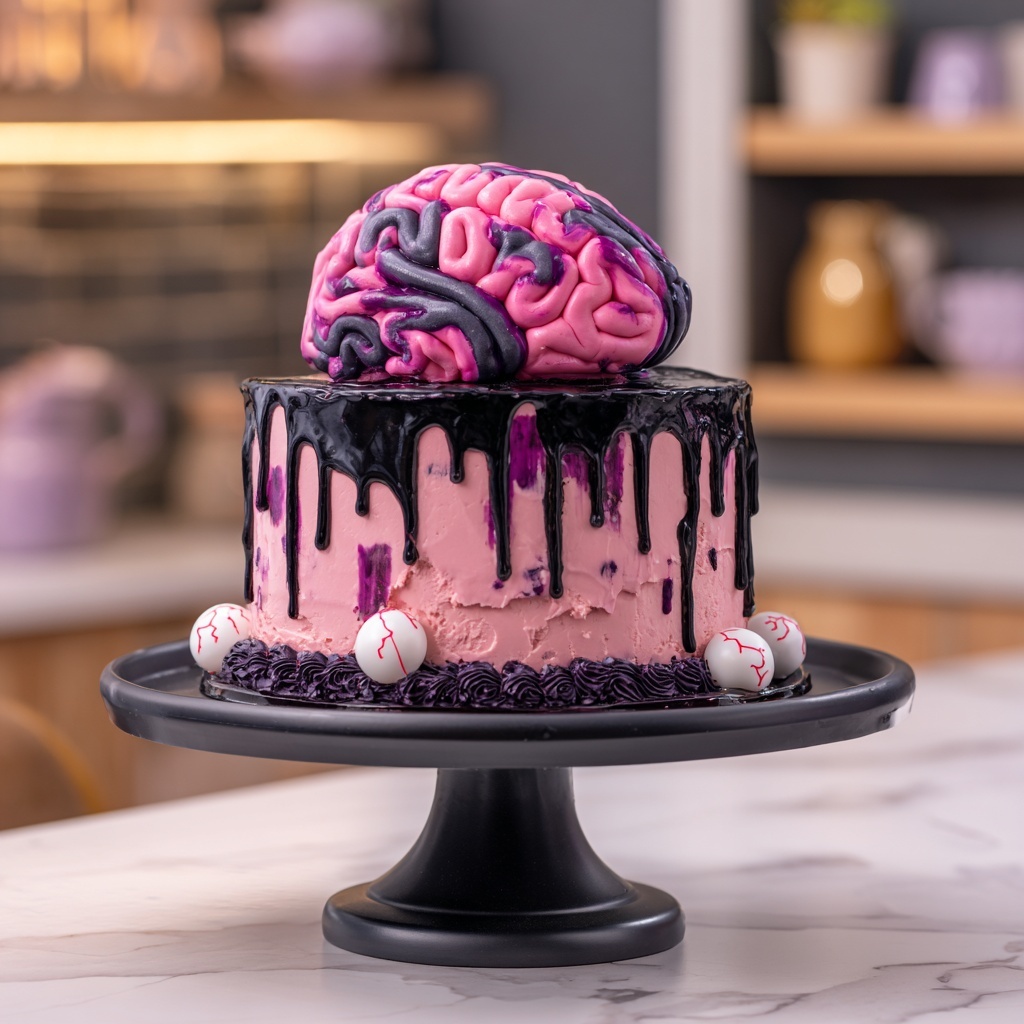
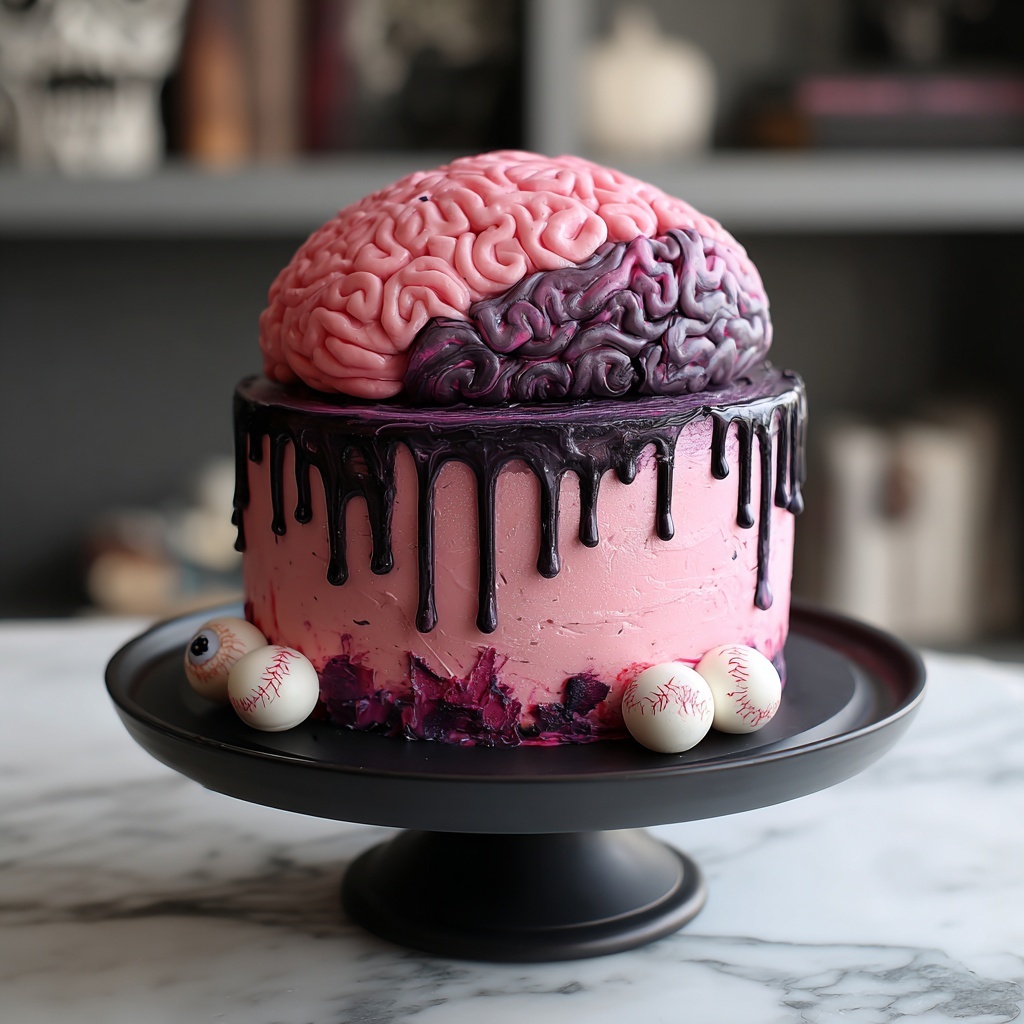
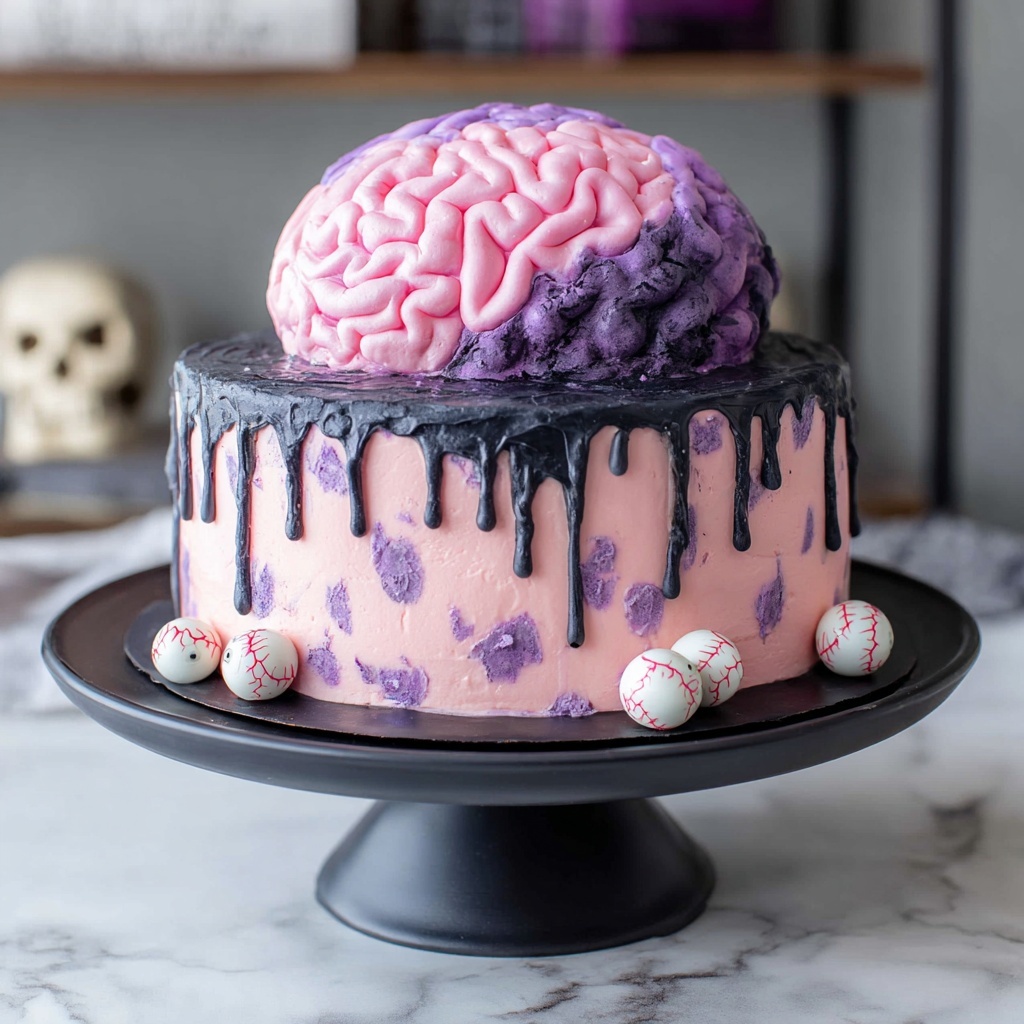
- Edible eyeballs (for decoration): The perfect creepy finishing touch to complete your brainy design.
- Gory decorations (optional, for presentation): For even more shock factor and fun on your zombie-themed table.
How to Make Zombie Brain Cake Recipe
Step 1: Mix Dry Ingredients
Start by combining your flour, sugar, cocoa powder, baking powder, baking soda, and salt in a large mixing bowl. These dry ingredients lay the groundwork for an even, flavorful cake that holds its shape well. Mixing them thoroughly ensures your batter will be consistent from the very first bite.
Step 2: Whisk Wet Ingredients and Combine
In a separate bowl, whisk together buttermilk, vegetable oil, eggs, and vanilla extract until smooth. This blend adds moisture and richness, critical for a tender crumb. Slowly pour the wet mixture into your dry ingredients and stir gently to avoid overmixing, which can lead to a dense cake.
Step 3: Incorporate Boiling Water
Gradually add the boiling water to the batter, stirring carefully as it creates a thin, silky mixture. The hot water helps bloom the cocoa, enhancing the depth of chocolate flavor that makes this cake irresistibly delicious.
Step 4: Bake in Brain-Shaped Pan
Pour the batter into a greased brain-shaped cake pan for the best effect. If you don’t have the special pan, bake it in a regular round pan and shape the brain later. Bake at 350°F (175°C) for about 30-35 minutes or until a toothpick inserted comes out clean. This step transforms your batter into the spooky centerpiece we’re aiming for.
Step 5: Cool the Cake
Allow the cake to cool in the pan for ten minutes, then carefully transfer it to a wire rack and let it cool completely. Cooling fully is crucial before frosting, ensuring your decorations don’t melt or slide off later on.
Step 6: Shape the Brain (if needed)
If you’re working without a brain pan, slice your round cake in half horizontally and carve the halves to mimic brain folds. Stack and secure them with a bit of frosting for stability. This step takes patience but rewards you with a uniquely creepy appearance.
Step 7: Make Pink and Purple Frosting
Beat the softened butter until fluffy, then gradually add powdered sugar to create a smooth, thick frosting. Divide the frosting and tint parts with pink and purple food coloring. These vibrant colors replicate the eerie veins and lobes of the zombie brain.
Step 8: Frost the Cake
Apply alternating swirls and layers of pink and purple frosting over the cake surface, focusing on creating realistic brain ridges and folds. The more textural details you add, the eerier and more impressive your brain cake will look.
Step 9: Prepare and Drizzle Ganache
Warm the heavy cream and pour it over dark chocolate chips in a bowl, stirring until smooth and glossy. Drizzle this ganache over the frosted cake for a delicious, slightly bitter contrast that also lends a glossy finish reminiscent of something freshly unwrapped from a zombie’s lair.
Step 10: Add Final Decorations
Place edible eyeballs strategically within the frosting folds and add any additional gory decorations you like. These touches take the Zombie Brain Cake Recipe from tasty to terrifyingly fun, making it a perfect centerpiece for spooky celebrations.
How to Serve Zombie Brain Cake Recipe
Garnishes
Edible eyeballs are a must for that perfect undead look, but you can also add red tinted syrup or raspberry coulis to mimic “blood” dripping down the sides. A sprinkle of crushed cookie crumbs around the base can resemble eerie dirt or moss, adding to the graveyard vibe.
Side Dishes
Pair this cake with simple sides such as whipped cream or fresh berries to balance its rich, chocolatey intensity. For a spooky spread, consider serving with “bloody” punch—cranberry or pomegranate drinks with floating lychee “eyeballs” for thematic continuity.
Creative Ways to Present
Display your brain cake on a dark, gothic platter surrounded by Halloween props like fake cobwebs, toy skeleton hands, or dry ice for smoky effects. For an extra scare, serve it in a dimly lit room with flickering candles to create a full horror-ambiance for your guests.
Make Ahead and Storage
Storing Leftovers
Store any leftover Zombie Brain Cake Recipe tightly wrapped with plastic wrap or in an airtight container at room temperature for up to two days. Keep it away from sunlight or heat to preserve the color and freshness.
Freezing
This cake freezes beautifully. Wrap individual slices or the whole cake tightly in plastic wrap and place in a freezer-safe bag or container. Freeze for up to two months and thaw in the refrigerator overnight before frosting or serving.
Reheating
Since it’s a frosted cake, it’s best enjoyed chilled or at room temperature rather than reheated. Simply take it out of the fridge about 30 minutes before serving to allow flavors and textures to come alive!
FAQs
Can I use a regular cake pan instead of a brain-shaped pan?
Absolutely! While a brain-shaped pan gives the most authentic look, you can bake in a regular round pan and carve it to resemble a brain. Just remember to chill the cake slightly for easier carving.
Is the Zombie Brain Cake Recipe very difficult to make?
Not at all! It may look intricate due to its design, but the steps are straightforward and beginner-friendly. Take your time with the frosting details, and you’ll be proud of the result.
What if I don’t want to use food coloring?
You can skip the food coloring if you prefer a natural look, though the unique zombie vibe comes from those pink and purple hues. Alternatively, experiment with natural colorings like beet juice or blueberry extract.
Can I prepare this cake in advance for a party?
Yes! You can bake and frost the cake one or two days ahead. Just store it covered in the fridge and decorate with eyeballs and ganache drizzle on the day of the event for maximum freshness.
Is this recipe suitable for one serving?
The recipe as written produces a generously sized cake suitable for sharing. For a single serving, consider scaling down ingredients accordingly or enjoy leftovers across several days.
Final Thoughts
This Zombie Brain Cake Recipe is a fantastically fun way to combine creativity with deliciousness, especially during festive seasons or any time you want to bring some spooky delight to the table. Take your time with the details, don’t be afraid to get a little messy, and enjoy the amazed reactions from everyone who tastes your chillingly good creation.
Print
Zombie Brain Cake Recipe
- Prep Time: 15 minutes
- Cook Time: 35 minutes
- Total Time: 50 minutes
- Yield: 1 (8-9 inch) brain cake, serves approx 12
- Category: Dessert
- Method: Baking
- Cuisine: American
Description
This Zombie Brain Cake recipe is a spooky and delicious dessert perfect for Halloween or themed parties. Featuring a moist chocolate cake baked in a brain-shaped pan, frosted with vibrant pink and purple buttercream to mimic brain matter, and finished with a rich dark chocolate ganache drizzle and creepy edible eyeball decorations, it offers both a fun and festive treat to impress your guests.
Ingredients
Cake
- 2 cups all-purpose flour
- 1 ½ cups granulated sugar
- ½ cup unsweetened cocoa powder
- 1 tablespoon baking powder
- 1 teaspoon baking soda
- ½ teaspoon salt
- 1 cup buttermilk
- ½ cup vegetable oil
- 2 large eggs
- 2 teaspoons vanilla extract
- 1 cup boiling water
Frosting
- 1 cup unsalted butter, softened
- 4 cups powdered sugar
- Pink and purple food coloring
Ganache
- ¼ cup heavy cream
- 1 cup dark chocolate chips
Decoration
- Edible eyeballs
- Gory decorations (optional)
Instructions
- Mix dry ingredients: In a large bowl, combine 2 cups all-purpose flour, 1 ½ cups granulated sugar, ½ cup unsweetened cocoa powder, 1 tablespoon baking powder, 1 teaspoon baking soda, and ½ teaspoon salt. Stir together until evenly mixed.
- Combine wet ingredients: In another bowl, whisk together 1 cup buttermilk, ½ cup vegetable oil, 2 large eggs, and 2 teaspoons vanilla extract until smooth.
- Make batter: Gradually add the wet ingredients to the dry ingredients, mixing gently. Then slowly pour in 1 cup boiling water while stirring to create a smooth, thin batter.
- Bake cake: Pour the batter into a greased brain-shaped cake pan. Bake in a preheated oven at 350°F (175°C) for 30-35 minutes, or until a toothpick inserted in the center comes out clean.
- Cool cake: Allow the cake to cool in the pan for 10 minutes before carefully transferring it to a wire rack to cool completely.
- Shape cake (if needed): If you baked in a round pan instead of a brain pan, trim and stack the cake halves to sculpt a brain shape.
- Prepare frosting: Beat 1 cup softened unsalted butter until creamy. Gradually add 4 cups powdered sugar, beating well to create a fluffy frosting. Divide frosting into two portions and color with pink and purple food coloring.
- Frost cake: Use the pink and purple frostings to cover the cake, mimicking the look of brain folds and texture.
- Make ganache: Heat ¼ cup heavy cream until hot but not boiling. Pour over 1 cup dark chocolate chips and let sit for a minute, then stir until smooth.
- Decorate cake: Drizzle the chocolate ganache over the frosted cake. Finish by adding edible eyeballs and optional gory decorations for a spooky presentation.
Notes
- Using a brain-shaped cake pan simplifies creating a realistic brain shape, but you can shape the cake manually if desired.
- Allow the cake to cool completely before frosting to prevent melting.
- Adjust food coloring intensity for the frosting to achieve desired vibrant brain-like colors.
- Ganache can be chilled briefly if too runny before drizzling.
- Store cake refrigerated and bring to room temperature before serving for best flavor.


