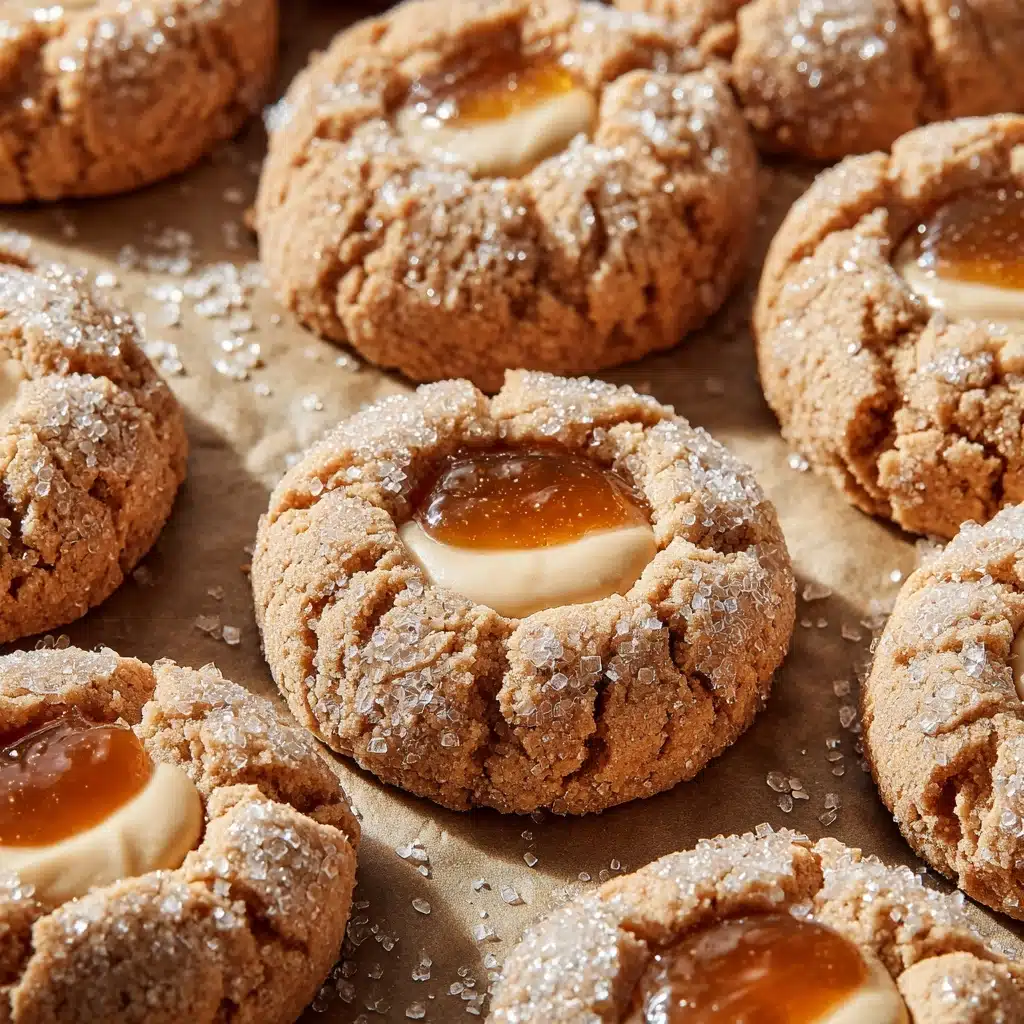
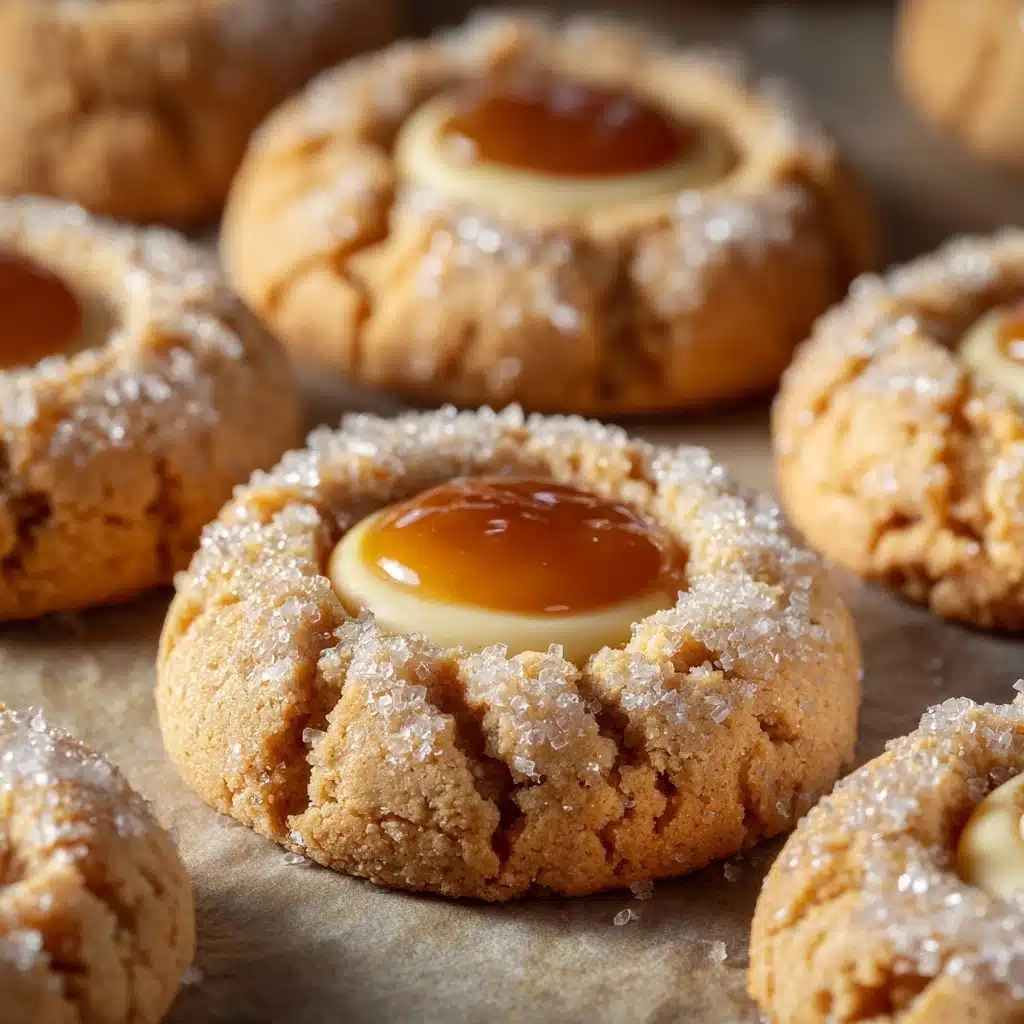
Snickerdoodle Thumbprint Cookies Recipe
If you’re looking for the very definition of cozy, festive baking, Snickerdoodle Thumbprint Cookies are it! Picture sweet cinnamon-sugar cookies with buttery, crisp edges and a delightful creamy center—each bite is soft, nostalgic, and packed with old-fashioned charm. The thumbprint gives them a playful look, while the cream cheese frosting nestling in the center adds that extra touch of indulgence. Whether you’re making them for a holiday cookie swap or just a Tuesday treat, Snickerdoodle Thumbprint Cookies are destined to be a hit with anyone lucky enough to grab one.
Ingredients You’ll Need
Every great batch of Snickerdoodle Thumbprint Cookies starts with a handful of simple, pantry-friendly ingredients that come together to create something irresistibly special. Each one is essential, contributing a unique texture, flavor, or touch of nostalgia that makes these cookies shine.
- Unsalted Butter (1 cup, softened): The backbone for richness and soft, tender cookies—be sure it’s at room temp for creamier dough!
- Granulated Sugar (1 cup + 1/4 cup for rolling): Provides the sweetness and that classic crackled cookie surface.
- Large Egg (1): Holds the dough together and adds a bit of chewiness to every bite.
- Vanilla Extract (2 tsp): Rounds out the flavor, making every bite warm and extra fragrant.
- All-Purpose Flour (2 3/4 cups): Gives structure to the cookies—measure carefully to get that just-right crumb.
- Cream of Tartar (2 tsp): The not-so-secret ingredient for that tang and the signature snickerdoodle texture.
- Baking Soda (1 tsp): Helps the cookies rise for a light and tender result.
- Salt (1/4 tsp): Makes all the flavors pop and balances the sweetness.
- Ground Cinnamon (1 tbsp, for rolling): The star of the coating—don’t skimp for that bold, cozy flavor!
- Cream Cheese Frosting or Vanilla Buttercream (1 cup, for filling): Adds a delightful creamy finish in the center—swap for caramel, Nutella, or jam to shake things up.
How to Make Snickerdoodle Thumbprint Cookies
Step 1: Prepare Your Baking Sheets and Preheat
Start by setting your oven to 350°F (175°C) and lining two baking sheets with parchment paper. This makes cleanup a breeze and ensures your Snickerdoodle Thumbprint Cookies come off the tray without a fuss.
Step 2: Cream the Butter and Sugar
In a large mixing bowl, beat the softened butter with the sugar until it’s light, fluffy, and pale in color. This process helps dissolve the sugar and guarantees the cookies will have that tender, melt-in-your-mouth crumb.
Step 3: Add Egg and Vanilla
Crack in the egg and mix in the vanilla extract. Keep beating until the mixture is smooth and cohesive. This step is your secret to that lovely chewy center!
Step 4: Whisk Together Dry Ingredients
In a separate bowl, whisk together the flour, cream of tartar, baking soda, and salt. This ensures everything is evenly distributed—no surprise clumps in your dough.
Step 5: Combine Wet and Dry Ingredients
Gradually add the dry ingredients to your wet mixture, stirring gently after each addition. Mix just until a soft dough forms—overmixing can make the cookies tough.
Step 6: Shape and Coat Cookies
In a small bowl, stir together the remaining 1/4 cup of granulated sugar and the cinnamon. Scoop out tablespoon-sized pieces of dough, roll them into balls, and give each a thorough coat in the cinnamon-sugar mixture for that iconic snickerdoodle sparkle.
Step 7: Make Thumbprints
Place the sugared dough balls a couple of inches apart on your lined sheets. Now for the fun part—gently press your thumb or the back of a spoon into the center of each to create a well. This is where the magic (and the filling) happens!
Step 8: Bake to Perfection
Bake for 10 to 12 minutes until the edges are set but the middles still look a bit soft. Don’t overbake! If the thumbprints puff up, press them gently again while the cookies are still warm.
Step 9: Cool and Fill
Let the cookies cool completely on a wire rack—you don’t want the frosting to melt! Once cool, pipe or spoon dollops of cream cheese frosting (or your filling of choice) into the center of each cookie. That final flourish transforms them into showstoppers.
How to Serve Snickerdoodle Thumbprint Cookies
Garnishes
Add a light dusting of cinnamon, a sprinkle of crushed pecans, or even a drizzle of caramel over the filled centers. Not only does this make your Snickerdoodle Thumbprint Cookies extra-eye catching, but it also adds a hint of extra flavor and crunch.
Side Dishes
These cookies are wonderful alongside a cup of chai, spiced coffee, or even a chilled glass of milk. For a simple dessert platter, try pairing them with fruit—thinly sliced apples or a handful of berries make a refreshing contrast to the richness of the cookies.
Creative Ways to Present
Arrange your Snickerdoodle Thumbprint Cookies on a festive serving tray for a holiday gathering, or package them in a pretty box with ribbon for a memorable homemade gift. If you’re hosting a cookie party, try stacking them on tiered stands for a truly irresistible centerpiece.
Make Ahead and Storage
Storing Leftovers
Keep your Snickerdoodle Thumbprint Cookies fresh by storing them in an airtight container at room temperature for up to three days. If you’re using a dairy-based filling, stash them in the fridge after a day, just to be safe, and let them come to room temperature before serving for the best texture.
Freezing
Both the cookie bases and the finished, frosted cookies freeze well. Pop the unfilled cookies in a zip-top bag and freeze for up to three months. If filled and frosted, layer cookies between sheets of parchment in a container so the centers stay neat. Thaw at room temperature and enjoy whenever the craving strikes!
Reheating
These cookies are at their best at room temperature, though if you want to refresh the texture, a quick zap in the microwave (five seconds, tops) does the trick—just don’t overdo it or the frosting can get melty.
FAQs
Can I use different fillings in Snickerdoodle Thumbprint Cookies?
Absolutely! While cream cheese frosting is classic, you can fill these with caramel, Nutella, fruit preserves, or even lemon curd to keep things exciting and satisfy everyone’s tastes.
My cookies spread too much in the oven—what happened?
Usually, this is because the butter was too soft or the dough was too warm. Try chilling your dough balls for 20 minutes before baking if it’s a warm day or your kitchen is toasty.
Is cream of tartar necessary?
Cream of tartar gives Snickerdoodle Thumbprint Cookies their signature soft, chewy center and a distinct tang. For the true snickerdoodle experience, it’s a must.
Can I make these cookies gluten-free?
Yes! Substitute your favorite 1:1 gluten-free baking flour for the all-purpose flour. Just make sure the blend contains xanthan gum for the best texture.
How do I keep the thumbprint from puffing up?
If your cookie centers puff during baking, gently press the well again as soon as they come out of the oven. This keeps the perfect little crater ready for filling.
Final Thoughts
There’s so much joy in baking and sharing a batch of Snickerdoodle Thumbprint Cookies. Their playful shape, irresistible cinnamon-sugar flavor, and creamy filling make them a favorite for all ages. Don’t be surprised if they disappear in a flash—grab one (or two!) for yourself while you can, and share the rest with someone who could use a little extra sweetness in their day.
Print
Snickerdoodle Thumbprint Cookies Recipe
- Total Time: 32 minutes
- Yield: 24 cookies 1x
- Diet: Vegetarian
Description
Delight your taste buds with these Snickerdoodle Thumbprint Cookies, a delightful twist on the classic snickerdoodle. These soft, cinnamon-sugar cookies are filled with a creamy center, making them perfect for any occasion.
Ingredients
Cookies:
- 1 cup unsalted butter, softened
- 1 cup granulated sugar
- 1 large egg
- 2 teaspoons vanilla extract
- 2 3/4 cups all-purpose flour
- 2 teaspoons cream of tartar
- 1 teaspoon baking soda
- 1/4 teaspoon salt
Rolling Mixture:
- 1/4 cup granulated sugar
- 1 tablespoon ground cinnamon
Filling:
- 1 cup cream cheese frosting or vanilla buttercream
Instructions
- Preheat the oven: Preheat the oven to 350°F (175°C) and line two baking sheets with parchment paper.
- Mix butter and sugar: In a large bowl, beat the butter and sugar until light and fluffy. Add the egg and vanilla extract, mixing until smooth.
- Combine dry ingredients: In another bowl, whisk together the flour, cream of tartar, baking soda, and salt. Gradually add the dry ingredients to the wet mixture, stirring until a dough forms.
- Prepare rolling mixture: In a small bowl, combine the remaining sugar and cinnamon.
- Shape and coat: Scoop tablespoon-sized portions of dough, roll into balls, and coat in the cinnamon-sugar mixture. Place on baking sheets.
- Make indentation: Use your thumb or a spoon to make an indentation in the center of each cookie.
- Bake: Bake for 10 to 12 minutes until edges are set. Cool on a wire rack.
- Fill: Once cooled, fill each cookie with cream cheese frosting or vanilla buttercream.
- Serve or store: Serve immediately or store in an airtight container.
Notes
- You can substitute the filling with caramel, Nutella, or jam for variety.
- If indentations puff up during baking, gently press them again while warm.
- Prep Time: 20 minutes
- Cook Time: 12 minutes
- Category: Dessert
- Method: Baking
- Cuisine: American
Nutrition
- Serving Size: 1 cookie
- Calories: 145
- Sugar: 11 g
- Sodium: 85 mg
- Fat: 7 g
- Saturated Fat: 4 g
- Unsaturated Fat: 2 g
- Trans Fat: 0 g
- Carbohydrates: 19 g
- Fiber: 0 g
- Protein: 1 g
- Cholesterol: 20 mg


