Delicious Cookie Monster Cheesecake Recipe
Dive into a world of whimsy and indulgence with this Delicious Cookie Monster Cheesecake! This playful dessert is a showstopper, swirling together a creamy, vibrant-blue cheesecake base with crushed chocolate chip and sandwich cookies, all resting on a chocolatey cookie crust. The crowning touch? Pillowy whipped cream and a mountain of cookies, capturing Cookie Monster’s spirit in every bite. Whether you’re baking for a birthday, a family get-together, or simply to brighten someone’s day, this cheesecake is guaranteed to bring smiles and satisfy any cookie lover’s wildest dreams.
Ingredients You’ll Need
The magic of Delicious Cookie Monster Cheesecake comes from a handful of simple, classic ingredients. Each one plays an important role in creating the bold color, creamy texture, and irresistible flavor that make this cheesecake so memorable.
- Chocolate sandwich cookies (24, finely crushed): These create the rich, chocolatey crust and add crunch inside the cheesecake itself.
- Unsalted butter (5 tablespoons, melted): Binds the cookie crumbs together for a firm, flavorful base.
- Cream cheese (3 packages, softened): The heart of your cheesecake, giving it that signature tangy, velvety texture.
- Granulated sugar (1 cup): Sweetens the filling just right without overpowering the cookies.
- Vanilla extract (2 teaspoons, divided): Adds depth and warmth to both the cheesecake and whipped cream.
- Large eggs (3): Bind the filling for a sliceable, custardy cheesecake.
- Sour cream (1 cup): Provides a subtle tang and extra creaminess.
- All-purpose flour (2 tablespoons): Helps the cheesecake set without cracking.
- Mini chocolate chips (½ cup): Stud the filling with melty, chocolatey pockets.
- Crushed chocolate chip cookies (1 cup): Layered throughout for extra cookie goodness and texture.
- Crushed chocolate sandwich cookies (1 cup): Doubles up the cookie flavor in every bite.
- Blue food coloring: Just a few drops give you that iconic Cookie Monster blue hue.
- Heavy cream (1½ cups): Whipped into fluffy clouds for topping.
- Powdered sugar (¼ cup): Sweetens the whipped cream without grittiness.
- Additional cookies (mini cookies, sandwich cookies, chocolate chip cookies): For decorating, because you can never have too many cookies!
How to Make Delicious Cookie Monster Cheesecake
Step 1: Prepare the Pan and Crust
Start by preheating your oven to 325°F (163°C). Grab a 9-inch springform pan, grease it well, and line the bottom with parchment paper—this little step makes for perfect, drama-free slicing later. In a bowl, mix the finely crushed chocolate sandwich cookies with the melted butter until all the crumbs look like wet sand. Press this mixture firmly into the bottom of your pan to form the crust. Set aside while you work on the luscious filling.
Step 2: Make the Creamy Cheesecake Filling
In a large mixing bowl, beat together the softened cream cheese, granulated sugar, and vanilla extract until the mixture looks cloud-like and smooth. This is the base of your Delicious Cookie Monster Cheesecake, so take your time to avoid lumps! Add the eggs one at a time, mixing gently on low speed just until combined—overbeating can cause cracks. Next, mix in the sour cream and flour, ensuring everything is just incorporated.
Step 3: Stir in the Cookie Goodness
Gently fold in the mini chocolate chips, crushed chocolate chip cookies, and extra crushed chocolate sandwich cookies. This is where the magic starts to happen! Add several drops of blue food coloring, then stir until you’ve achieved that unmistakable Cookie Monster blue throughout the batter. If you want an extra vibrant color, add a couple more drops, but remember: a little goes a long way.
Step 4: Bake the Cheesecake
Pour the blue-speckled batter over your prepared crust and smooth the top with a spatula. Pop the pan into your preheated oven and bake for 55 to 65 minutes. The edges should look set, but the center will still have a slight jiggle—don’t worry, it’ll firm up as it cools. Turn off the oven, crack the door, and let your cheesecake rest inside for an hour. This gentle cooling helps prevent cracks and keeps the texture ultra-creamy.
Step 5: Chill and Decorate
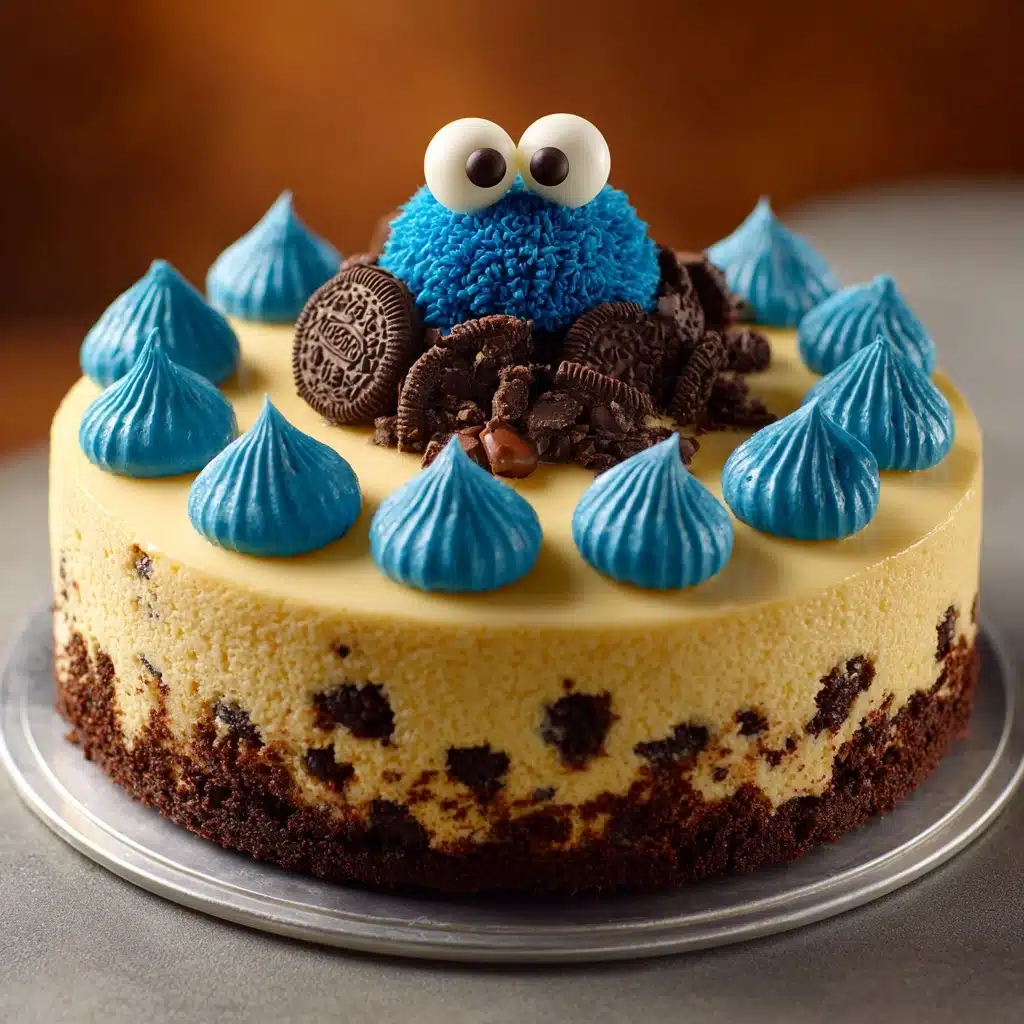
Once out of the oven, let your cheesecake cool completely before transferring it to the fridge. Chill for at least 4 hours, or overnight if you can resist temptation. When you’re ready to serve, whip up the heavy cream, powdered sugar, and vanilla extract until you have stiff peaks. Pipe big, playful swirls on top, then go wild with your cookie decorations—mini cookies for eyes, whole cookies for smiles, and heaps of cookie crumbles for that iconic Delicious Cookie Monster Cheesecake look!
How to Serve Delicious Cookie Monster Cheesecake

Garnishes
The finishing touches make all the difference! Top your Delicious Cookie Monster Cheesecake with a mix of mini chocolate chip cookies, sandwich cookies, and even a few whole cookies perched on whipped cream swirls. For a true Cookie Monster effect, use two mini cookies for eyes and a whole cookie poking out of a swirl for his “mouth.” Kids and adults alike will adore this playful presentation.
Side Dishes
While this cheesecake is the star of any dessert table, pairing it with something light and fresh can be a delightful contrast. Try serving chilled berries, a simple fruit salad, or a tall glass of cold milk. Even a scoop of vanilla ice cream can make each bite even more indulgent.
Creative Ways to Present
For parties or birthdays, turn your Delicious Cookie Monster Cheesecake into a centerpiece by displaying it on a bright blue cake stand. Slice it into mini squares for a dessert platter, or serve individual slices topped with extra whipped cream and a mini cookie for each guest. You can even create a “make your own monster” bar with bowls of assorted cookies and sprinkles for everyone to decorate their own slice!
Make Ahead and Storage
Storing Leftovers
Store any leftover Delicious Cookie Monster Cheesecake in an airtight container in the refrigerator for up to five days. The flavors actually meld and improve overnight, making those second-day slices even more irresistible!
Freezing
You can absolutely freeze this cheesecake! Wrap individual slices or the whole cheesecake tightly in plastic wrap, then foil, and freeze for up to three months. Thaw overnight in the fridge before serving; just wait to add the whipped cream and cookies until after defrosting for the freshest look.
Reheating
Cheesecake is best enjoyed chilled, but if you like it a bit closer to room temperature, simply let your slice sit out for 10 to 15 minutes before indulging. Avoid microwaving, as it can soften the texture and melt your gorgeous whipped cream and cookie toppings.
FAQs
Can I use store-bought whipped cream instead of making my own?
Absolutely! While homemade whipped cream adds a fresh, fluffy touch, store-bought whipped topping works in a pinch and still looks festive on your Delicious Cookie Monster Cheesecake.
What’s the best way to get that vibrant blue color?
Gel food coloring gives you the brightest, truest Cookie Monster blue without thinning your batter. Start with a few drops and add more as needed until you reach your desired shade.
Can I make Delicious Cookie Monster Cheesecake gluten-free?
Yes, just swap the regular cookies for your favorite gluten-free versions and use a gluten-free flour blend in the filling. The result will be just as creamy and delightful!
How do I prevent cracks in my cheesecake?
Letting the cheesecake cool slowly in the oven with the door cracked is key. If a few cracks do appear, don’t worry—generous swirls of whipped cream and cookie decorations will cover them beautifully.
Can I make this cheesecake ahead for a party?
Definitely! Delicious Cookie Monster Cheesecake is actually best when made a day in advance. Chill it overnight, then decorate just before serving for maximum freshness and presentation.
Final Thoughts
If you’re looking for a dessert that’s as fun to make as it is to eat, you can’t go wrong with Delicious Cookie Monster Cheesecake. It’s whimsical, decadent, and totally unforgettable—perfect for birthdays, bake sales, or anytime you want to treat yourself and your loved ones. Go ahead, gather your favorite cookies and dive in. You’re going to love every delicious, blue bite!
Print
Delicious Cookie Monster Cheesecake Recipe
- Total Time: 5 hours 30 minutes
- Yield: 12 servings 1x
- Diet: Vegetarian
Description
This Delicious Cookie Monster Cheesecake is a fun and indulgent dessert featuring a rich, creamy blue cheesecake base loaded with chocolate chips and crushed cookies, all atop a chocolate sandwich cookie crust. Topped with fluffy whipped cream and decorated with mini cookies, it’s perfect for birthdays or any celebration that calls for a playful and tasty treat.
Ingredients
Crust
- 24 chocolate sandwich cookies, finely crushed
- 5 tablespoons unsalted butter, melted
Cheesecake Filling
- 3 (8-ounce) packages cream cheese, softened
- 1 cup granulated sugar
- 1 teaspoon vanilla extract
- 3 large eggs
- 1 cup sour cream
- 2 tablespoons all-purpose flour
- ½ cup mini chocolate chips
- 1 cup crushed chocolate chip cookies
- 1 cup crushed chocolate sandwich cookies
- Blue food coloring, several drops
Whipped Cream Topping
- 1½ cups heavy cream
- ¼ cup powdered sugar
- 1 teaspoon vanilla extract
Decoration
- Additional cookies for topping (mini cookies, sandwich cookies, chocolate chip cookies)
Instructions
- Prepare the crust: Preheat your oven to 325°F (163°C). Grease a 9-inch springform pan and line the bottom with parchment paper. In a bowl, mix the finely crushed chocolate sandwich cookies with melted butter until well combined. Press this mixture firmly into the bottom of the prepared pan to form an even crust. Set aside.
- Make the cheesecake batter: In a large mixing bowl, beat the softened cream cheese, granulated sugar, and vanilla extract together until the mixture is smooth and creamy. Add the eggs one at a time, mixing on low speed after each addition just until combined. Then blend in the sour cream and flour until incorporated evenly.
- Add mix-ins and coloring: Gently fold in the mini chocolate chips, crushed chocolate chip cookies, and crushed chocolate sandwich cookies. Add several drops of blue food coloring and mix until the batter takes on a vibrant blue hue, reminiscent of the Cookie Monster.
- Assemble and bake: Pour the cheesecake batter over the prepared crust and smooth the top with a spatula. Bake for 55 to 65 minutes until the edges are set but the center is still slightly jiggly. Once done, turn off the oven and crack the door open. Let the cheesecake rest inside the oven for 1 hour to cool gradually.
- Chill the cheesecake: Remove the cheesecake from the oven and cool completely at room temperature. Once cooled, refrigerate it for at least 4 hours or preferably overnight to set fully.
- Prepare the whipped cream topping: In a chilled mixing bowl, beat the heavy cream, powdered sugar, and vanilla extract together until stiff peaks form. This will be used for topping the cheesecake.
- Decorate and serve: Pipe swirls of whipped cream over the top of the chilled cheesecake. Decorate with additional mini cookies, sandwich cookies, and chocolate chip cookies to mimic the Cookie Monster’s playful look. Slice and serve chilled for the best flavor and texture.
Notes
- For a stronger Cookie Monster theme, use a mix of mini cookies and whole cookies for decorating.
- If cracks appear on top of the cheesecake, cover them with whipped cream and cookies for a beautiful finish.
- This cheesecake can be made 1–2 days ahead and stored covered in the refrigerator to enhance flavors.
- Prep Time: 30 minutes
- Cook Time: 1 hour
- Category: Dessert
- Method: Baking
- Cuisine: American
Nutrition
- Serving Size: 1 slice
- Calories: 560
- Sugar: 38 g
- Sodium: 340 mg
- Fat: 36 g
- Saturated Fat: 19 g
- Unsaturated Fat: 14 g
- Trans Fat: 0 g
- Carbohydrates: 52 g
- Fiber: 1 g
- Protein: 7 g
- Cholesterol: 110 mg


