Peanut Butter Spider Cookies: A Spooky Twist for Halloween Recipe
“`html
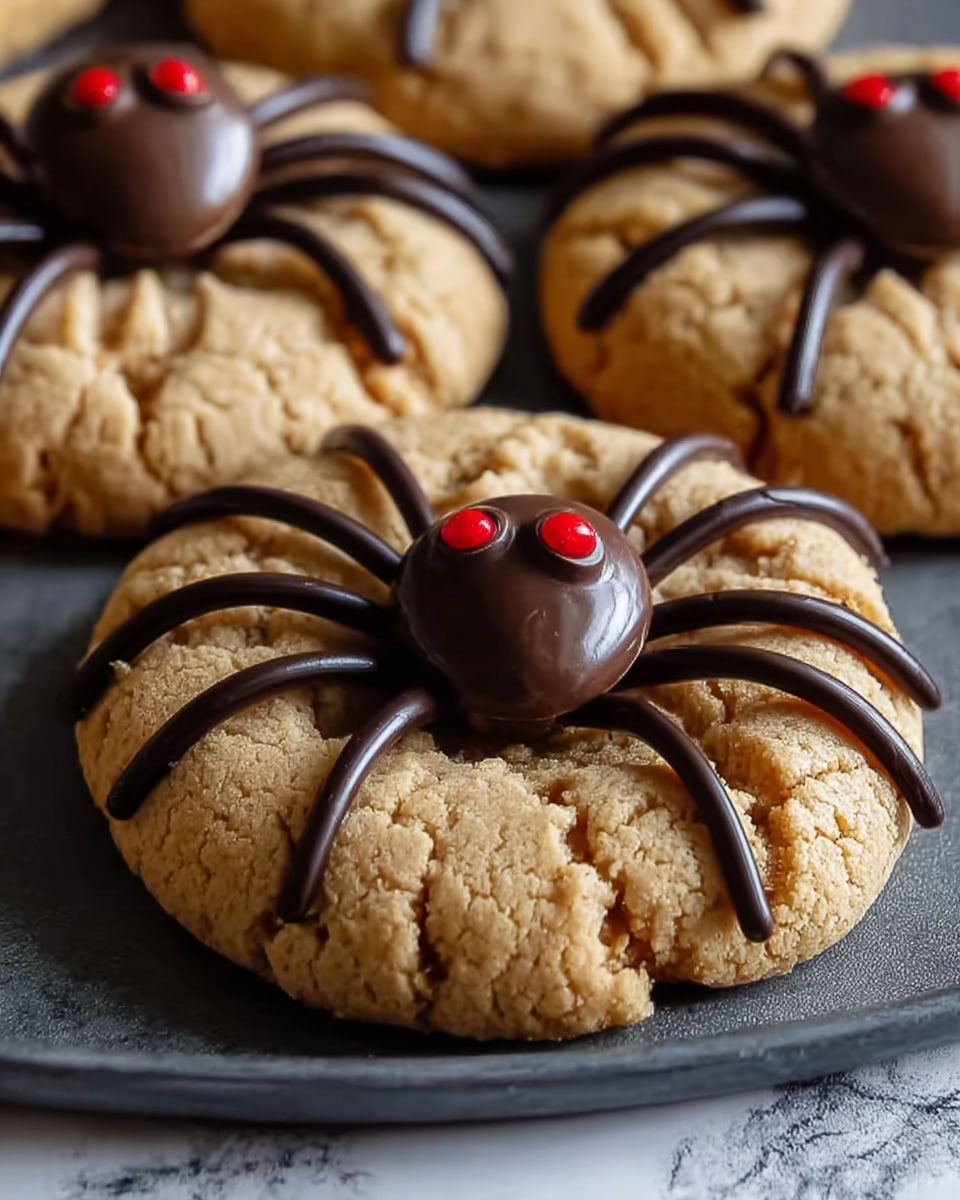
If you are looking for a Halloween treat that not only delights your taste buds but also brings a playful spookiness to your festivities, you have to try the Peanut Butter Spider Cookies: A Spooky Twist for Halloween Recipe. These charming cookies combine the rich, comforting flavors of peanut butter with a clever spider design made from Whoppers and chocolate legs. The result is a fun, festive, and utterly snackable cookie that’s perfect for parties, school events, or any autumn gathering. Whether you’re a Halloween fanatic or just someone who loves creative baking, this recipe is a must-make!
Ingredients You’ll Need
Gathering these ingredients is a breeze, yet each one has an essential role in crafting the perfect texture, flavor, and spooky appearance of these Peanut Butter Spider Cookies: A Spooky Twist for Halloween Recipe. From the creamy peanut butter that adds moisture and a nutty depth, to the chocolate chips that bring richness and help create those iconic spider legs, every component matters.
- 1 ½ cups all-purpose flour: The foundation of your cookie dough, providing structure and chewiness.
- ½ teaspoon baking soda: Helps your cookies rise and develop a tender crumb.
- ½ teaspoon baking powder: Adds a bit of lightness for a soft yet sturdy texture.
- ½ cup salted butter, softened: Brings richness and contributes to a tender, melt-in-your-mouth feel.
- ½ cup granulated sugar: Gives the right amount of sweetness and helps with cookie spread.
- ½ cup brown sugar, packed: Adds moisture and a subtle caramel flavor to balance the peanut butter.
- 1 large egg: Binds everything together and adds tenderness.
- ½ cup creamy peanut butter (not natural): The star ingredient lending a smooth, nutty taste and creamy texture.
- 1 teaspoon vanilla extract: Enhances all the flavors and adds warmth.
- 44 Whoppers (22 large, 22 small): The playful “body” and “head” of your peanut butter spiders.
- 1 cup semi-sweet chocolate chips (6 ounces): Melts to create detailed, delicious spider legs.
- 1 small tube of white cake decorating gel: Perfect for crafting spooky spider eyes.
- ¼ cup granulated sugar (for rolling): Adds an irresistible sugary crust on the outside of each cookie.
- Black nonpareil sprinkles (optional): Tiny dots that make the spider eyes even more lifelike and creepy.
How to Make Peanut Butter Spider Cookies: A Spooky Twist for Halloween Recipe
Step 1: Preheat the Oven
Start by setting your oven to 375°F (190°C) and prepare two baking sheets lined with parchment paper or silicone mats. This even heat and non-stick surface ensures your cookies bake to golden perfection without sticking.
Step 2: Prepare Dry Ingredients
In a medium bowl, whisk together the flour, baking soda, and baking powder. This ensures even distribution of your leavening agents so your cookies rise uniformly and develop a tender texture.
Step 3: Cream the Butter and Sugars
Using a large mixing bowl, cream the softened butter, granulated sugar, brown sugar, and creamy peanut butter until the mixture is light and fluffy. This step aerates the dough for a soft crumb. Then add the egg and vanilla extract, mixing thoroughly to combine everything smoothly.
Step 4: Combine Wet and Dry Ingredients
Gradually add the dry ingredients to the wet mixture, stirring carefully until a thick, cohesive dough forms. If your dough feels too sticky, a quick chill can help before shaping.
Step 5: Form Cookie Dough Balls
Use a 2-tablespoon scoop to portion out the dough into balls. Roll each ball in the ¼ cup granulated sugar, giving the cookies a sparkly, sweet crust once baked. Place the sugared balls onto the prepared pans with some space between each to allow spreading.
Step 6: Bake the Cookies
Bake your cookies for 8 to 10 minutes until the edges are golden and set, but the centers still look slightly soft. This balance gives you a perfect peanut butter cookie with a subtle chewiness.
Step 7: Add the Spider Bodies
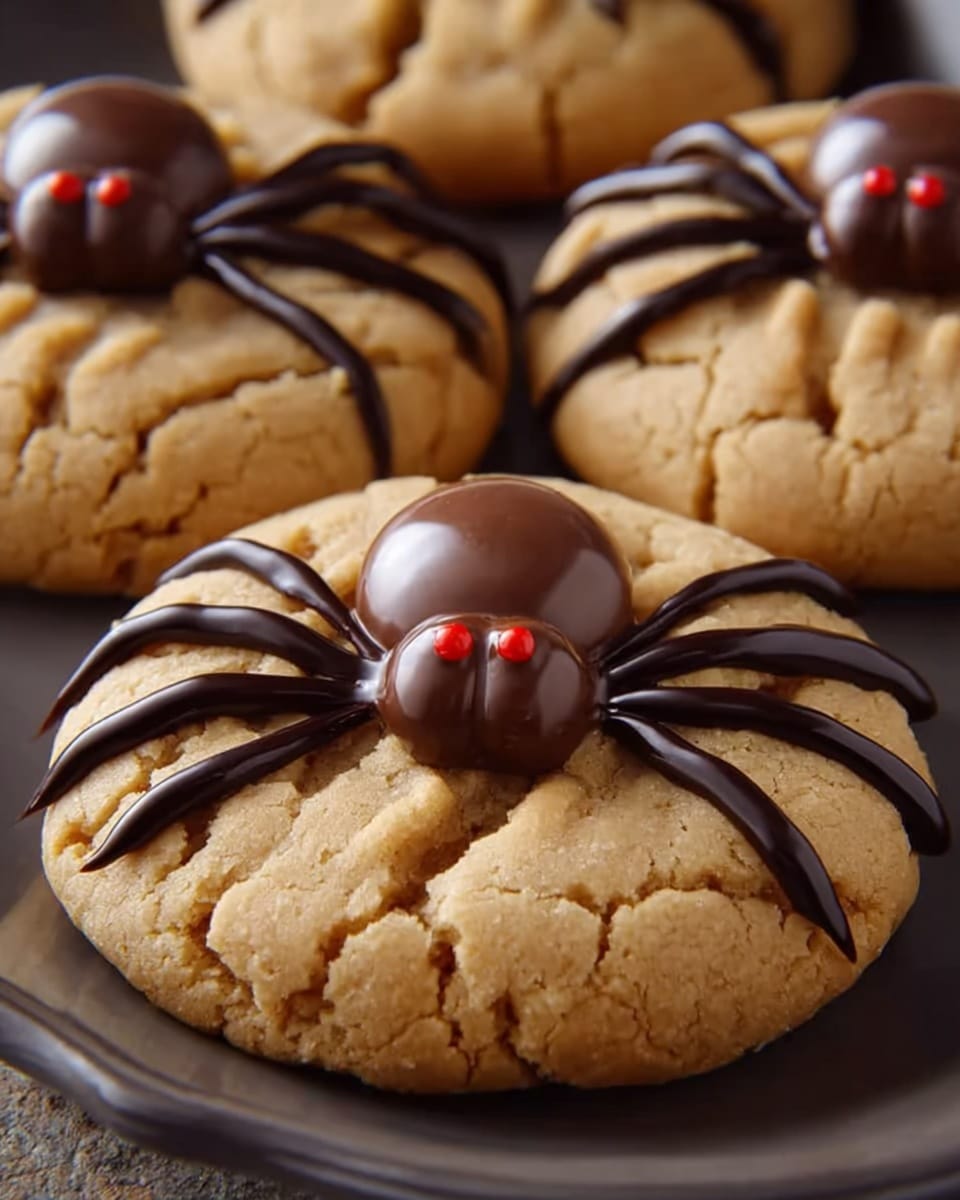
While the cookies are still warm, gently press one large Whopper (the spider’s body) and one small Whopper (the spider’s head) onto the top of each cookie. The residual warmth helps secure them in place without flattening the cookie too much.
Step 8: Cool the Cookies
Transfer the cookies to the fridge to cool for a few minutes until they are firm to the touch. Cooling them quickly ensures your decorations will hold steady during the next steps.
Step 9: Prepare and Pipe the Spider Legs
Melt the semi-sweet chocolate chips in short bursts in the microwave, stirring in between, until smooth and silky. Let the chocolate cool just slightly before placing it into a piping bag or a small zip-top bag with a tiny corner snipped off. Pipe eight legs on each spider, using a “V” shape with four legs on each side of the Whopper body, for an eerily cute look.
Step 10: Add the Eyes
Use the white cake decorating gel to apply two small dots on the smaller Whopper, forming the spider’s eyes. For an extra eerie effect, place a black nonpareil sprinkle in the middle of each white dot to mimic creepy spider eyes.
Step 11: Let the Cookies Set
Allow the cookies to set completely so the chocolate legs harden and the decorating gel firms up. For a speedier set, pop them back into the fridge for a few minutes before serving.
How to Serve Peanut Butter Spider Cookies: A Spooky Twist for Halloween Recipe
Garnishes
Enhance the spooky vibe by serving these cookies on a platter dusted with edible spider webs or crushed chocolate cookies resembling dirt. You can even scatter some candy corn or autumn leaves for a truly festive touch that surprises guests before they even take a bite.
Side Dishes
These peanut butter spider cookies pair wonderfully with a creamy glass of cold milk or a warm mug of hot chocolate topped with whipped cream and a dash of cinnamon. For party spreads, consider complementing them with other Halloween-themed treats like caramel apples or pumpkin muffins to round out your spooky feast.
Creative Ways to Present
Get inventive by building a “spider web” display using black licorice strands or string icing on a large platter, placing the cookies strategically to look like the spiders are crawling across it. If you want a kid-friendly option, serve them on a tiered cake stand decorated with plastic spiders and mini pumpkins to really bring the Halloween spirit alive.
Make Ahead and Storage
Storing Leftovers
If you find yourself with extras, store your Peanut Butter Spider Cookies: A Spooky Twist for Halloween Recipe in an airtight container at room temperature. They will stay fresh for up to five days, maintaining that chewy peanut buttery goodness and crisp sugar coating.
Freezing
To enjoy these delicious cookies later, freeze them in a single layer on a baking sheet first, then transfer to a freezer-safe container or bag. They freeze beautifully for up to three months. When you want a spooky snack, just thaw them at room temperature and refresh the spider legs with a little melted chocolate if needed.
Reheating
Warm your cookies in the microwave for 10 to 15 seconds before serving to bring back a bit of softness and amplify those peanut butter aromas. Be careful not to overheat as it may melt the chocolate decoration, but a gentle warmth gives you that fresh-baked feel every time.
FAQs
Can I use natural peanut butter instead of creamy peanut butter?
Natural peanut butter tends to have a thinner consistency and less sugar, which may affect the texture and sweetness of these cookies. For best results with the Peanut Butter Spider Cookies: A Spooky Twist for Halloween Recipe, stick to creamy, non-natural peanut butter for that classic taste and dough consistency.
What if I don’t have Whoppers? Are there alternatives?
If Whoppers aren’t available, malted milk balls or even small round chocolates can work as spider bodies and heads. The key is choosing a candy that holds its shape and complements the cookie’s flavor and appearance.
Can I make these cookies gluten-free?
You can substitute the all-purpose flour with a gluten-free baking blend, but be sure it contains xanthan gum or another binder to maintain the right texture. Baking times might vary slightly, so keep an eye on your cookies as they bake to avoid overcooking.
How do I pipe the spider legs neatly?
Use a small piping bag with a fine tip for maximum control, or a zip-top bag with a tiny corner cut off. Practice on parchment paper first to get a feel for the pressure and flow of the chocolate before decorating the cookies.
Are these cookies suitable for kids to help make?
Absolutely! The Peanut Butter Spider Cookies: A Spooky Twist for Halloween Recipe is a fantastic hands-on project for kids, especially piping the legs and adding eyes. Just supervise with the melted chocolate and oven use. It’s a wonderful way to make baking a fun, spooky team effort.
Final Thoughts
There’s something incredibly joyful about baking up a batch of these charming Peanut Butter Spider Cookies: A Spooky Twist for Halloween Recipe. The combination of classic peanut butter cookie flavors with the playful spider design brings both nostalgia and creativity to your Halloween celebrations. Give this recipe a try, and watch smiles creep across the faces of everyone lucky enough to taste these delightful, spooky treats!
“`
Print
Peanut Butter Spider Cookies: A Spooky Twist for Halloween Recipe
- Total Time: 30 minutes
- Yield: 22 servings 1x
Description
These Peanut Butter Spider Cookies offer a fun and spooky twist for Halloween celebrations. Featuring a classic peanut butter cookie base topped with Whoppers candies forming cute spider bodies and heads, and decorated with melted chocolate spider legs and cake decorating gel eyes, these treats are perfect for a festive and delicious holiday snack.
Ingredients
Dry Ingredients
- 1 ½ cups all-purpose flour
- ½ teaspoon baking soda
- ½ teaspoon baking powder
Wet Ingredients
- ½ cup salted butter, softened
- ½ cup granulated sugar
- ½ cup brown sugar, packed
- 1 large egg
- ½ cup creamy peanut butter (not natural)
- 1 teaspoon vanilla extract
Decorations
- 44 Whoppers (22 large, 22 small)
- 1 cup semi-sweet chocolate chips (6 ounces)
- 1 small tube of white cake decorating gel
- ¼ cup granulated sugar (for rolling)
- Black nonpareil sprinkles (optional, for the spider eyes)
Instructions
- Preheat the Oven: Preheat your oven to 375°F (190°C). Line two baking sheets with parchment paper or silicone mats to prepare for baking.
- Prepare Dry Ingredients: In a medium bowl, whisk together the flour, baking soda, and baking powder. Set this dry mixture aside for later.
- Cream the Butter and Sugars: In a large mixing bowl, cream together the softened butter, granulated sugar, brown sugar, and peanut butter until the mixture is light and fluffy. Then add the egg and vanilla extract, mixing until fully combined.
- Combine Wet and Dry Ingredients: Gradually add the dry ingredient mixture into the wet mixture, stirring until a thick and cohesive dough forms.
- Form Cookie Dough Balls: Using a 2-tablespoon scoop, form dough balls. Roll each ball in the ¼ cup of granulated sugar, then place them on the prepared baking sheets spaced apart.
- Bake the Cookies: Bake the cookies for 8-10 minutes until the edges turn golden and the cookies feel firm to the touch. Remove the baking sheets from the oven.
- Add the Spider Bodies: While the cookies are still warm, gently press one large Whopper (for the spider’s body) and one small Whopper (for the head) onto the top of each cookie to create the spider shape.
- Cool the Cookies: Transfer the cookies to the fridge and let them cool for a few minutes until they are cool to the touch and slightly firm.
- Prepare the Spider Legs: Melt the semi-sweet chocolate chips in the microwave in 30-second increments, stirring in between until completely melted. Allow the melted chocolate to cool slightly before transferring it to a piping bag or a plastic bag with a small corner cut off.
- Pipe the Legs: Use the melted chocolate to pipe 8 spider legs onto each cookie, making “V” shapes with four legs on each side of the large Whopper body to resemble spider legs.
- Add the Eyes: Use the white cake decorating gel to carefully add two dots on the smaller Whopper (the spider’s head) to represent the eyes. For added detail, optionally place a small black nonpareil sprinkle in the center of each white dot.
- Let Set: Allow the cookies to set completely so the chocolate legs harden and the decorating gel dries. To speed up this process, place the cookies back in the fridge for a few minutes before serving.
Notes
- Use creamy peanut butter (not natural) for best texture and binding.
- Roll the cookie dough balls in granulated sugar to add a subtle crunch and sparkle to the cookie surface.
- If interested in a prettier presentation, use black nonpareil sprinkles to add detail to the spider eyes.
- Allow the melted chocolate to cool slightly before piping to avoid melting the cookies or causing the chocolate to run.
- Store leftovers in an airtight container refrigerated to maintain freshness and shape.
- Prep Time: 20 minutes
- Cook Time: 10 minutes
- Category: Dessert
- Method: Baking
- Cuisine: American
