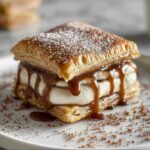
Description
Indulge in the delightful Brown Sugar Pop Tart Cookies, combining a tender buttery crust with a sweet cinnamon brown sugar filling. These homemade treats capture the nostalgic flavor of classic pop tarts in cookie form, enhanced with a smooth vanilla glaze and festive sprinkles. Perfect for a cozy snack or special occasion, this recipe guides you step-by-step through making soft, flavorful cookies with a luscious filling and a sweet finishing touch.
Ingredients
Scale
Cookie Dough
- 2 ½ cups all-purpose flour, plus more for dusting
- 1 teaspoon baking powder
- ½ teaspoon baking soda
- ½ teaspoon salt
- 1 cup (2 sticks) unsalted butter, softened
- ¾ cup granulated sugar
- ¾ cup packed light brown sugar
- 2 large eggs
- 1 teaspoon vanilla extract
Brown Sugar Filling
- ½ cup (1 stick) unsalted butter, softened
- 1 cup packed light brown sugar
- 2 tablespoons all-purpose flour
- 1 tablespoon milk
- ½ teaspoon ground cinnamon
- ¼ teaspoon salt
Vanilla Glaze
- 2 cups powdered sugar
- 4-6 tablespoons milk, or more as needed
- ½ teaspoon vanilla extract
- Your favorite sprinkles for decorating
Instructions
- Combine Dry Ingredients: In a medium bowl, whisk together the flour, baking powder, baking soda, and salt until evenly mixed. Set aside this dry ingredient mixture to incorporate later.
- Cream Butter and Sugars: In a large bowl or stand mixer, beat the softened butter, granulated sugar, and brown sugar until the mixture is light and fluffy, approximately 3 to 5 minutes, which helps create a tender cookie texture.
- Add Eggs and Vanilla: Beat in the eggs one at a time, ensuring each is fully incorporated before adding the next. Then mix in the vanilla extract to infuse flavor.
- Gradually Add Dry Ingredients: Slowly add the dry flour mixture to the wet ingredients on low speed, mixing just until combined to avoid overworking the dough which can cause toughness.
- Chill the Dough: Divide the dough into two equal portions. Flatten each into a disc, wrap tightly in plastic wrap, and refrigerate for at least 1 hour, preferably 2 hours. Chilling firms the dough making it easier to roll out and cut.
- Combine Filling Ingredients: In a separate bowl, mix the softened butter, brown sugar, flour, milk, cinnamon, and salt until the filling is smooth and creamy, preparing a rich sweet filling for the cookies.
- Adjust Consistency (if needed): If the filling is too thick, add milk a teaspoon at a time until it spreads easily. If too thin, mix in a small amount of flour gradually to thicken.
- Preheat Oven and Prepare Baking Sheets: Heat the oven to 350°F (175°C). Line two baking sheets with parchment paper for even baking and easy cleanup.
- Roll Out the Dough: On a lightly floured surface, roll out one disc of dough to about ⅛-inch thickness. Use a 3-inch cookie cutter to cut shapes and place them on the prepared baking sheets, spacing each about 1 inch apart.
- Repeat with Second Dough Disc: Roll and cut the second dough disc similarly; these pieces will form the tops of the pop tart cookies.
- Apply Filling: Spread a thin layer of the brown sugar filling onto half of the cookies, leaving a small border around the edges to seal the cookies properly.
- Top with Second Cookie: Carefully place the second cookie pieces over the filling-topped cookies, aligning edges as closely as possible for neat sandwiches.
- Seal the Edges: Press the edges together using a fork to crimp and seal the cookies, which prevents the filling from leaking during baking.
- Poke Holes (Important!): Use a toothpick or skewer to poke several small holes in the top cookie layer to allow steam to escape and keep the cookies from puffing up unevenly.
- Bake: Bake the assembled cookies for 10–12 minutes, or until the edges turn a light golden brown, indicating they are cooked but still soft inside.
- Cool: Let the cookies cool on the baking sheets briefly, then transfer them to a wire rack to cool completely for best texture before glazing.
- Prepare the Glaze: Whisk together powdered sugar, milk, and vanilla in a bowl until smooth. Adjust thickness by adding milk a tablespoon at a time until desired consistency is achieved.
- Glaze the Cookies: Drizzle or spread the glaze over the completely cooled cookies to add sweetness and shine.
- Add Sprinkles (Optional): Immediately decorate the glazed cookies with your favorite sprinkles before the glaze sets for a fun, colorful finish.
- Let the Glaze Set: Allow the glaze to firm up fully, about 30 minutes to an hour, before serving or storing the cookies to prevent smudging.
Notes
- Chilling the dough is essential for easier handling and to maintain the shape of your cookies while baking.
- Be careful not to overmix the dough to keep the cookies tender.
- Use parchment paper for an easy clean-up and to prevent cookies from sticking.
- Poking holes in the top cookie layer is crucial to release steam and avoid cracking or uneven rising.
- The glaze consistency can be adjusted for thicker or thinner coverage based on your preference.
- Store the cookies in an airtight container at room temperature for up to 3 days or freeze for longer storage.