Cherry Hand Pies Recipe
If you’ve ever wished for a perfectly portable, irresistibly sweet treat bursting with juicy fruit, this Cherry Hand Pies Recipe is about to become your new obsession. These little beauties marry tender, flaky crust with a luscious cherry filling that’s both tangy and sweet, making them an absolute joy to bake and even more delightful to eat. Whether you’re packing a picnic, craving a cozy dessert, or just want to impress friends with minimal fuss, these charming hand pies deliver flavor and comfort in every bite.
Ingredients You’ll Need
Gathering simple, wholesome ingredients is key to making these hand pies shine. Each item plays a special role in creating that perfect balance of flaky pastry and vibrant cherry filling that makes this Cherry Hand Pies Recipe so delightful.
- Fresh or frozen pitted cherries (2 cups): The star of the show, offering natural sweetness and tartness that define the filling.
- Granulated sugar (1/3 cup): Adds just enough sweetness to complement the cherries without overpowering them.
- Cornstarch (1 tablespoon): Helps thicken the cherry filling for that perfect, spoonable consistency.
- Lemon juice (1 tablespoon): Brightens the flavor with a subtle citrus tang that enhances the cherries.
- Vanilla extract (1/2 teaspoon): Adds warmth and depth to the filling’s flavor.
- Store-bought or homemade pie crust (2 sheets): The flaky outer layer that creates that irresistible texture contrast.
- Egg (1, for egg wash): Gives the pies a gorgeous golden color and helps seal the edges.
- Milk (1 tablespoon): Mixed with the egg to create a smooth, shiny glaze.
- Coarse sugar (optional): Sprinkled on top for extra sparkle and crunch.
How to Make Cherry Hand Pies Recipe
Step 1: Prepare the Cherry Filling
Start by heating up your cherries with sugar, cornstarch, lemon juice, and vanilla in a saucepan over medium heat. Stir the mixture gently as it cooks, letting it thicken for about 5 to 7 minutes. This step transforms fresh or thawed cherries into a luscious filling that’s thick enough to stay put inside the pies without being too runny. Once thickened, set it aside to cool completely — this helps prevent the crust from getting soggy later on.
Step 2: Cut and Shape the Dough
Roll out your pie crust on a lightly floured surface until it’s evenly thin. Use a round cutter, about 4 to 5 inches in diameter, to cut out circles. The size is perfect to hold just the right amount of cherry filling while keeping these pies perfectly handheld. Don’t worry if you’re using store-bought dough—this recipe is wonderfully forgiving and still produces a flaky crust that tastes homemade.
Step 3: Assemble the Pies
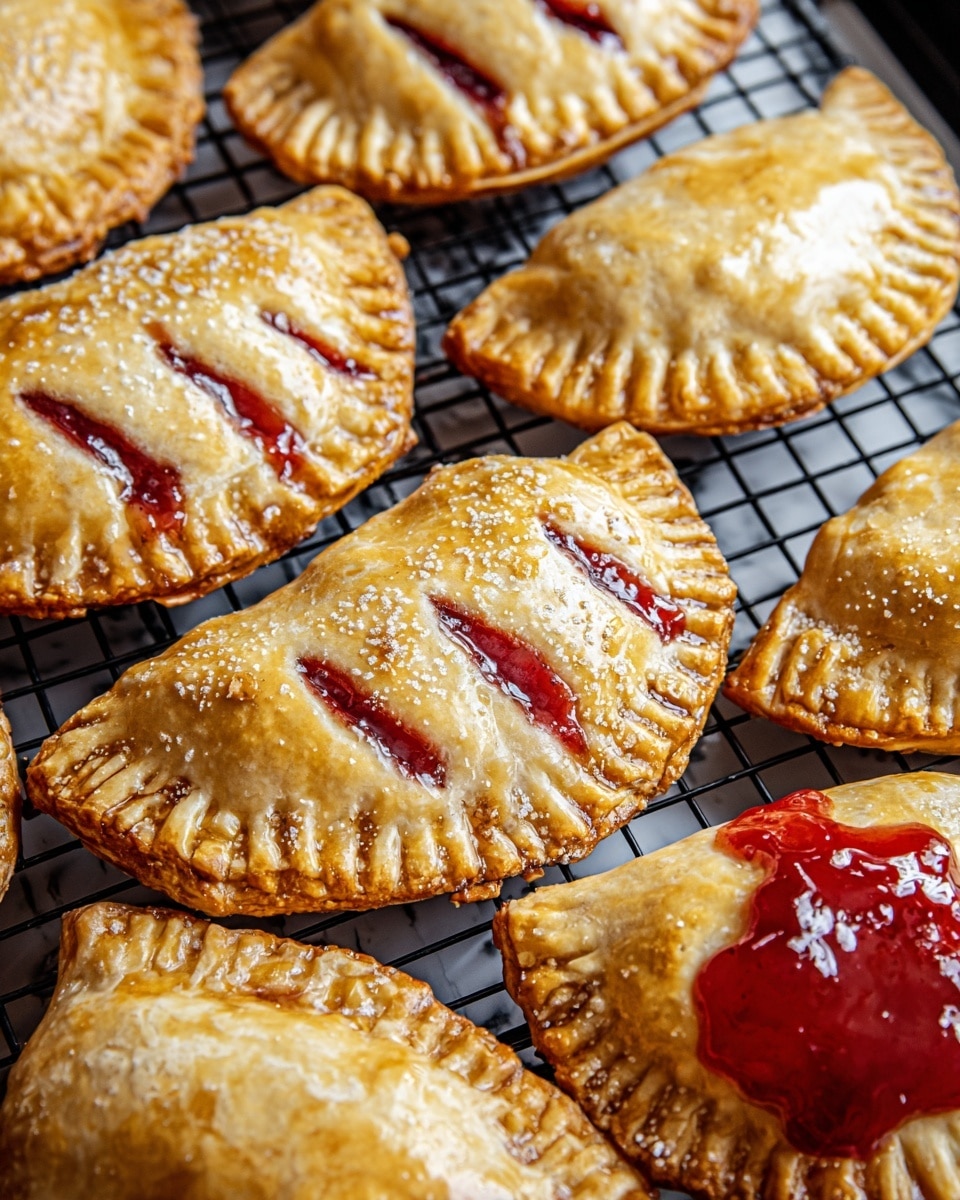
Take half of the dough circles and spoon 1 to 2 tablespoons of the cooled cherry filling into their center. Brush the edges lightly with an egg wash (egg whisked with milk) to act like glue for sealing. Gently place another dough circle over each filled half, then press the edges together using a fork to create a sealed, pretty crimped edge. Don’t forget to cut a small slit on top—this sneaky step lets steam escape, so your pies won’t puff up unevenly or burst open while baking.
Step 4: Bake to Golden Perfection
Arrange the pies on a parchment-lined baking sheet. Brush the tops with the egg wash for that irresistible glossy finish, and if you like, sprinkle coarse sugar on top for a subtle crunch. Pop them into the oven at 400°F (200°C) and bake for 18 to 22 minutes until the crust turns a beautiful golden brown. The smell alone will have you counting down the minutes!
Step 5: Let Them Cool and Enjoy
Once the pies are out of the oven, allow them to cool slightly on a wire rack. This resting time lets the filling set inside and ensures every bite is perfectly warm and juicy without risk of burning your mouth. Then, grab one (or two) and savor the magic of homemade cherry goodness wrapped in flaky pastry!
How to Serve Cherry Hand Pies Recipe

Garnishes
Adding a little garnish can instantly elevate your Cherry Hand Pies Recipe. A light dusting of powdered sugar lends an elegant touch, while a dollop of whipped cream or a scoop of vanilla ice cream creates a lovely contrast between warm pie and cool creaminess. Fresh mint leaves add a pop of color and a hint of freshness that pairs beautifully with the cherry filling.
Side Dishes
Cherry hand pies shine as a standalone treat, but if you’re serving these at a gathering, consider pairing them with a simple salad of mixed greens with a citrus vinaigrette for balance, or a chilled glass of sparkling wine to refresh the palate. For a cozy night in, a hot cup of tea or coffee makes the perfect companion, allowing the sweetness to unfold bite after bite.
Creative Ways to Present
If you want to impress your guests, try presenting these pies in rustic cupcake liners for a charming look that’s easy to handle. Arranging them on a wooden platter with scattered fresh cherries and small bowls of clotted cream or fruit preserves can turn your homemade pies into the centerpiece of any dessert table. These little pies are as much fun to share as they are to eat!
Make Ahead and Storage
Storing Leftovers
If you happen to have leftovers, which is unlikely, store them in an airtight container at room temperature for up to two days. This keeps the crust tender and the filling fresh. For longer storage, refrigeration is best, though the crust may lose a bit of its flakiness.
Freezing
This Cherry Hand Pies Recipe can be easily made ahead by freezing the assembled pies before baking. Arrange them on a baking sheet lined with parchment paper and freeze until solid, then transfer to a freezer-safe bag. When you’re ready, bake from frozen, adding a few extra minutes to the cooking time. This prep hack means you can enjoy fresh, homemade hand pies even on your busiest days.
Reheating
To reheat your hand pies, pop them in a preheated 350°F (175°C) oven for about 10 minutes. This reheats the filling while crisping the crust back up, giving you that fresh-baked experience all over again. Avoid microwaving, as it can make the crust soggy.
FAQs
Can I use canned cherry pie filling instead of fresh cherries?
Absolutely! Using canned cherry pie filling is a great shortcut and still delivers delicious results. You may want to reduce the sugar in the filling as canned varieties can be quite sweet already.
What if I don’t have cornstarch?
While cornstarch works best for thickening the filling, you can substitute it with an equal amount of all-purpose flour. Just be sure to cook the filling a bit longer to activate the thickening power.
Can I make the dough from scratch?
Definitely! Homemade pie dough adds that extra personal touch and buttery flavor, but store-bought crust saves time and still yields fantastic flaky results.
How big should the hand pies be?
Cutting your dough circles to about 4 to 5 inches in diameter creates a perfect handheld size — big enough to hold plenty of filling but small enough to eat in a few bites.
Is it possible to make these pies vegan?
Yes! Use a plant-based pie dough and substitute the egg wash with a mix of non-dairy milk and maple syrup or a little aquafaba for brushing the crust.
Final Thoughts
There is something truly magical about pulling warm, golden hand pies fresh from the oven and biting into that bright, juicy cherry filling. This Cherry Hand Pies Recipe is a wonderful way to bring comfort and sweetness into your kitchen with very little fuss. Whether you’re cooking for family, friends, or treating yourself, I can’t recommend giving this recipe a try enough — it’s sure to become a beloved favorite in your baking repertoire!
Print
Cherry Hand Pies Recipe
- Total Time: 45 minutes
- Yield: 8 hand pies 1x
- Diet: Vegetarian
Description
These Cherry Hand Pies are delightful, portable desserts featuring a sweet and tangy cherry filling encased in a flaky, golden-brown pie crust. Perfect for any occasion, these mini pies are easy to make using store-bought or homemade dough and offer a nostalgic taste of classic American desserts.
Ingredients
Filling
- 2 cups fresh or frozen pitted cherries (thawed if frozen)
- 1/3 cup granulated sugar
- 1 tablespoon cornstarch
- 1 tablespoon lemon juice
- 1/2 teaspoon vanilla extract
Dough and Finishing
- 1 package (2 sheets) store-bought pie crust or homemade pie dough
- 1 egg (for egg wash)
- 1 tablespoon milk
- Coarse sugar for sprinkling (optional)
Instructions
- Preheat Oven and Prepare Pan: Preheat your oven to 400°F (200°C) and line a baking sheet with parchment paper to prevent sticking and facilitate even baking.
- Cook Cherry Filling: In a medium saucepan over medium heat, combine the cherries, granulated sugar, cornstarch, lemon juice, and vanilla extract. Stir frequently and cook for 5 to 7 minutes until the mixture thickens and becomes glossy. Remove from heat and allow to cool completely.
- Prepare Dough Circles: Roll out your pie crust sheets on a floured surface and use a 4 to 5-inch round cutter to cut out circles. Aim for an even number of circles as these will form the top and bottom of each hand pie.
- Assemble Hand Pies: Spoon 1 to 2 tablespoons of the cooled cherry filling onto the center of half the dough circles. Whisk together the egg and milk to create an egg wash and brush it lightly around the edges of these circles.
- Seal Edges: Place a plain dough circle on top of each filled circle. Press the edges firmly together with a fork to seal completely, ensuring no filling leaks out. Cut a small slit on top of each pie to allow steam to escape while baking.
- Final Touches: Arrange the assembled hand pies on the prepared baking sheet. Brush the tops with the remaining egg wash and sprinkle with coarse sugar if desired for added sweetness and crunch.
- Bake: Place the baking sheet in the preheated oven and bake for 18 to 22 minutes, or until the hand pies are golden brown and crisp.
- Cool and Serve: Remove the pies from the oven and let them cool slightly on a wire rack before serving to allow the filling to set and avoid burns.
Notes
- You can substitute homemade cherry filling with canned cherry pie filling for a quicker preparation.
- These hand pies can be frozen before baking; when ready to bake, place them in the oven from frozen and add a few extra minutes to the baking time.
- Prep Time: 25 minutes
- Cook Time: 20 minutes
- Category: Dessert
- Method: Baking
- Cuisine: American


