Description
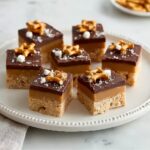
These Chocolate Pretzel Peanut Butter Squares are a delightful no-bake treat combining creamy peanut butter, crunchy pretzels, and rich semi-sweet chocolate. With a perfect balance of salty and sweet, these squares are easy to prepare and a crowd-pleasing dessert that’s perfect for parties or snack time.
Ingredients
Scale
Base Layer Ingredients
- 2 cups (approx. 480 ml) creamy peanut butter, smooth (e.g., Jif or Skippy)
- ¾ cup (170 g) salted butter, softened
- 2 cups (250 g) powdered sugar, finely sifted (confectioners’ sugar)
- 4 cups (approx. 120 g) broken mini pretzels, crunchy variety (e.g., Snyder’s)
- 2 cups (340 g) semi-sweet chocolate chips, good-quality (e.g., Ghirardelli or Guittard)
Instructions
- Prepare Your Pan: Line a 13×9 inch baking pan with non-stick heavy-duty foil, leaving an overhang on two sides to easily lift out the dessert later. Lightly grease the foil or alternatively use parchment paper for easier removal.
- Beat the Mixture: In a large mixing bowl, beat together 1¼ cups (300 ml) creamy peanut butter and the softened salted butter until the mixture is completely smooth and creamy with no lumps to ensure proper texture.
- Add the Dry Ingredients: Gradually add 1 cup (125 g) of the powdered sugar to the peanut butter mixture, beating continuously until no dry spots are visible. Then stir in the remaining 1 cup (125 g) of powdered sugar by hand to retain some texture.
- Fold in Pretzels and Chocolate Chips: Gently fold in 3 cups (approx. 90 g) of the broken pretzel bits along with ½ cup (85 g) of semi-sweet chocolate chips until everything is evenly coated with the peanut butter mixture.
- Spread Mixture in Pan: Press and spread the peanut butter, pretzel, and chocolate chip mixture evenly into the prepared pan, smoothing the surface flat with a spatula or your hands lined with parchment.
- Melt Chocolate Mixture: In a heavy pan over the lowest heat setting, combine the remaining 1½ cups (255 g) of semi-sweet chocolate chips with ¾ cup (180 ml) peanut butter. Stir constantly to melt gently, preventing overheating or burning, then remove from heat immediately once smooth and glossy.
- Spread Chocolate Layer: Pour and evenly spread the melted chocolate and peanut butter mixture over the peanut butter base layer in the pan, working quickly to create a smooth, uniform finish.
- Press Pretzels on Top: Sprinkle the remaining 1 cup (30 g) of broken pretzel bits evenly over the warm chocolate layer and lightly press them down to help them adhere as the chocolate cools.
- Chill to Firm: Cover the pan with plastic wrap or foil and refrigerate for at least 2 hours until the squares are very firm to enable clean cutting and optimal texture.
- Cut into Squares: Using the foil overhang, lift the dessert out of the pan onto a cutting board. For best cutting results, slice the slab in half and chill one half while cutting the other. Use a sharp bread knife and optionally a ruler to cut into small, uniform squares.
Notes
- Use smooth creamy peanut butter for the best texture; natural varieties may alter consistency.
- Be sure to melt the chocolate and peanut butter mixture gently on low heat to prevent burning and maintain shine.
- Pressing broken pretzels on top adds both crunch and visual appeal.
- Refrigerate sufficiently to ensure squares hold their shape when cut.
- These squares can be stored in an airtight container in the refrigerator for up to one week.
- For easy removal, using heavy-duty foil with an overhang is recommended when lining the pan.