Crispy, Cheesy Quesabirria Tacos Recipe
Get ready to fall in love with the ultimate street food indulgence: Crispy, Cheesy Quesabirria Tacos. These glorious handheld delights combine slow-braised, spice-infused beef with a melty cheese pull, all wrapped in a beautifully crisped tortilla and finished with fresh toppings and a rich, savory consommé for dipping. With every bite, you’ll enjoy a feast of flavors and textures that’s impossible to resist—this dish is a celebration of everything we crave in comfort food, and once you try it, you’ll be making it on repeat!
Ingredients You’ll Need
Every element in these tacos matters, from the tender beef to the vibrant chiles and gooey cheese. Here’s a rundown of exactly what you’ll need to make your Crispy, Cheesy Quesabirria Tacos unforgettable, with each ingredient playing its own delicious role in texture, color, and full-bodied flavor.
- Beef chuck roast (3 pounds, cut into large chunks): This cut is wonderfully marbled, making your birria melt-in-your-mouth tender after a long simmer.
- Vegetable oil (2 tablespoons): Helps caramelize the beef and veg, unlocking their flavors at the very start.
- Onion (1, quartered): Adds sweetness and depth to both the stew and your consommé.
- Dried guajillo chiles (4, stemmed and seeded): Essential for authentic, slightly sweet and tangy Mexican flavor plus a gorgeous red color.
- Dried ancho chiles (2, stemmed and seeded): For a subtle smoky richness that gives the birria its soulful complexity.
- Chipotle pepper in adobo (1): Adds bold heat and a touch of smokiness.
- Garlic cloves (4): Roasting in the pot brings a savory backbone to the stew.
- Apple cider vinegar (1 tablespoon): Lifts the flavors and balances the richness of the meat.
- Ground cumin (1 teaspoon): For that earthy, warm base note which no birria is complete without.
- Dried oregano (1 teaspoon): Introduces a slightly herbal aroma to the whole dish.
- Ground cloves (1/2 teaspoon): Just a pinch goes a long way to subtly intensify the flavor profile.
- Bay leaves (2): Classic for bringing a subtle, aromatic uplift to the consommé.
- Beef broth (4 cups): Forms the rich, savory backbone for both the birria meat and that addictive dipping sauce.
- Salt and pepper (to taste): Essential for seasoning every layer just right.
- Corn tortillas (12): These crisp up beautifully and soak up all that delicious consommé flavor.
- Shredded Oaxaca or mozzarella cheese (2 cups): Provides the gooey, stretchy magic—Oaxaca is traditional, but mozzarella is a handy stand-in!
- Chopped white onion and fresh cilantro (for topping): Bring brightness and crunch to each taco.
- Lime wedges (for serving): A quick squeeze wakes up all the flavors in an instant.
How to Make Crispy, Cheesy Quesabirria Tacos
Step 1: Sear the Beef
Start by heating that good splash of vegetable oil in a heavy-bottomed Dutch oven or pot over medium-high heat. Once it’s shimmering, add your beef chunks, searing all sides until they’re gorgeously browned and caramelized. Don’t rush this step—those crusty brown edges are pure flavor gold for your Crispy, Cheesy Quesabirria Tacos, and totally worth a little extra patience.
Step 2: Sauté Aromatics and Toast Chiles
In the same pot, lower the heat slightly and toss in the quartered onion, garlic cloves, and dried guajillo and ancho chiles. Sauté everything for a few minutes until the onions are soft and the chiles are a little puffy and fragrant—this toasting brings out their deep, complex flavors, which are essential for an authentic quesabirria experience.
Step 3: Build the Birria Sauce
Add the beef broth, chipotle pepper in adobo, apple cider vinegar, cumin, oregano, ground cloves, bay leaves, plus a generous pinch of salt and pepper. Stir everything together, scraping up any tasty browned bits stuck to the bottom of the pot. Return the beef to the pot and nestle it down into that flavorful bath. Bring to a gentle boil, then reduce the heat so it just simmers.
Step 4: Slow Simmer Until Tender
Cover your pot and let the birria bubble away gently for 2.5 to 3 hours. You’ll know it’s ready when the beef shreds effortlessly with a fork and everything smells completely irresistible. This long, slow cook is where the magic happens—the meat soaks up every note of chile, garlic, and spice, becoming unbelievably tender and flavorful.
Step 5: Shred Beef and Prepare Consommé
Lift the beef out onto a plate and shred it into bite-sized pieces with two forks. Meanwhile, strain the remaining liquid into a bowl, discarding the solids. This rich consommé is the secret weapon that takes Crispy, Cheesy Quesabirria Tacos over the top, both for dipping tortillas and for serving alongside the finished tacos.
Step 6: Crisp Up the Tacos
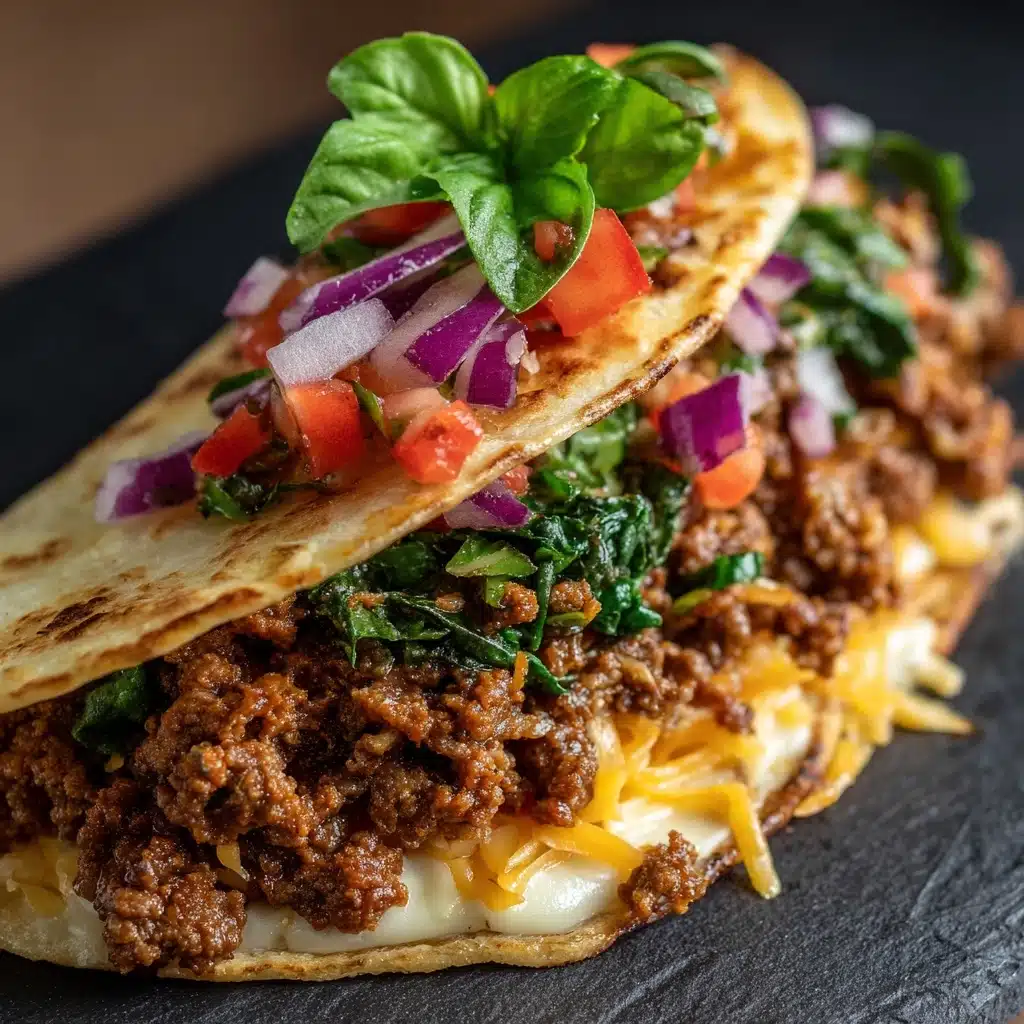
Heat a nonstick skillet over medium heat. Working with one or two tortillas at a time, dip them briefly into the warm consommé (get both sides moistened for extra flavor), then lay them in the skillet. Sprinkle on a generous layer of shredded cheese and a scoop of that luscious shredded beef. Fold the tortillas, press gently, and cook for a few minutes on each side until the cheese is melted and the tortillas are crispy and deeply golden. Let your senses be your guide—the sizzle and aroma will tell you when they’re ready!
Step 7: Top and Serve
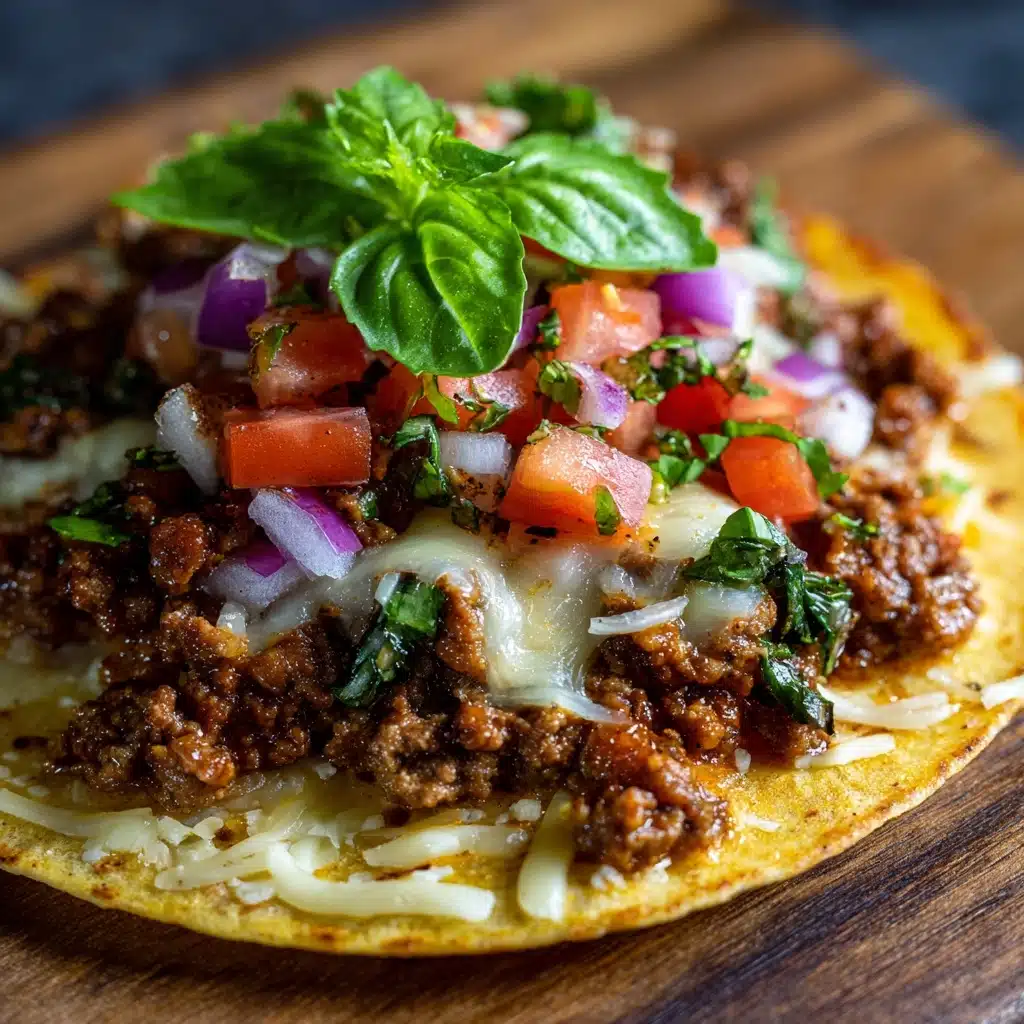
Lift your perfect Crispy, Cheesy Quesabirria Tacos onto a plate, sprinkle with chopped white onion and fresh cilantro, and serve immediately with lime wedges. Don’t forget to ladle some hot consommé into little bowls—dipping your tacos is half the fun, and truly the secret to taco perfection!
How to Serve Crispy, Cheesy Quesabirria Tacos
Garnishes
For the ultimate finish, don’t skimp on the fresh toppings. A shower of chopped white onion and cilantro keeps your Crispy, Cheesy Quesabirria Tacos tasting lively with bright crunch and herbal notes. A few squeezes of lime juice cut through the richness, tying everything together beautifully. For extra flair, add sliced radishes or a dash of your favorite hot sauce!
Side Dishes
Round out your meal with sides that let the tacos shine while adding their own flavors and textures. Try Mexican street corn (elote), spicy pickled carrots, or a simple black bean salad. A side of Mexican rice or tortilla chips with guacamole can turn taco night into a real feast, complementing the bold flavors without overwhelming your star dish.
Creative Ways to Present
Bring the street food vibe straight to your kitchen by serving your Crispy, Cheesy Quesabirria Tacos on parchment-lined trays, with bowls of consommé for everyone. For parties, turn the tacos into bite-sized appetizers—cut each one in half, skewer with toothpicks, and serve with a mini cup of dipping broth for a fun twist. You can even set up a taco bar and let everyone build their own, customizing with their favorite toppings and sides.
Make Ahead and Storage
Storing Leftovers
If you have leftover tacos or birria beef, store them separately in airtight containers—the meat and consommé in one, the tortillas in another. The birria beef will keep well in the fridge for up to 4 days, and the consommé will retain its savory punch for easy meals throughout the week.
Freezing
Birria beef and consommé are both freezer-friendly! Let them cool completely, then transfer to freezer-safe containers or resealable bags. Store up to three months. Just remember to leave out the toppings and tortillas until reheating for the best texture and flavor in your future Crispy, Cheesy Quesabirria Tacos.
Reheating
When you’re ready to revive your leftover birria, gently reheat the beef and consommé on the stove or in the microwave until piping hot. To get the tortillas crispy again, dip them in consommé and crisp them in a hot skillet as you did originally—this way, your second (or third!) round of Crispy, Cheesy Quesabirria Tacos is just as good as fresh.
FAQs
Can I use a different cut of beef?
Absolutely! While beef chuck is wonderfully tender and flavorful, you can use brisket or short ribs as alternatives. Just make sure to choose cuts that have good marbling for juicy, shreddable results in your Crispy, Cheesy Quesabirria Tacos.
What if I can’t find Oaxaca cheese?
No worries at all—mozzarella or Monterey Jack both work beautifully and melt just right. Oaxaca is traditional for that authentic stretchy pull, but use what you love and can find locally.
Are there gluten-free options?
Yes, as long as you use certified gluten-free corn tortillas, your Crispy, Cheesy Quesabirria Tacos will be naturally gluten free. Double-check broth and cheese for hidden gluten if you’re highly sensitive.
Can I make the birria ahead of time?
Definitely! Making the birria a day ahead actually enhances the flavor, giving the spices more time to mingle. Just refrigerate the beef and consommé, then crisp up fresh tacos right before serving.
How spicy are these tacos?
These tacos deliver a gentle warmth with lots of smoky, savory depth rather than outright heat. If you want more of a kick, feel free to add another chipotle or some extra chili powder during the braise—or supply hot sauce at the table!
Final Thoughts
There’s nothing quite like the joy of biting into Crispy, Cheesy Quesabirria Tacos: the irresistible crunch, the juicy melt of beef, the runny cheese, and that dunk in rich consommé. It’s pure fiesta on a plate! Gather your favorite people, whip up a batch, and discover for yourself why these tacos are always met with empty plates and big smiles.
Print
Crispy, Cheesy Quesabirria Tacos Recipe
- Total Time: 3 hours 30 minutes
- Yield: 6 servings (2 tacos per person) 1x
- Diet: Non-Vegetarian
Description
Indulge in the ultimate comfort food with these Crispy, Cheesy Quesabirria Tacos. A traditional Mexican dish, these tacos are packed with flavorful shredded beef, melted cheese, and a savory consommé for dipping. Perfect for a satisfying meal any day of the week!
Ingredients
For the Birria:
- 3 pounds beef chuck roast, cut into large chunks
- 2 tablespoons vegetable oil
- 1 onion, quartered
- 4 dried guajillo chiles, stemmed and seeded
- 2 dried ancho chiles, stemmed and seeded
- 1 chipotle pepper in adobo
- 4 garlic cloves
- 1 tablespoon apple cider vinegar
- 1 teaspoon ground cumin
- 1 teaspoon dried oregano
- 1/2 teaspoon ground cloves
- 2 bay leaves
- 4 cups beef broth
- Salt and pepper, to taste
For the Tacos:
- 12 corn tortillas
- 2 cups shredded Oaxaca or mozzarella cheese
- Chopped white onion and fresh cilantro, for topping
- Lime wedges, for serving
Instructions
- Prepare the Birria: In a large pot or Dutch oven, heat vegetable oil over medium-high heat. Sear beef until browned, then set aside. Sauté onion, garlic, and dried chiles until softened. Add beef broth, chipotle pepper, vinegar, cumin, oregano, cloves, bay leaves, salt, and pepper. Return beef to pot, boil, then simmer covered for 2.5 to 3 hours until tender. Shred beef and reserve consommé.
- Assemble the Tacos: Heat a skillet over medium heat. Dip a tortilla in consommé, place in skillet, add cheese and shredded beef, fold, and cook until crispy. Repeat with remaining tortillas. Serve hot with toppings and consommé for dipping.
Notes
- Oaxaca cheese provides the best stretch, but mozzarella or Monterey Jack work well.
- Birria can be made a day ahead for enhanced flavor and convenience.
- Prep Time: 30 minutes
- Cook Time: 3 hours
- Category: Main Course
- Method: Stovetop
- Cuisine: Mexican
Nutrition
- Serving Size: 2 tacos
- Calories: 610
- Sugar: 3g
- Sodium: 620mg
- Fat: 38g
- Saturated Fat: 15g
- Unsaturated Fat: 19g
- Trans Fat: 1g
- Carbohydrates: 28g
- Fiber: 4g
- Protein: 42g
- Cholesterol: 125mg


