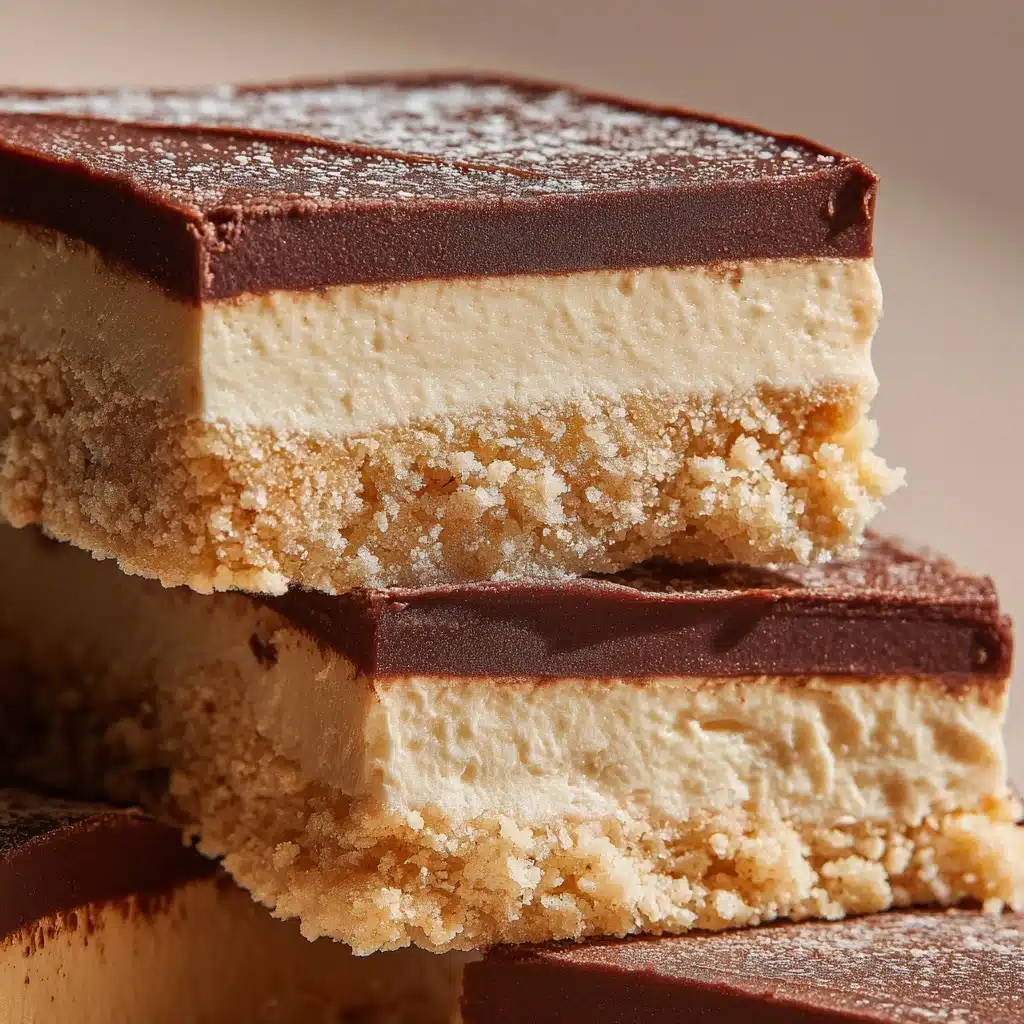
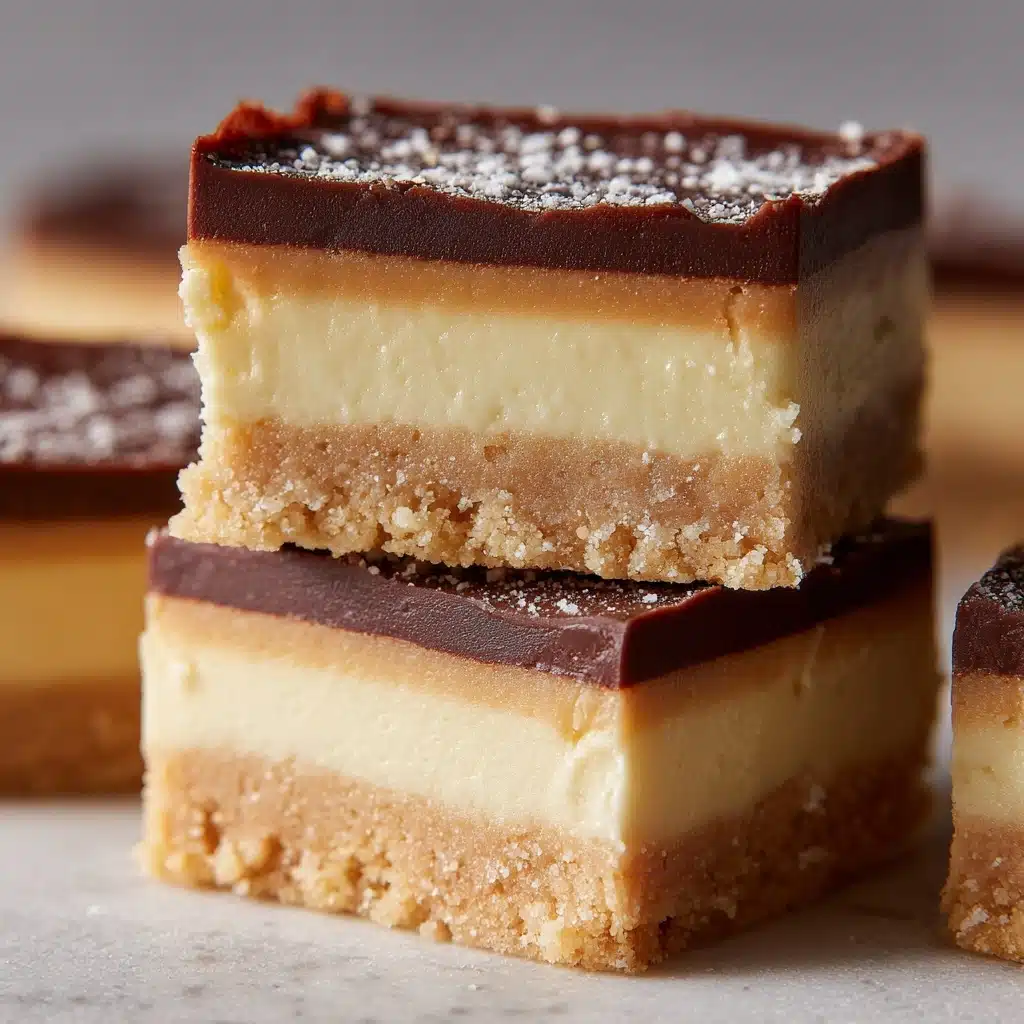
Disneyland Peanut Butter Squares Recipe
If you’ve ever wandered through Main Street and caught the scent of sweet nostalgia, these Disneyland Peanut Butter Squares will bring that magical moment right into your kitchen. Combining rich, creamy peanut butter with a layer of irresistible milk chocolate, this no-bake treat is perfect for anyone craving a taste of that famous theme park happiness. Whether you’re a die-hard Disney lover, a serious peanut butter fan, or just looking to whip up an easy dessert that delightfully straddles comfort and indulgence, these bars are about to become your new favorite recipe.
Ingredients You’ll Need
The best part about Disneyland Peanut Butter Squares is just how simple the ingredient list is—yet every element plays a superstar role. From the smooth peanut butter base to the glossy chocolate topping, each addition brings flavor, texture, or the perfect touch of sweetness.
- Peanut Butter: Choose creamy for a classic texture, or go chunky if you want a little crunch in every bite.
- Unsalted Butter (softened): This gives the bars their tender, melt-in-your-mouth richness—be sure to start with it at room temperature for easy mixing.
- Powdered Sugar: Adds that soft sweetness and helps the filling hold its shape without grittiness.
- Graham Cracker Crumbs: These create the signature crumbly base and bring a delightful, subtle crunch.
- Vanilla Extract: A splash elevates and rounds out the peanut butter flavor.
- Milk Chocolate Chips: Melted on top, they form that luscious, thick chocolate layer every bar needs.
- Vegetable Oil: Just a spoonful makes the chocolate silky, shiny, and easy to slice—even straight from the fridge.
How to Make Disneyland Peanut Butter Squares
Step 1: Combine the Base Ingredients
In a large mixing bowl, add your creamy peanut butter, softened unsalted butter, powdered sugar, graham cracker crumbs, and vanilla extract. Using a sturdy spatula or hand mixer, blend everything together until the mixture is completely smooth and there are no streaks of dry crumbs remaining. It should come together easily and have the consistency of a thick, slightly sticky dough—the kind that’s just begging to be tasted right from the bowl!
Step 2: Press into the Pan
Line a 9×13-inch baking dish with parchment paper, letting a bit hang over the edges for easy lifting later. Scrape your peanut butter mixture into the pan, then use the back of a spatula or even your fingertips to press it into an even, compact layer all the way to the corners. Take a moment to smooth the top—this gives your squares a beautiful, professional finish once set.
Step 3: Melt the Chocolate
Next come the chocolate chips and vegetable oil. Place them together in a microwave-safe bowl. Microwave in 30-second bursts, pausing to stir thoroughly between each round, until the chocolate is glossy and totally smooth—usually in about 1 to 1 1/2 minutes. Be careful not to overheat, as you want the chocolate silky, not scorched.
Step 4: Spread the Chocolate Layer
Pour the melted chocolate mixture right over the peanut butter base, then use a spatula to spread it evenly. Don’t worry if it looks a little imperfect—once chilled, the chocolate firms up into a satisfyingly thick, shiny layer that seals in all the goodness below.
Step 5: Chill and Set
Pop the pan into your refrigerator and chill for at least 2 hours. This lets the layers set fully so slicing is easy and clean. If you’re feeling impatient and just can’t wait (we’ve all been there!), speed things up by putting the pan in the freezer for 45-60 minutes instead.
Step 6: Slice and Serve
Once the chocolate is firm, use the parchment overhang to lift the entire slab out of the pan. Grab a sharp knife and cut into squares—24 is traditional, but you can go larger or smaller if you want snack bites or party-sized portions. Enjoy chilled for a firmer texture, or let them come to room temperature for a slightly softer, more melt-in-your-mouth experience.
How to Serve Disneyland Peanut Butter Squares
Garnishes
A little garnish can take these bars from delicious to downright dazzling. Sprinkle with flaky sea salt for a sweet-and-salty contrast, drizzle with extra melted chocolate in a decorative zigzag, or even top with chopped toasted peanuts for irresistible crunch. A dollop of whipped cream on the side also adds a touch of old-school sundae shop magic.
Side Dishes
While Disneyland Peanut Butter Squares steal the spotlight on any dessert platter, they do pair delightfully with sides. Serve with scoops of vanilla or strawberry ice cream for an all-American treat, or round things out with fresh berries for a bright, tart counterpoint. A cup of coffee or tall glass of cold milk is also the classic companion.
Creative Ways to Present
Think outside the box for parties by serving these bars cupcake-style in colorful paper liners, or cutting into bite-sized cubes and threading onto skewers for a dessert “kabob.” Arrange on a vintage cake stand for a nostalgic Disney tea party, or stack in a pretty tin for an edible gift sure to earn you a shower of thanks!
Make Ahead and Storage
Storing Leftovers
Store any remaining Disneyland Peanut Butter Squares in an airtight container, layered with parchment to prevent sticking. Keep them chilled in the fridge for up to one week—a quick, satisfying treat every time the craving strikes.
Freezing
These squares freeze beautifully. Place in a single layer on a baking sheet to freeze solid, then transfer to a freezer-safe bag or container, separating layers with parchment. They’ll keep their gorgeous texture and flavor for up to 2 months—just thaw in the fridge overnight before you’re ready to serve.
Reheating
There’s no need to reheat these no-bake bars, but if you prefer that just-melted chocolate experience, pop a square in the microwave for 5-10 seconds. Watch closely: you want it just soft enough to become extra fudgy, not melted into a puddle!
FAQs
Can I use natural peanut butter for Disneyland Peanut Butter Squares?
You can use natural peanut butter, but be sure it’s well-stirred and not too oily, as the texture might turn out softer. For the best texture and structure, conventional creamy peanut butter usually works best.
Is it possible to make these bars gluten-free?
Absolutely! Just swap in gluten-free graham cracker crumbs (widely available at most grocery stores) and every other ingredient remains naturally gluten-free, so everyone can enjoy a little slice of Disney magic.
Do Disneyland Peanut Butter Squares need to stay refrigerated?
For optimal freshness and that perfect, sliceable texture, keep your bars refrigerated, especially if your kitchen runs warm. They are still delicious at room temperature for a few hours, making them great for parties and potlucks.
Can I double the recipe for a crowd?
Certainly! Simply double all the ingredients and use two 9×13-inch pans or a larger jelly roll pan. These are perfect for potlucks, bake sales, or big gatherings where you want that wow-factor treat everyone loves.
What other toppings can I try on Disneyland Peanut Butter Squares?
Feel free to get creative—mini M&Ms, colorful sprinkles, crushed pretzels, or even a white chocolate drizzle all make fun and tasty toppings. The basic recipe is a blank canvas for your imagination!
Final Thoughts
There’s something undeniably nostalgic and special about these Disneyland Peanut Butter Squares—they deliver theme park happiness in every decadent bite. Whether you’re making them for a party, packing them in a lunchbox, or simply indulging a craving for something sweet and homey, I can’t recommend this recipe enough. Try them once, and I promise, they’ll become a staple in your dessert lineup!
Print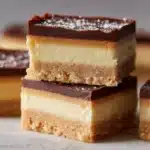
Disneyland Peanut Butter Squares Recipe
- Total Time: 2 hours 15 minutes (including chill time)
- Yield: 24 squares 1x
- Diet: Non-Vegetarian
Description
These Disneyland Peanut Butter Squares are a delightful no-bake treat that combines the rich flavors of peanut butter and chocolate in a perfect square. Easy to make and even easier to enjoy, these squares are a favorite for both kids and adults alike.
Ingredients
Peanut Butter Layer:
- 1 cup creamy peanut butter
- 1/2 cup unsalted butter, softened
- 2 cups powdered sugar
- 1 1/2 cups graham cracker crumbs
- 1 teaspoon vanilla extract
Chocolate Layer:
- 2 cups milk chocolate chips
- 1 tablespoon vegetable oil
Instructions
- Prepare Peanut Butter Layer: In a large mixing bowl, combine peanut butter, softened butter, powdered sugar, graham cracker crumbs, and vanilla extract. Mix until smooth and fully combined.
- Press Into Pan: Press the mixture evenly into a parchment-lined 9×13-inch baking dish.
- Prepare Chocolate Layer: In a microwave-safe bowl, combine the chocolate chips and vegetable oil. Microwave in 30-second intervals, stirring between each, until smooth and melted.
- Layer and Chill: Pour the melted chocolate over the peanut butter layer and spread evenly with a spatula. Refrigerate for at least 2 hours or until fully set.
- Serve: Once firm, cut into squares and serve chilled or at room temperature.
Notes
- For a crunchier texture, use chunky peanut butter or add chopped peanuts.
- These bars can be stored in the refrigerator for up to 1 week or frozen for longer storage.
- Prep Time: 15 minutes
- Cook Time: 0 minutes
- Category: Dessert
- Method: No-Bake
- Cuisine: American
Nutrition
- Serving Size: 1 square
- Calories: 210
- Sugar: 18g
- Sodium: 95mg
- Fat: 13g
- Saturated Fat: 5g
- Unsaturated Fat: 6g
- Trans Fat: 0g
- Carbohydrates: 22g
- Fiber: 1g
- Protein: 3g
- Cholesterol: 10mg


