
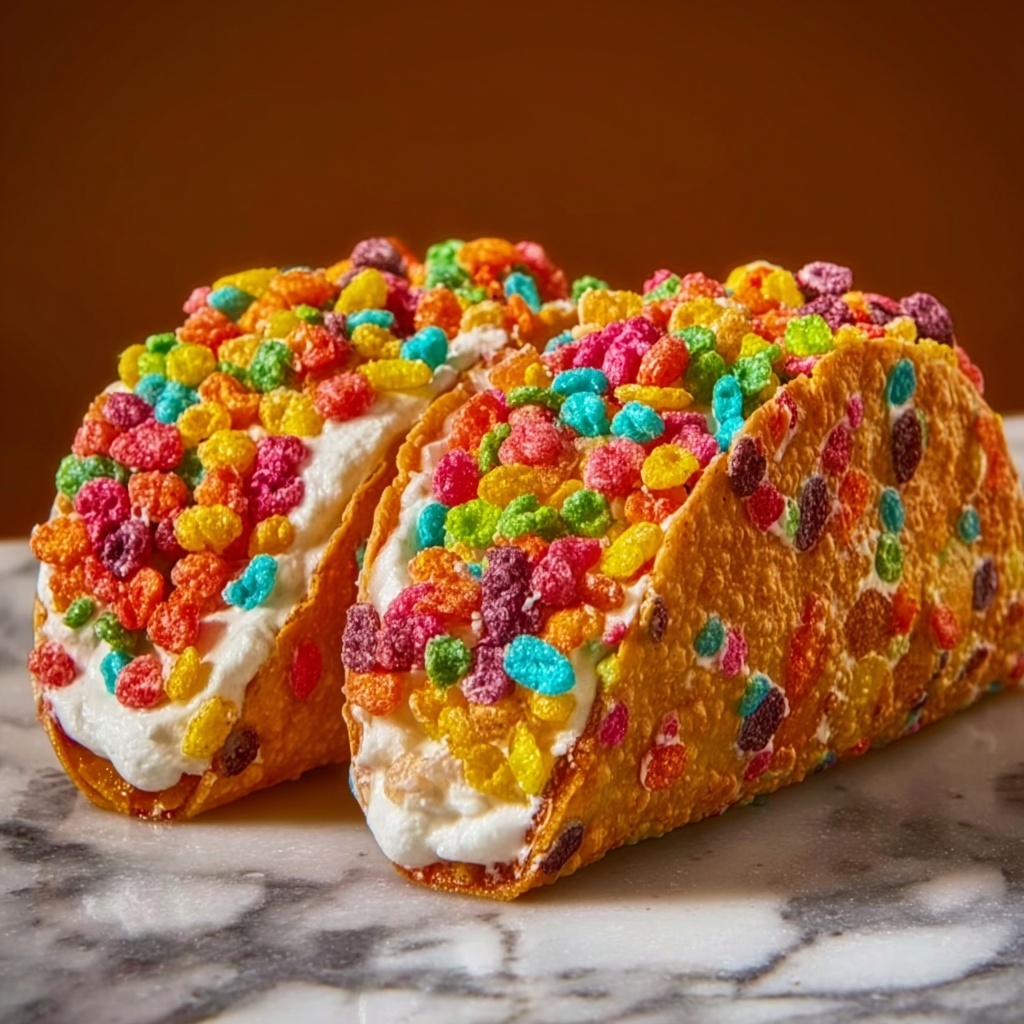
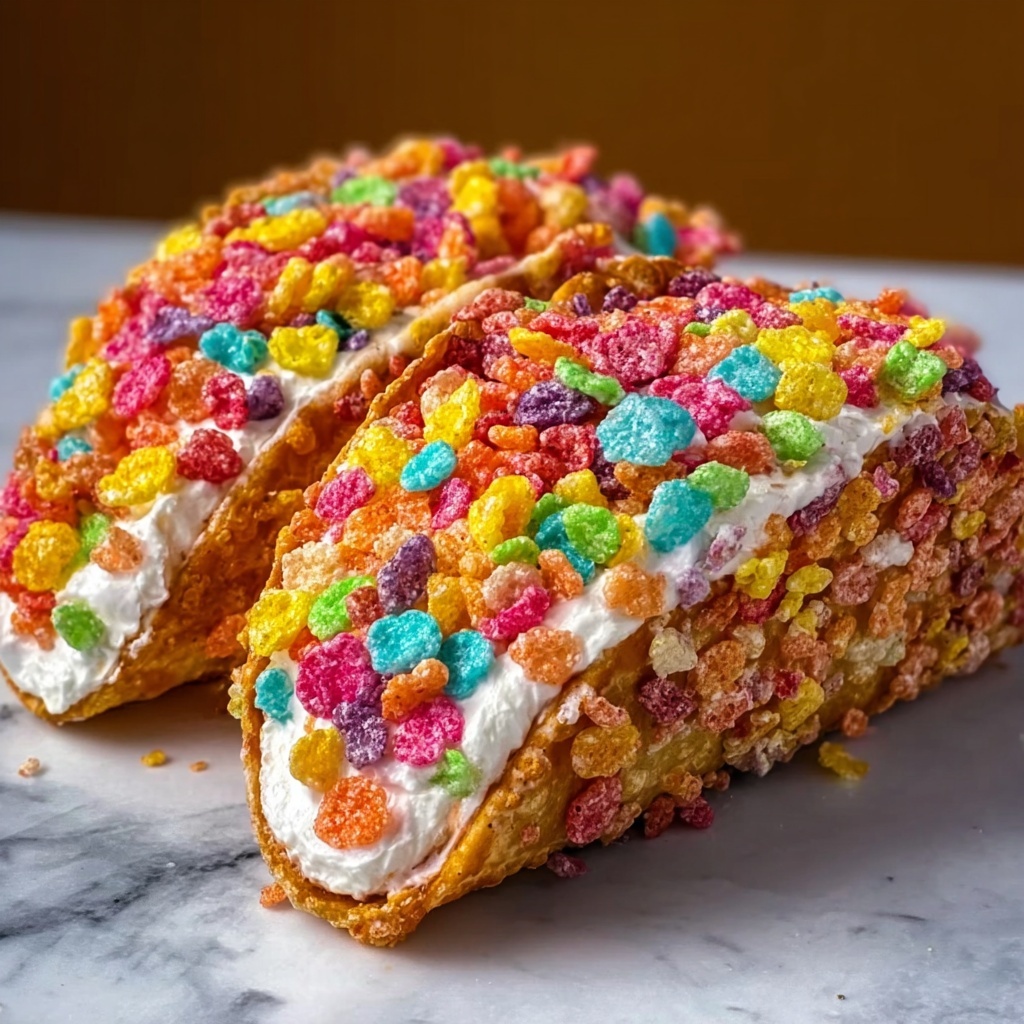
If you are looking for a playful, colorful dessert that brings smiles all around, then the Fruity Pebbles Cheesecake Tacos Recipe is your new best friend in the kitchen. Combining the nostalgic crunch of Fruity Pebbles cereal with a creamy, dreamy cheesecake filling tucked inside crispy, golden taco shells, this treat is a delightful twist on classic desserts. It’s vibrant, fun, and surprisingly simple to make, making it perfect for parties, family gatherings, or any time you want to wow your guests with something truly special.
Ingredients You’ll Need
Every ingredient in this recipe plays an essential role in building its unique texture and mouthwatering flavor. From the crispy taco shells to the silky cream cheese filling, and of course, the colorful Fruity Pebbles that add that perfect fruity crunch, these simple ingredients come together to create pure magic.
- 10 small flour tortillas: These form the taco shells, crisping up beautifully in the oven to hold the filling.
- 3 cups Fruity Pebbles cereal, divided: Adds irresistible fruity crunch both inside and on top of your tacos.
- 3 tablespoons melted butter: Brushed on tortillas for a golden, crisp finish.
- 16 ounces cream cheese, softened: The creamy base for the cheesecake filling, providing richness and smoothness.
- 1 cup powdered sugar: Brings the perfect amount of sweetness without graininess.
- 1 teaspoon vanilla extract: Adds warm depth and enhances the creamy filling flavors.
- 1 cup heavy whipping cream, cold: Whipped to stiff peaks for a light, airy texture in the filling.
- 1 tablespoon granulated sugar: Sweetens the whipped cream slightly for balance.
- 1 cup white chocolate chips, melted: Used to coat the inside of shells, acting as a delicious glue for the cereal and adding creamy sweetness.
- 2 tablespoons milk (optional): Helps thin the melted white chocolate for easy dipping.
- Additional Fruity Pebbles for garnish: Provides a colorful, crunchy finish that truly makes these tacos pop.
How to Make Fruity Pebbles Cheesecake Tacos Recipe
Step 1: Prepare the Crispy Taco Shells
Start by preheating your oven to 375°F. Lightly brush both sides of each small flour tortilla with melted butter—this step is key to achieving that perfect crispy, golden exterior. Next, shape the tortillas into taco shells by pressing them into the spaces between the bars of an inverted muffin tin or draping them over oven rack bars. Pop them in the oven for 7 to 9 minutes until they are crisp and lightly golden. Once baked, set those shells aside and let them cool completely. This process gives your tacos the perfect sturdy base to hold all the creamy goodness waiting to come.
Step 2: Melt the White Chocolate and Prep the Shells
While the shells are cooling, melt the white chocolate chips in a microwave-safe bowl using short 20-second intervals, stirring in between until smooth. If the chocolate is too thick, add a splash of milk to thin it out. Once your shells are fully cooled, dip the inside of each tortilla shell into the melted white chocolate, ensuring full coverage. Immediately after dipping, sprinkle about 1 cup of Fruity Pebbles onto the chocolate so the cereal sticks firmly. This step creates a delicious, colorful coating that adds flavor and texture while helping keep the shells crisp.
Step 3: Whip Up the Cheesecake Filling
In a large bowl, beat the softened cream cheese until it becomes smooth and fluffy—this is what will make your cheesecake filling luxuriously creamy. Add the powdered sugar and vanilla extract, mixing until everything is fully combined and silky. In a separate chilled bowl, whip the cold heavy cream along with the granulated sugar until stiff peaks form. Gently fold the whipped cream into the cream cheese mixture, maintaining the airy, light texture that makes this filling such a treat.
Step 4: Assemble Your Cheesecake Tacos
Now the fun really begins. Spoon or pipe the fluffy cheesecake filling into each prepared taco shell, filling them generously. For that finishing touch, sprinkle the tops with the remaining Fruity Pebbles cereal, adding extra color, crunch, and a nostalgic punch. Place your filled tacos in the refrigerator for about 20 minutes—this chilling step allows the filling to set just right for the best mouthfeel and taste.
How to Serve Fruity Pebbles Cheesecake Tacos Recipe
Garnishes
Elevate your Fruity Pebbles Cheesecake Tacos Recipe by drizzling melted white chocolate over the top just before adding the final sprinkle of cereal. For extra flair, toss on some fresh berries or a mint leaf to create contrast and freshness. A light dusting of powdered sugar adds a pretty, sweet finish.
Side Dishes
These vibrant cheesecake tacos shine on their own but pair beautifully with a chilled glass of fruity sangria, lemonade, or even a scoop of vanilla ice cream. Fresh fruit salad is another great side, complementing the fruity crunch while keeping the dessert experience bright and refreshing.
Creative Ways to Present
Think beyond plates! Serve your Fruity Pebbles Cheesecake Tacos Recipe in a colorful taco holder or on a platter lined with edible flowers for a festive touch. Consider stacking them into a “taco tower” or even serving mini versions for bite-sized delight at parties. Presentation is a playground here, so have fun making these as eye-catching as they are delicious.
Make Ahead and Storage
Storing Leftovers
If you have leftovers (and you might, if you manage to resist eating them all at once), store the cheesecake tacos in an airtight container in the refrigerator. They will keep well for up to 2 days. Be mindful that the shells might lose some of their crispness over time, so chilling is best for short-term enjoyment.
Freezing
Freezing is not recommended for this recipe because the texture of the cream cheese filling and the crispy shells will be compromised. The cereal coating can become soggy when thawed, and the filling may separate or become grainy.
Reheating
Reheating isn’t ideal either since these tacos are best enjoyed cold or at room temperature to preserve their unique textures. If you’d like to crisp up the shells again, briefly warm them separately in a toaster oven before filling, but avoid reheating the assembled tacos.
FAQs
Can I use other cereals instead of Fruity Pebbles?
Absolutely! While Fruity Pebbles give this recipe its signature color and fruity flavor, you can experiment with other colorful or fruity cereals like Trix or Fruit Loops for a fun twist. Just keep in mind that each cereal’s texture and sweetness vary.
What can I substitute for cream cheese if I have dietary restrictions?
You can try using vegan cream cheese alternatives or a dairy-free whipped topping, but you may need to adjust the sweetness and texture. The taste might differ, but it’s a great option for those avoiding dairy.
How can I make this recipe ahead for a party?
Prepare the taco shells and filling separately up to a day in advance. Keep the shells at room temperature and the filling refrigerated. Assemble the tacos shortly before serving to keep shells crisp and fresh.
Are these tacos gluten-free?
The recipe uses flour tortillas which contain gluten. To make gluten-free Fruity Pebbles Cheesecake Tacos, substitute with gluten-free tortillas or consider making edible taco shells from gluten-free alternatives.
Can I prepare these without baking the tortillas?
Baking is essential to get the crispy taco shell texture. Unbaked tortillas will be too soft and won’t hold the filling properly, so it’s best not to skip this step.
Final Thoughts
The Fruity Pebbles Cheesecake Tacos Recipe is one of those delightful surprises that combines childhood fun with sophisticated flavor in the best possible way. Whether you’re serving them at a party or indulging in a sweet treat at home, these tacos are guaranteed to bring color, joy, and creaminess to your dessert table. Give this recipe a try—you’ll be creating happy memories bite by bite!
Print
Fruity Pebbles Cheesecake Tacos Recipe
- Prep Time: 20 minutes
- Cook Time: 9 minutes
- Total Time: 29 minutes
- Yield: 10 tacos
- Category: Dessert
- Method: Baking
- Cuisine: American
- Diet: Vegetarian
Description
Delight in these Delicious Fruity Pebbles Cheesecake Tacos, a fun and colorful dessert perfect for parties and family gatherings. Crispy baked flour tortillas are coated with melted white chocolate and loaded with a fluffy, no-bake cheesecake filling, then topped with vibrant Fruity Pebbles cereal for a crunchy, sweet finish.
Ingredients
Taco Shells
- 10 small flour tortillas
- 3 tablespoons melted butter
- About 2 cups Fruity Pebbles cereal (divided)
- 1 cup white chocolate chips, melted
- 2 tablespoons milk (optional, for thinning chocolate)
Cheesecake Filling
- 16 ounces cream cheese, softened
- 1 cup powdered sugar
- 1 teaspoon vanilla extract
- 1 cup heavy whipping cream, cold
- 1 tablespoon granulated sugar
Garnish
- Additional Fruity Pebbles cereal for topping
Instructions
- Prepare Taco Shells: Preheat the oven to 375°F. Lightly brush both sides of each tortilla with melted butter. Shape the tortillas into taco shells by pressing them into the spaces between bars of an inverted muffin tin or draping them over oven rack bars to create a taco shape.
- Bake Shells: Place the shaped tortillas in the oven and bake for 7 to 9 minutes until they are crisp and lightly golden. Remove from the oven and let them cool completely to harden and maintain shape.
- Melt White Chocolate: In a microwave-safe bowl, melt the white chocolate chips in short intervals, stirring between each until smooth. If the chocolate is too thick, add milk a little at a time to thin it out for easier dipping.
- Coat Shells with Chocolate and Cereal: Dip the inside of each cooled taco shell into the melted white chocolate, then immediately sprinkle about 1 cup of Fruity Pebbles cereal inside so it sticks to the chocolate. Set aside the coated shells to allow the chocolate to harden.
- Make Cheesecake Filling: In a large bowl, beat the softened cream cheese until smooth and fluffy. Add powdered sugar and vanilla extract and mix well until fully combined.
- Whip Cream: In a separate chilled bowl, whip the cold heavy cream with granulated sugar until stiff peaks form.
- Combine Filling and Cream: Gently fold the whipped cream into the cream cheese mixture until light and creamy, maintaining a fluffy texture.
- Fill Taco Shells: Spoon or pipe the cheesecake filling into each prepared taco shell evenly.
- Add Final Toppings: Sprinkle the tops of the filled tacos with the remaining Fruity Pebbles cereal for added color and crunch.
- Chill Before Serving: Refrigerate the filled tacos for about 20 minutes to achieve the best texture before serving.
Notes
- For extra flavor, drizzle melted white chocolate over the filled tacos before adding the final cereal topping.
- These tacos are best served the same day to keep the shells crispy.
- Store any leftovers in an airtight container in the refrigerator for up to 2 days.


