Halloween Cookies Recipe
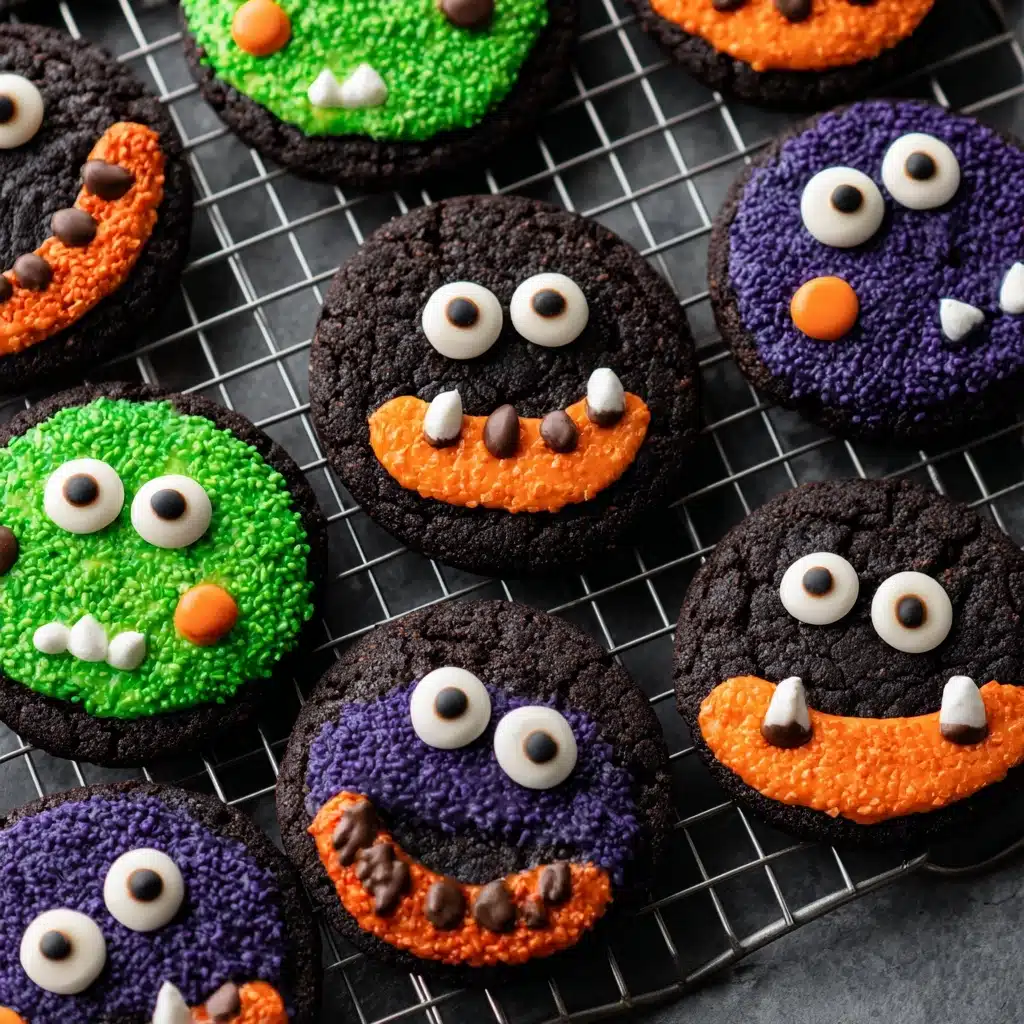
Get ready to transform your kitchen into a spooky (but oh-so-sweet) wonderland with these vibrant, irresistibly soft Halloween Cookies! Each bite brings together the buttery comfort of a classic sugar cookie and the playful crunch of colored sprinkles, all topped off with googly candy eyes or festive Halloween decorations. Whether you’re baking for a party, classroom treat, or simply making memories with your favorite ghouls, these cookies bring a burst of color, fun, and nostalgia to every October gathering.

Ingredients You’ll Need
You won’t believe how a handful of everyday, pantry ingredients can turn into the most showstopping Halloween Cookies. Every ingredient here plays a starring role, whether it’s in building that perfect soft texture, boosting the flavor, or jazzing up the festive appearance. Let’s break it down so each cookie comes out just right!
- All-purpose flour: Gives the cookies structure for the perfect bite.
- Baking soda: Adds lift and ensures the cookies stay soft and puffy.
- Baking powder: Works with the baking soda to create tenderness with a hint of rise.
- Salt: Enhances flavors and balances the sweetness beautifully.
- Unsalted butter (softened): The secret to that dreamy, rich taste and soft texture.
- Granulated sugar: Sweetens each bite and helps create those crisp edges.
- Large egg: Binds everything together and adds moisture.
- Vanilla extract: Essential for that classic sugar cookie aroma.
- Almond extract (optional): Adds a whisper of nutty flavor for a delightful surprise.
- Orange and black sanding sugar or colored sprinkles: The easiest way to create festive, eye-popping colors.
- Candy eyes or Halloween-themed decorations: Instantly transform each cookie into a playful Halloween masterpiece!
How to Make Halloween Cookies
Step 1: Prep Your Oven and Baking Sheets
Start by heating your oven to 375°F (190°C) so it’s ready when your dough is. Line two baking sheets with parchment paper, which will keep your cookies from sticking and also makes cleanup a breeze. Having everything prepped lets you focus on the fun part—decorating your Halloween Cookies!
Step 2: Mix the Dry Ingredients
In a medium bowl, whisk together the all-purpose flour, baking soda, baking powder, and salt. This ensures everything is distributed evenly, so your cookies bake up consistent with just the right amount of lift and softness.
Step 3: Cream Butter and Sugar
In your largest bowl, beat the softened butter and granulated sugar together until the mixture is pale and fluffy, about 2 to 3 minutes. This step creates air pockets for a light, tender cookie. Don’t rush—it makes a real difference!
Step 4: Add Egg and Extracts
Now blend in the egg, vanilla extract, and almond extract if you’re using it. Beat until fully combined and the dough smells wonderfully fragrant. This is the step where those cozy, bakery-style aromas really start to fill your kitchen.
Step 5: Combine Wet and Dry Mixtures
Gradually add your dry ingredients to the wet mixture, mixing until a soft dough forms. Take care not to overmix—stop as soon as all the flour disappears. You’ll end up with a dough that’s easy to roll without being sticky.
Step 6: Shape and Decorate
Roll the dough into 1-inch balls, then roll each ball in orange and black sanding sugar (or colored sprinkles) for instant festive flair. Place them on your prepared sheets about 2 inches apart. For even more personality, gently press candy eyes or Halloween decorations into the tops. Now you’re really bringing your Halloween Cookies to life!
Step 7: Bake and Cool
Bake for 8 to 10 minutes, just until the edges are a subtle golden color. You want soft middles with barely crisp edges. Let the cookies cool on the pan for 5 minutes before moving to a wire rack, ensuring they set up perfectly firm but still tender.
How to Serve Halloween Cookies
Garnishes
A sprinkle of extra colored sugar or a drizzle of melted white chocolate webs instantly ups the wow factor. Don’t forget more candy eyes—they’re a hit with kids and make your cookies extra eye-catching for Halloween night.
Side Dishes
Serve your Halloween Cookies with mugs of hot apple cider, pumpkin spice lattes, or cold glasses of milk for an unbeatable autumn treat. For party spreads, combine them with a bowl of clementines (painted like jack-o-lanterns) or a platter of spooky gummy candies.
Creative Ways to Present
Pile your Halloween Cookies on a platter surrounded by faux spider webs, or tuck a few into clear treat bags tied with orange ribbon for adorable party favors. Arrange them on a black cake stand or use mini cauldrons for individual servings—the spookier and brighter, the better!
Make Ahead and Storage
Storing Leftovers
Store cooled Halloween Cookies in an airtight container at room temperature for up to 5 days. Place layers of parchment or wax paper between each row to keep decorations and sprinkles from sticking together.
Freezing
These cookies freeze beautifully! Once cooled, stack them in an airtight freezer-safe container with sheets of parchment between layers. They’ll keep for up to 2 months and still taste fresh when thawed on the counter.
Reheating
To bring your Halloween Cookies back to that just-baked softness, warm them on a baking sheet in a 300°F (150°C) oven for 2 to 3 minutes. If you’re short on time, a quick 5–10 seconds in the microwave also revives that lovely, soft texture.
FAQs
Can I make the dough ahead of time?
Absolutely! The dough for Halloween Cookies can be prepared up to 2 days in advance and chilled in the refrigerator. Just cover tightly so it doesn’t dry out, and let it soften a bit before shaping and baking.
Do I have to use candy eyes and sprinkles?
Not at all! Feel free to get creative with icing, mini chocolate chips, or different colors of sanding sugar. The fun of Halloween Cookies is making them your own, whether you go all out with decorations or keep it simple and classic.
Can I use cookie cutters for shaped cookies?
Yes! This dough works well for rolling out and cutting into shapes if you’d like to make ghosts, pumpkins, or bats. Just dust your rolling pin and countertop with a bit of flour to prevent sticking.
What if I don’t have almond extract?
No problem—just use a bit more vanilla extract, or leave it out altogether. The almond extract is optional and simply adds a little extra depth to the flavor.
How do I prevent my cookies from spreading too much?
Make sure your butter isn’t overly soft and don’t skip chilling the dough if your kitchen is warm. Arranging the balls well apart on the tray and baking on parchment also helps keep your Halloween Cookies perfectly shaped.
Final Thoughts
I hope you have as much fun making—and eating—these Halloween Cookies as I do every year. They’re festive, flavorful, and sure to bring a little extra magic to your spooky celebrations. Dig in, share with friends, and let your creativity shine!
Print
Halloween Cookies Recipe
- Total Time: 25 minutes
- Yield: 30 cookies 1x
- Diet: Vegetarian
Description
These Halloween cookies are the perfect festive treat for spooky season! With a buttery, vanilla-almond flavored dough rolled in colorful sanding sugar and topped with fun decorations, they’re a hit with kids and adults alike.
Ingredients
Dry Ingredients:
- 2 3/4 cups all-purpose flour
- 1 teaspoon baking soda
- 1/2 teaspoon baking powder
- 1/2 teaspoon salt
Wet Ingredients:
- 1 cup unsalted butter, softened
- 1 1/2 cups granulated sugar
- 1 large egg
- 1 teaspoon vanilla extract
- 1/2 teaspoon almond extract (optional)
Decorations:
- Orange and black sanding sugar or colored sprinkles
- Candy eyes or Halloween-themed decorations
Instructions
- Preheat the oven: Preheat the oven to 375°F (190°C) and line two baking sheets with parchment paper.
- Prepare the dough: Whisk together the dry ingredients in a medium bowl. In a large bowl, beat butter and sugar until fluffy. Add egg, vanilla extract, and almond extract. Gradually mix in the dry ingredients to form a dough.
- Shape and decorate: Roll dough into balls, coat with sanding sugar or sprinkles, and place on baking sheets. Press on candy eyes or decorations.
- Bake: Bake for 8 to 10 minutes until edges are golden. Cool on the pan before transferring to a wire rack.
Notes
- Get creative with shapes and decorations!
- Dough can be made ahead and chilled.
- Prep Time: 15 minutes
- Cook Time: 10 minutes
- Category: Dessert
- Method: Baking
- Cuisine: American
Nutrition
- Serving Size: 1 cookie
- Calories: 130
- Sugar: 10g
- Sodium: 75mg
- Fat: 6g
- Saturated Fat: 4g
- Unsaturated Fat: 2g
- Trans Fat: 0g
- Carbohydrates: 18g
- Fiber: 0g
- Protein: 1g
- Cholesterol: 20mg
