Homemade Rock Candy Recipe
There’s something truly magical about making Homemade Rock Candy in your own kitchen. With just a handful of everyday ingredients and a dash of patience, you can transform humble sugar and water into dazzling, sparkling candy sticks that look like they belong in a candy shop window. Whether you’re crafting these colorful treats with kids, surprising guests at a party, or just satisfying your inner child, Homemade Rock Candy is a sweet science experiment and nostalgic delight all at once.

Ingredients You’ll Need
The beauty of Homemade Rock Candy lies in its simplicity—each ingredient has a starring role in the final, crystalline masterpiece. From the granulated sugar that forms every shimmering crystal to the optional flavorings and colorings that make each stick uniquely yours, every component has its purpose.
- Water: The essential base that dissolves the sugar and sets the stage for crystal formation.
- Granulated Sugar: Go for plain white sugar—this is what builds the candy’s iconic crystals and gives them structure and sparkle.
- Extra Sugar (for coating): Rolling your skewers in sugar gives the crystals a head start and ensures beautiful growth.
- Food Coloring (optional): Just a drop or two transforms your rock candy into a vibrant, eye-catching treat. Choose your favorite shades!
- Flavored Extract (optional): A little vanilla, cherry, or peppermint extract adds a fun twist to the traditional sweet flavor.
- Wooden Skewers or Cotton Strings: These serve as the “backbone” for your sugar crystals to cling to as they grow.
- Clothespins or Clips: These handy tools keep your skewers or strings perfectly suspended in the jars.
- Glass Jars: Clean, clear jars help you watch the magic happen and prevent contamination while your candy grows.
How to Make Homemade Rock Candy
Step 1: Prep the Skewers or Strings
Dampen your wooden skewers or cotton strings with a bit of water, then roll them in granulated sugar to coat thoroughly. Set them aside and let them dry completely—this sugary layer acts like a road map for crystal growth, giving your Homemade Rock Candy a perfect surface to start its transformation.
Step 2: Make the Sugar Syrup
In a medium saucepan, bring the water to a gentle boil over medium heat. Gradually add the sugar, about one cup at a time, stirring constantly and patiently waiting for each addition to dissolve before adding the next. This method ensures you get a super-saturated sugar solution, which is key for those big, beautiful crystals.
Step 3: Add Color and Flavor
Once every grain of sugar is dissolved and your syrup is clear, remove the pan from heat. If you want to get creative, now’s the time to stir in a drop or two of food coloring and your favorite flavored extract. These simple additions transform your Homemade Rock Candy into a custom treat, ready to match any celebration or mood.
Step 4: Cool and Pour
Let the sugar syrup cool for about 10 to 15 minutes. Carefully pour it into clean glass jars, giving each stick or string its own space to shine. Be sure your jars are squeaky clean—you want only sugar crystals forming, not anything unwanted!
Step 5: Set the Skewers and Wait
Suspend your prepared skewers or strings in the jars so they hang down the middle without touching the sides or bottom. Secure each one with a clothespin or clip balanced across the jar’s mouth. Loosely cover the top with a paper towel to keep dust out, and then set the jars in a quiet spot at room temperature. Now comes the hardest part: waiting 5 to 7 days while your crystals slowly grow!
Step 6: Harvest and Dry
When your Homemade Rock Candy has reached the perfect size, remove the sticks from the jars. Let them dry on a clean surface for an hour or two; this ensures they’re crisp, not sticky, and ready for eating or gifting.
How to Serve Homemade Rock Candy

Garnishes
Rock candy is a star all on its own, but you can make it pop even more with playful garnishes. Dip the finished sticks in a bit of colored sanding sugar or edible glitter for extra sparkle. If you’re feeling festive, wrap each stick with a ribbon or add a tiny tag for a personalized touch.
Side Dishes
Serve your Homemade Rock Candy alongside a cup of hot tea or coffee—the crystals look gorgeous perched on the side of a mug and can even sweeten your drink as they dissolve. They’re also a fun addition to dessert platters or as an edible centerpiece at parties.
Creative Ways to Present
Presentation is half the fun! Arrange a rainbow of rock candy sticks in a clear vase for a dazzling table display, or tuck them into little cellophane bags for party favors. For a science-themed birthday or event, set up a “candy lab” and let guests watch the crystals grow over several days.
Make Ahead and Storage
Storing Leftovers
To keep your Homemade Rock Candy as crisp and beautiful as the day it was made, store it in an airtight container at room temperature. Avoid humid places, as moisture can make the crystals sticky or cause them to dissolve.
Freezing
Freezing isn’t recommended for rock candy—the moisture from thawing can ruin the crystalline texture. It’s best to store your candy at room temperature and away from direct sunlight.
Reheating
Rock candy doesn’t require reheating, but if it becomes slightly sticky, you can let it air dry on a wire rack in a cool, dry place. If you’re using it to sweeten hot drinks, just stir and enjoy as the crystals slowly melt.
FAQs
Can I use natural food colorings for Homemade Rock Candy?
Absolutely! Feel free to use plant-based or natural food dyes for a more wholesome twist. Just be aware that natural colorings can sometimes be less vibrant, but they’ll still make your rock candy look gorgeous.
Why didn’t my crystals grow?
If your crystals didn’t form, it could be due to a few culprits: the sugar solution wasn’t saturated enough, the skewers weren’t properly coated with sugar, or the jars were disturbed during the growing period. Make sure to follow each step closely and give your jars a peaceful, undisturbed spot.
How do I make multiple colors and flavors?
Once your sugar syrup is ready, simply divide it into separate jars and add a different food coloring and extract to each one. This way, you can create a rainbow of Homemade Rock Candy sticks, each with its own unique flavor!
Is Homemade Rock Candy safe for young kids to make?
Homemade Rock Candy is a fantastic kitchen science project for kids, but adult supervision is a must—especially during the boiling and pouring steps. Once the syrup is safely in the jars, kids can watch the crystals grow day by day.
How long does Homemade Rock Candy last?
Stored properly in an airtight container, your Homemade Rock Candy can stay fresh and delicious for up to several weeks. Just keep it away from humidity and heat for best results.
Final Thoughts
There’s nothing quite like the excitement of watching Homemade Rock Candy crystals appear day after day—it’s a treat that tastes as delightful as it looks! Whether you’re making memories with family or adding a touch of whimsy to your next party, this recipe is guaranteed to bring sweet smiles all around. Gather your ingredients and give it a try—you’ll be amazed by what a little sugar and science can do!
Print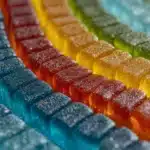
Homemade Rock Candy Recipe
- Total Time: 7 days (including crystal growth time)
- Yield: 6 rock candy sticks 1x
- Diet: Vegetarian
Description
Homemade Rock Candy is a fun and simple dessert project that transforms sugar crystals into edible, sparkling candy sticks. Perfect for kids and adults alike, this recipe offers a delightful science-based activity with customizable flavors and colors using natural extracts and food coloring.
Ingredients
Ingredients
- 2 cups water
- 5 cups granulated sugar (plus extra for coating sticks)
- 1–2 drops food coloring (optional)
- 1/2 teaspoon flavored extract (optional, such as vanilla, cherry, or peppermint)
- Wooden skewers or cotton strings
- Clothespins or clips
- Glass jars
Instructions
- Prepare Sticks: Dampen the wooden skewers or cotton strings lightly, then roll them in granulated sugar to coat evenly. Allow them to dry completely. This sugar coating encourages crystal formation on the sticks.
- Make Sugar Solution: In a medium saucepan over medium heat, bring 2 cups of water to a gentle boil. Gradually add 5 cups of granulated sugar, about 1 cup at a time, stirring continuously until each addition is fully dissolved and the solution becomes clear before adding more.
- Add Flavor and Color: Remove the sugar solution from heat and stir in 1–2 drops of food coloring and 1/2 teaspoon of flavored extract, if desired, to customize your rock candy.
- Cool the Solution: Let the sugar syrup cool for 10–15 minutes to slightly thicken and avoid cracking the jars or melting the coating on the sticks.
- Set Up Jars: Carefully pour the solution into clean glass jars. Suspend one prepared sugar-coated skewer or string in each jar, making sure it hangs in the center without touching sides or bottom, securing it with a clothespin or clip over the jar opening.
- Grow Crystals: Cover the jars loosely with paper towels and allow the setup to sit undisturbed at room temperature for 5–7 days to allow crystals to form and grow on the sticks.
- Dry and Serve: Once the rock candy has reached preferred size, remove from jars and let dry for 1–2 hours before enjoying or packaging for gifts or storage.
Notes
- Ensure jars are clean and dry before use to avoid contamination or mold.
- You can experiment with different food coloring and flavored extracts by dividing the syrup into smaller batches for variety.
- This is a great science experiment for children but requires adult supervision due to hot sugar handling.
- Do not disturb the jars during crystal formation to allow proper growth.
- Use food-safe sticks or strings to ensure safety for consumption.
- Prep Time: 20 minutes
- Cook Time: 10 minutes
- Category: Dessert
- Method: Stovetop + Resting
- Cuisine: American
Nutrition
- Serving Size: 1 stick
- Calories: 180
- Sugar: 45g
- Sodium: 0mg
- Fat: 0g
- Saturated Fat: 0g
- Unsaturated Fat: 0g
- Trans Fat: 0g
- Carbohydrates: 45g
- Fiber: 0g
- Protein: 0g
- Cholesterol: 0mg


