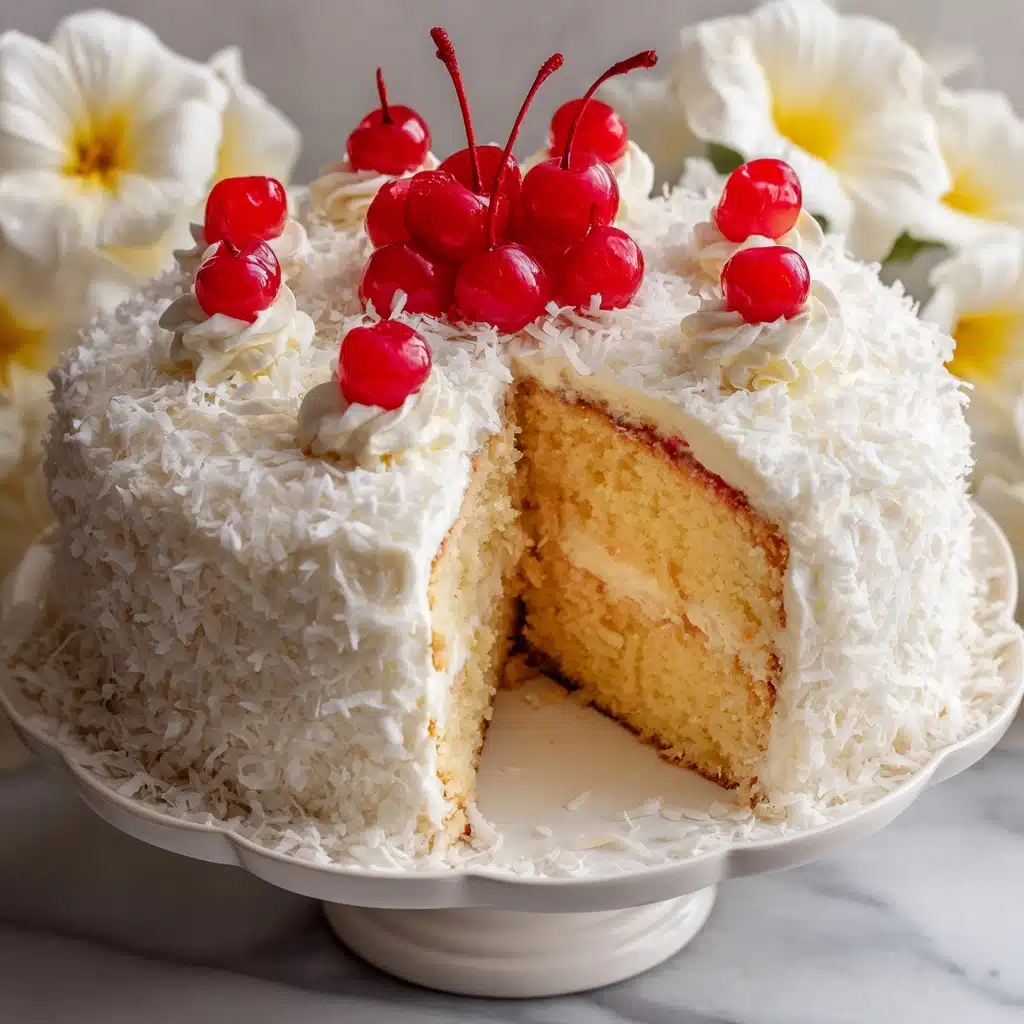
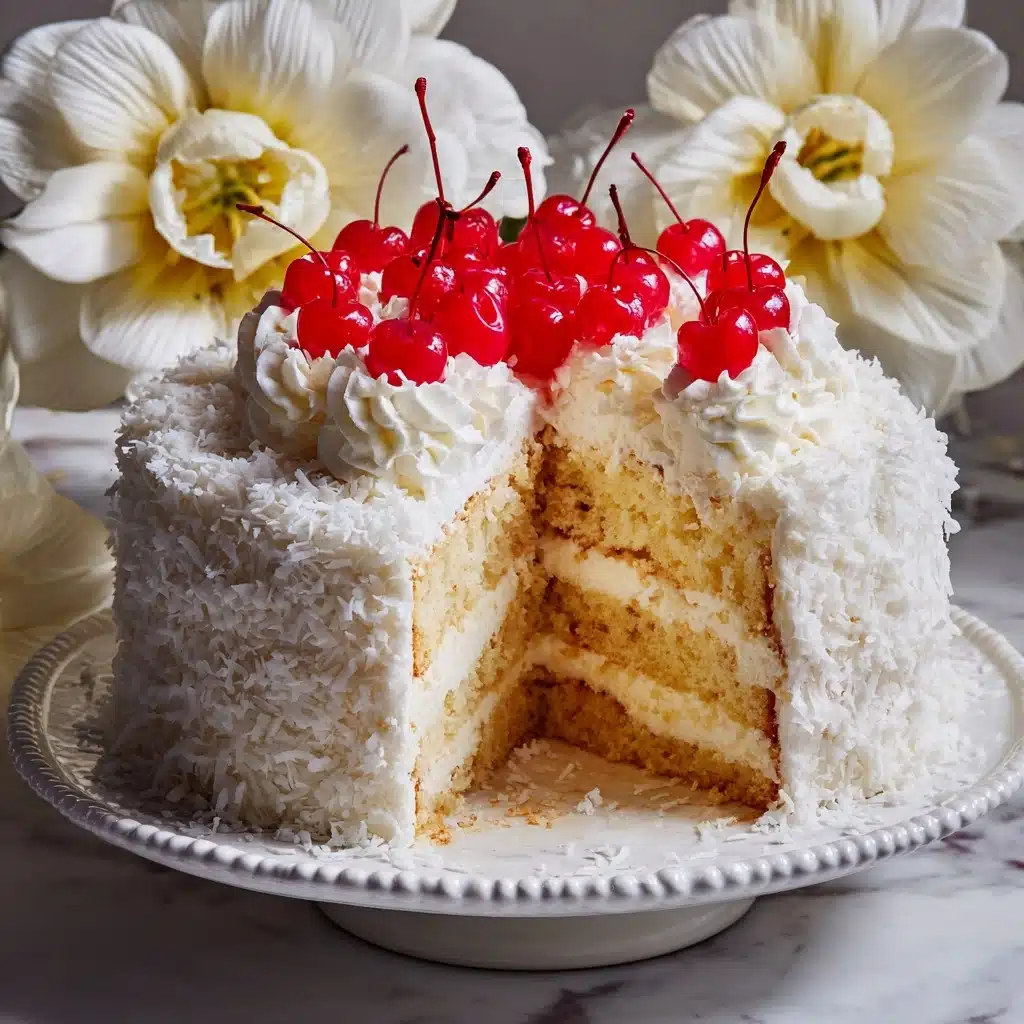
Old-Fashioned Snowball Cake Recipe
Get ready to make a showstopper, because the Old-Fashioned Snowball Cake isn’t just a dessert—it’s a time machine back to those magical, joy-filled celebrations of yesteryear. Imagine layers of chocolate cake, fluffy whipped cream, tangy cream cheese, bright gelatin, and sweet pineapple all cloaked in a flurry of coconut. The result? A slice of festive nostalgia that tastes as fun and whimsical as it looks. This cake is the definition of comfort: each creamy, cloud-like bite delivers old-fashioned flavor and a sense of pure celebration, making the Old-Fashioned Snowball Cake a must-have for any gathering or special occasion.
Ingredients You’ll Need
You won’t believe how a handful of classic, easy-to-find ingredients weave together to create this irresistibly fun and flavorful dessert. Every component plays a crucial role—whether adding chocolatey richness, fruity brightness, pillowy texture, or a whimsical blanket of coconut that brings the Old-Fashioned Snowball Cake to life.
- Cake Mix: A box of chocolate cake mix forms the rich, chocolatey base; use the eggs, oil, and water as directed for the perfect crumb.
- Strawberry or Cherry Gelatin: A burst of fruit-flavored gelatin lends color and that signature hint of fruity fun.
- Hot and Cold Water: Dissolves the gelatin smoothly and helps the flavors meld into the creamy filling.
- Cream Cheese: Softened cream cheese adds luscious tang and richness to the creamy mixture.
- Granulated Sugar: Just enough to sweeten the filling and balance the tartness of the fruit and cream cheese.
- Crushed Pineapple: Drained well so the cake isn’t soggy—pineapple brings a delightful pop of tropical juiciness.
- Mini Marshmallows: These are the secret to that fun, pillowy, and slightly chewy texture hiding inside every bite.
- Whipped Topping: Whether you use Cool Whip or homemade, it’s what keeps the whole mixture dreamy and light.
- Sweetened Shredded Coconut: The cake’s snowy, whimsical finish—don’t skimp! Coconut is what gives the Old-Fashioned Snowball Cake its name and irresistible texture.
How to Make Old-Fashioned Snowball Cake
Step 1: Bake the Chocolate Cake
Prepare your chocolate cake mix according to the package instructions, using the recommended eggs, oil, and water. Bake it in a 9×13-inch pan, and then let it cool completely. This wait might test your patience, but a fully cooled cake is essential for achieving those wonderful, chunk-like bites later in the recipe.
Step 2: Prepare the Gelatin
In a small bowl, dissolve your strawberry or cherry gelatin in half a cup of hot water. Once that’s smooth, stir in the cold water. Let this mixture cool just a bit—you want it to be chilly but not set, so it blends easily into the creamy filling and doesn’t turn lumpy.
Step 3: Make the Creamy Filling
In a large bowl, beat together softened cream cheese and sugar until you have a luxuriously smooth and slightly fluffy base. This is the anchor for all that delicious fruit and marshmallow—never skip out on beating until totally smooth to avoid any lumps in your finished cake.
Step 4: Add Fruit and Marshmallows
Gently mix in the well-drained crushed pineapple and those delightful mini marshmallows. Pour in the slightly cooled gelatin and stir until fully combined. The marshmallows will soften a bit overnight, delivering that magical, nostalgic texture that defines a true Old-Fashioned Snowball Cake.
Step 5: Fold in the Whipped Topping
Now, fold in the whipped topping. This step is key—fold, don’t stir aggressively, so everything stays light and fluffy. This is the moment when your filling transforms into something irresistible: creamy, slightly fruity, and perfectly sweet.
Step 6: Combine Cake and Cream Mixture
Take your cooled cake and break it into large, slightly uneven chunks—don’t worry about precision; rustic is perfect for this recipe! Gently fold these cake pieces into the creamy mixture, taking care not to overmix. You want islands of cake surrounded by a sea of luscious filling.
Step 7: Create the Snowball Shape
Line a large mixing bowl with plastic wrap and sprinkle the bottom and sides generously with shredded coconut. This not only helps with easy release but creates that signature snowy coating. Spoon in your cake-and-cream mixture, pressing gently to fill every corner (but don’t compact it too much). Sprinkle the top (which will become the bottom when unmolded) with more coconut, cover, and let it chill for at least 4 hours, but overnight is even better for melding all those glorious flavors.
Step 8: Unmold and Serve
When you’re ready to wow your guests, invert the bowl onto a serving plate and carefully peel away the plastic wrap for a perfect dome of coconut-coated deliciousness. Slice, serve, and listen for the delighted “oohs” and “aahs”—your Old-Fashioned Snowball Cake is ready to shine!
How to Serve Old-Fashioned Snowball Cake
Garnishes
Take your Old-Fashioned Snowball Cake to the next level with some playful garnishes. Scatter a few extra mini marshmallows and maraschino cherries across the snowy coconut dome, or sprinkle a touch of grated chocolate on top if you want to echo the rich chocolate layer inside. For extra sparkle, a light dusting of powdered sugar is a festive touch that looks lovely in photos and on the dessert table.
Side Dishes
Pair your cake with a crisp fruit salad—think strawberries, pineapple, or oranges—to echo the cake’s fruity notes and add a refreshing contrast. A scoop of vanilla bean ice cream is another classic pairing; it’s wonderfully creamy and simple, balancing the sweet, textured bite of the Old-Fashioned Snowball Cake beautifully. And, of course, a hot cup of coffee or a creamy latte never goes amiss!
Creative Ways to Present
Want to truly dazzle a crowd? Make mini, individual snowball cakes by using small bowls or ramekins lined with plastic wrap and coconut. You can even try alternating layers of filling and cake for a stunning trifle effect in a clear glass bowl, showcasing those vibrant fruity and chocolatey layers. For holiday gatherings, serve slices with festive toothpicks or edible glitter for a bit of vintage glam!
Make Ahead and Storage
Storing Leftovers
Leftovers of Old-Fashioned Snowball Cake store beautifully in the fridge, tightly covered with plastic wrap. The flavors continue to meld, making each subsequent bite just as dreamy as the first. Plan to enjoy within 3-4 days for the best texture and taste—the marshmallows soften, the coconut stays fluffy, and the cake remains moist.
Freezing
Yes, you can freeze Old-Fashioned Snowball Cake! Wrap slices (or the whole cake) tightly in plastic wrap and then in foil, and stash in the freezer for up to a month. Thaw overnight in the fridge when you’re ready for a retro dessert fix. Keep in mind the coconut and marshmallows might be a touch softer after freezing, but the flavor will still sing.
Reheating
This is a no-bake, chilled dessert, so skip the oven or microwave. The Old-Fashioned Snowball Cake tastes best straight from the fridge, with its cool, creamy texture and refreshing fruity flavors. If you’ve frozen it, just allow the cake to thaw thoroughly in the fridge before serving.
FAQs
Can I substitute other flavors of gelatin?
Absolutely! Strawberry and cherry are classic choices for their color and flavor, but raspberry, orange, or even lime gelatin would create fun, fruity variations. Just make sure to use the same quantity and method for dissolving, and have fun experimenting with your favorites.
Do I have to use chocolate cake?
Chocolate cake provides that signature old-fashioned richness, but if you’re feeling adventurous, vanilla or even red velvet cake can be delicious alternatives. Each kind of cake brings its own unique character to the snowball, so follow your cravings!
What’s the best way to keep the coconut from sticking to the bowl?
Lining your mixing bowl with plastic wrap is the secret to an easy release, while a generous sprinkle of coconut on both the plastic and the top of your cake mixture ensures the “snowball” effect all around. When you unmold, the coconut comes right with it for a perfect, snowy finish.
Can I make Old-Fashioned Snowball Cake ahead of time?
Yes, and it’s actually encouraged! The cake needs at least 4 hours to chill (overnight is ideal), which makes it a great make-ahead dessert for parties or potlucks. You can even prep a day or two in advance—just keep it well-wrapped in the fridge until it’s time to serve.
Is there a way to make it less sweet?
If you prefer a less sweet version, try reducing the sugar in the cream cheese filling slightly or opt for unsweetened coconut. You could also use a homemade whipped cream (with less sugar) in place of commercial whipped topping for a lighter touch.
Final Thoughts
There’s just something about the Old-Fashioned Snowball Cake that brings out smiles and happy memories at any table. If you’re after a dessert that’s as eye-catching as it is delicious, full of fun flavors and irresistible texture, this is the recipe to try. Gather your ingredients, invite someone you love to help, and make a little magic in your kitchen—you’ll be glad you did!
Print
Old-Fashioned Snowball Cake Recipe
- Total Time: 5 hours (includes chilling time)
- Yield: 12 servings 1x
- Diet: Non-Vegetarian
Description
Indulge in the nostalgic charm of an Old-Fashioned Snowball Cake, a delightful dessert that combines the richness of chocolate cake with a luscious cream cheese and pineapple filling, all wrapped in sweet coconut flakes. Perfect for special occasions or a sweet treat any day!
Ingredients
For the Cake:
- 1 box (15.25 oz) chocolate cake mix (plus ingredients listed on the box: eggs, oil, water)
For the Filling:
- 1 package (3 oz) strawberry or cherry gelatin
- 1/2 cup hot water
- 1/2 cup cold water
- 1 package (8 oz) cream cheese (softened)
- 1 cup granulated sugar
- 1 can (20 oz) crushed pineapple (drained)
- 2 cups mini marshmallows
- 1 container (8 oz) whipped topping (like Cool Whip)
- 2 cups sweetened shredded coconut
Instructions
- Prepare the Cake: Bake the chocolate cake in a 9×13-inch pan according to package directions. Let cool.
- Prepare the Filling: Dissolve gelatin in hot water, then stir in cold water. In a bowl, beat cream cheese and sugar. Stir in pineapple, marshmallows, and gelatin. Fold in whipped topping.
- Assemble: Break cooled cake into chunks. Line a bowl with plastic wrap and coconut. Spoon in the cake mixture. Refrigerate for at least 4 hours.
- Serve: Invert the bowl onto a plate, remove plastic wrap.
Notes
- For a brighter color and fruity flavor, use strawberry gelatin.
- You can substitute homemade whipped cream for Cool Whip if preferred.
- Garnish with maraschino cherries for a festive touch.
- Prep Time: 25 minutes
- Cook Time: 30 minutes
- Category: Dessert
- Method: No-Bake (with baked cake base)
- Cuisine: American
Nutrition
- Serving Size: 1 slice
- Calories: 370
- Sugar: 32g
- Sodium: 320mg
- Fat: 18g
- Saturated Fat: 11g
- Unsaturated Fat: 6g
- Trans Fat: 0g
- Carbohydrates: 48g
- Fiber: 2g
- Protein: 4g
- Cholesterol: 45mg


