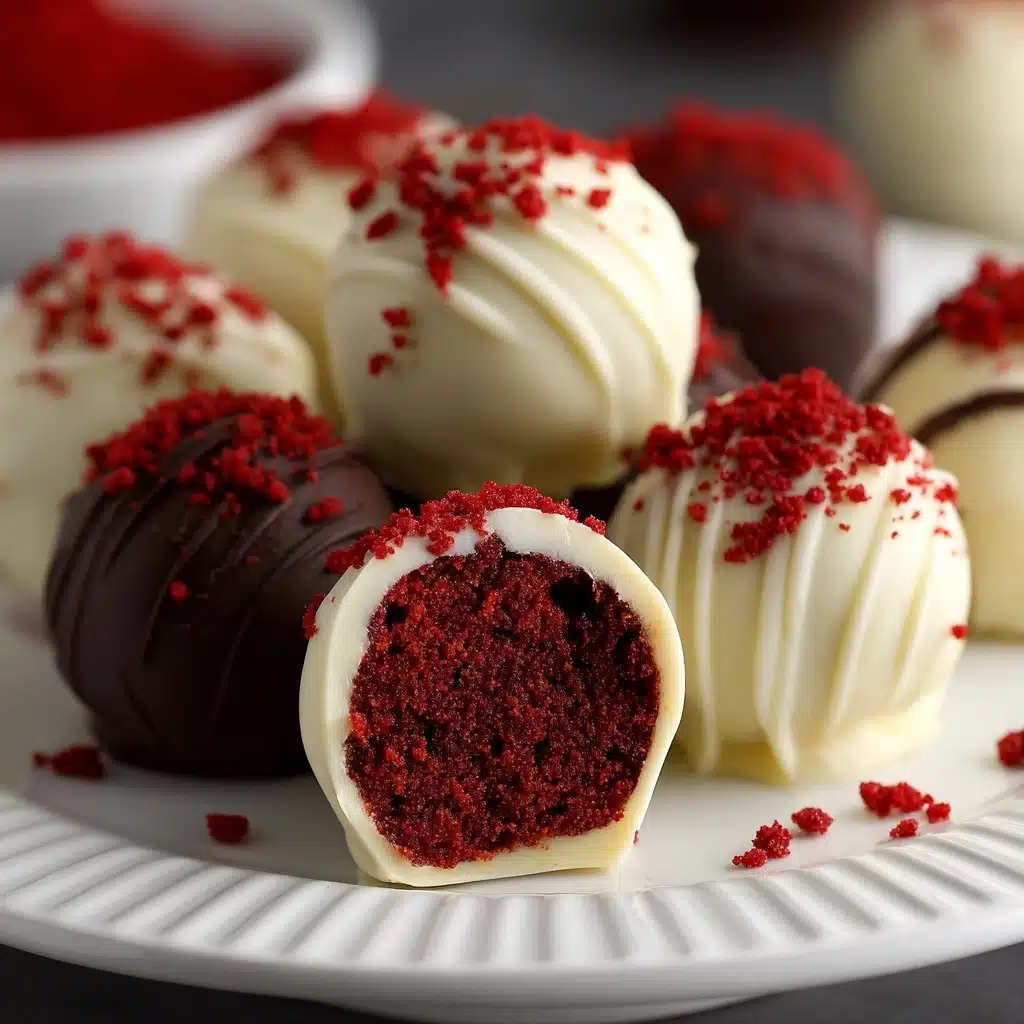
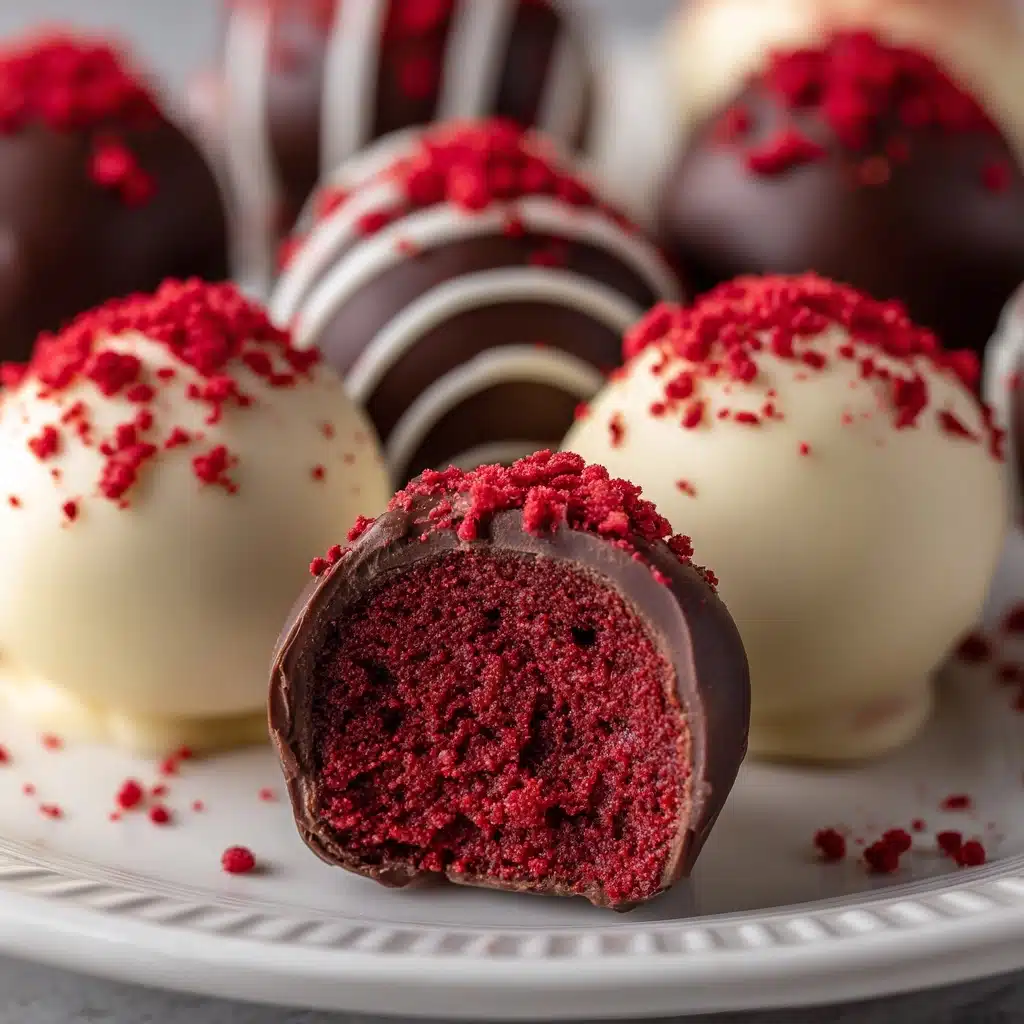
Red Velvet Cake Balls Recipe
Red Velvet Cake Balls are that irresistible treat you whip up when you want something decadent, with a playful twist. They combine the rich, chocolatey notes and scarlet hue of classic red velvet with a creamy, tangy interior, all enveloped in a crisp white chocolate shell. Each bite is a sweet little burst of comfort, making them an absolute favorite for holidays, gatherings, or when you just want to indulge your sweet tooth. Simple yet showstopping, they always disappear fast—so save a few for yourself!
Ingredients You’ll Need
Gathering a handful of simple ingredients is all it takes to create these dreamy cake balls. Each one serves a special role, shaping the texture, flavor, and iconic look that makes Red Velvet Cake Balls unforgettable.
- Red velvet cake mix: The star of the show, giving vibrant color and subtle cocoa flavor—just use the ingredients listed on the box to prepare it.
- Cream cheese (softened): Brings creaminess and a slightly tangy contrast that pairs perfectly with red velvet.
- Vanilla extract: Adds a warm aromatic note that rounds out the flavor.
- White chocolate or vanilla candy coating (melted): Creates that snappy, sweet outer shell—try candy melts for easier dipping!
- Red and white sprinkles (optional): For that festive, eye-catching finish and a bit of crunch on top.
How to Make Red Velvet Cake Balls
Step 1: Bake the Red Velvet Cake
Start by baking your red velvet cake according to the directions on the box. Let it bake until a toothpick comes out clean—don’t rush it! Once baked, let the cake cool completely. The cooler the cake, the easier it is to crumble without turning gummy.
Step 2: Crumble and Combine
Crumble the cooled cake into a large mixing bowl, breaking it down to fine crumbs with your hands or a fork. Add in the softened cream cheese and vanilla extract. This is where the magic happens—mix everything together until it forms a luscious, thick dough that holds together when squeezed.
Step 3: Roll into Balls
Scoop out about a tablespoon of the mixture and roll it between your palms to form 1-inch balls. Place them on a parchment-lined baking sheet, evenly spaced to prevent sticking. Take your time here; uniform balls look best when dipped!
Step 4: Chill
Refrigerate the cake balls for at least one hour, or pop them in the freezer for about 20 minutes. Chilling helps each piece firm up, so they don’t crumble or fall apart when you dip them into the melted coating.
Step 5: Dip and Decorate
Melt your white chocolate or candy coating as the package instructs. With a fork or dipping tool, submerge each chilled ball, letting the excess drip off before placing back on the parchment. While the coating is still wet, shower on some red and white sprinkles for sparkle and crunch. Let them set at room temperature, or refrigerate to speed up the process.
How to Serve Red Velvet Cake Balls
Garnishes
A little flourish goes a long way with Red Velvet Cake Balls! Before the coating sets, sprinkle them with shimmering red and white sprinkles or edible gold dust for a bit of glam. A drizzle of melted dark chocolate adds contrast and elegance.
Side Dishes
Serve alongside a mug of hot chocolate, rich coffee, or a scoop of vanilla ice cream. Their creamy centers pair wonderfully with creamy drinks or a tangy fruit platter for a tangy-sweet medley.
Creative Ways to Present
Display your cake balls nestled in pretty mini cupcake liners, arrange them in a tiered stand, or skewer them on sticks for cake pops. For holidays, box them up as gifts—just tie with a ribbon, and you’ve got the perfect homemade present.
Make Ahead and Storage
Storing Leftovers
Store any extra Red Velvet Cake Balls in an airtight container in the fridge. They’ll stay fresh and delicious for up to five days—though they usually disappear long before then!
Freezing
Want to make a batch ahead? Place the finished (and set) cake balls in a freezer-safe container, separating layers with parchment paper. They keep in the freezer for up to two months. Simply thaw them in the fridge before serving.
Reheating
No need to reheat these treats; they’re best enjoyed chilled or at room temperature. If frozen, just let them sit in the fridge until fully thawed for optimal texture.
FAQs
Can I use homemade red velvet cake instead of a box mix?
Absolutely! Homemade red velvet cake works beautifully. Just make sure it’s completely cooled before crumbling, and use enough cream cheese to bring the mixture together.
How do I prevent the white chocolate coating from cracking?
Let the cake balls come to room temperature for a few minutes before dipping if they’re very cold. Extreme temperature changes can make the coating crack, so a slight chill (not frozen solid) is just right.
Can I make Red Velvet Cake Balls in advance for a party?
Yes, these are perfect for making ahead. Their coating keeps them fresh and they hold up well for several days in the fridge, making them a party planner’s dream dessert.
What’s the best way to melt the chocolate for dipping?
You can melt white chocolate or candy coating in the microwave in short bursts, stirring between each, or use a double boiler on the stovetop. Just be gentle to avoid scorching the chocolate.
Are there any fun variations I can try?
Of course! Swap out the chocolate coating for dark or milk chocolate, or try mixing chopped nuts or cookie crumbs into the dough. You can even flavor the cream cheese with citrus zest or a splash of almond extract for a creative twist.
Final Thoughts
Red Velvet Cake Balls are pure happiness in a bite—festive, creamy, and downright addictive. If you’ve never tried making them, now is the perfect time! Gather your ingredients, get a little messy, and share these sweet treats with those you love. Chances are, they’ll become a new tradition in your home.
Print
Red Velvet Cake Balls Recipe
- Total Time: 1 hour 30 minutes (including chilling)
- Yield: 36 cake balls 1x
- Diet: Vegetarian
Description
Indulge in these delicious Red Velvet Cake Balls, perfect for any occasion. These bite-sized treats are a delightful combination of red velvet cake and creamy frosting coated in white chocolate and sprinkles.
Ingredients
Cake Balls:
- 1 box red velvet cake mix (plus ingredients listed on box)
- 1 (8 oz) package cream cheese, softened
- 1/2 teaspoon vanilla extract
Coating:
- 12 oz white chocolate or vanilla candy coating, melted
- red and white sprinkles (optional)
Instructions
- Bake the Red Velvet Cake: Follow the instructions on the cake mix box and let it cool completely.
- Prepare the Mixture: Crumble the cooled cake into a mixing bowl. Add cream cheese and vanilla extract. Mix until combined into a dough-like consistency.
- Form Cake Balls: Roll the mixture into 1-inch balls and place on a lined baking sheet. Chill in the fridge for 1 hour or freezer for 20 minutes.
- Coat the Cake Balls: Melt the white chocolate, dip each cake ball, let excess drip off, top with sprinkles, and let set.
Notes
- For a sweeter coating, mix white chocolate chips with a bit of coconut oil.
- Store in an airtight container in the fridge for up to 5 days or freeze for longer freshness.
- Prep Time: 30 minutes
- Cook Time: 30 minutes (for cake)
- Category: Dessert
- Method: No-Bake (after cake is baked)
- Cuisine: American
Nutrition
- Serving Size: 1 cake ball
- Calories: 140
- Sugar: 12 g
- Sodium: 130 mg
- Fat: 7 g
- Saturated Fat: 4.5 g
- Unsaturated Fat: 2 g
- Trans Fat: 0 g
- Carbohydrates: 17 g
- Fiber: 0 g
- Protein: 1 g
- Cholesterol: 15 mg


