
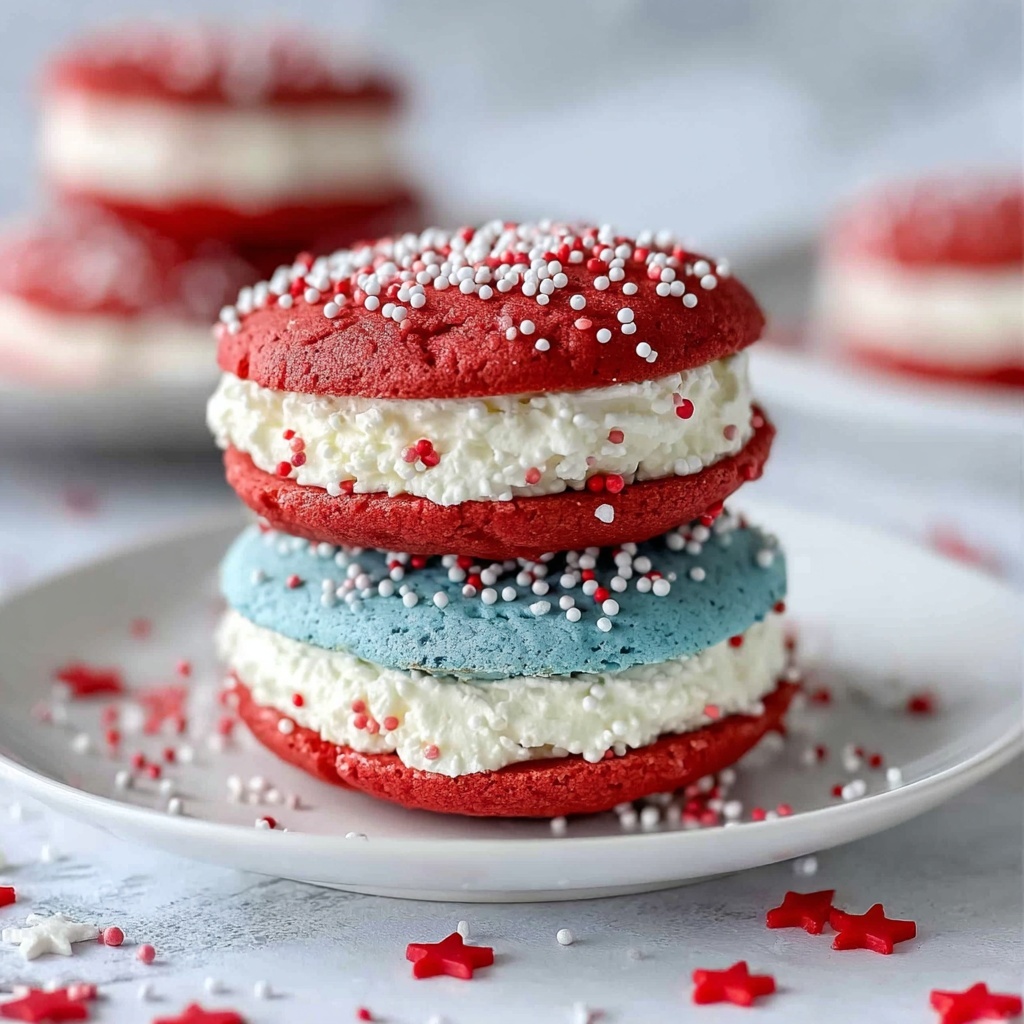
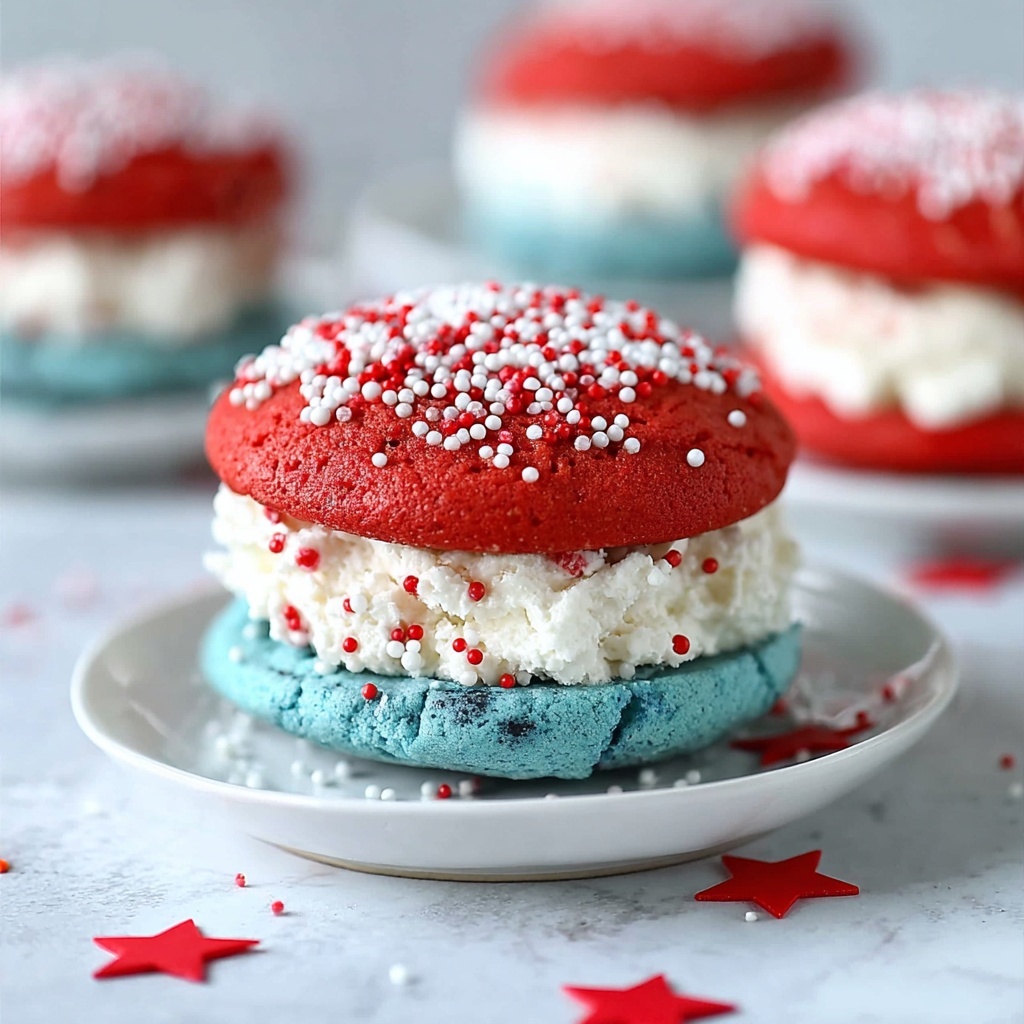
If you’re craving a dessert that’s as fun to look at as it is to eat, this Red, White and Blue Whoopie Pies Recipe is absolutely going to steal your heart. Imagine soft, pillowy cookies in patriotic colors sandwiching a luscious, creamy filling that’s perfectly sweet and tangy. These charming treats are fantastic for any celebration, from summer barbecues to holiday gatherings, and their vibrant red and blue hues alongside snowy white filling make them a feast for both your eyes and your taste buds.
Ingredients You’ll Need
The ingredients for this Red, White and Blue Whoopie Pies Recipe are straightforward and accessible, each bringing a specific quality to the final treat—whether it’s the tender crumb of the cookies or the silky smooth cream cheese filling, and of course, those iconic colors we all love.
- White cake mix: The base of the cookies, ensuring a light, fluffy texture that holds the colors well.
- Instant vanilla pudding mix: Adds extra moisture and a subtle vanilla flavor for richer cookies.
- Unsalted butter, softened: Provides a creamy richness and tender crumb when mixed into the dough.
- Large eggs, room temperature: Help bind the ingredients and add structure to the cookies.
- Red food coloring: Brings that festive, bold red hue to half the dough with ease.
- Blue food coloring: Colors the other half vibrant blue, creating that iconic patriotic contrast.
- Red, white, and blue sprinkles: These add that final celebratory touch and some extra fun texture on the edges.
- Cream cheese, softened: The star of the filling, lending a tangy creaminess that balances the sweetness.
- Powdered sugar: Sweetens and thickens the filling for a perfectly smooth consistency.
- Vanilla extract: Enhances the flavor depth with a warm, comforting aroma.
How to Make Red, White and Blue Whoopie Pies Recipe
Step 1: Preheat Oven and Prepare Baking Sheets
Begin by positioning a rack in the center of your oven and preheating it to 350°F (175°C). Meanwhile, line two baking sheets with parchment paper to ensure your cookies don’t stick and bake evenly. This simple prep step sets you up for success with perfectly shaped whoopie pies.
Step 2: Make the Cookie Dough
In the bowl of a stand mixer fitted with the paddle attachment, combine the white cake mix and instant vanilla pudding mix. Add softened butter and eggs, then beat on medium speed until the dough comes together and is thick. The pudding mix adds a luscious moisture that keeps the cookies soft and tender, making each bite a delight.
Step 3: Color the Dough
Divide the dough evenly between two bowls, dedicating one for the red food coloring and one for the blue. Mix each bowl thoroughly until you achieve uniform, vibrant color without any streaks. This step is where the magic starts to feel real, as those iconic red and blue shades come alive.
Step 4: Shape the Cookies
Using a tablespoon or cookie scoop, drop rounded dollops of dough onto the prepared baking sheets, making sure to space them at least two inches apart so they have room to spread gently. This spacing is key to getting nicely rounded, evenly baked cookies that will pair beautifully.
Step 5: Bake and Cool
Bake one sheet at a time for about 10 minutes, until the cookie rounds spring back lightly when pressed. Let them cool on the sheet for a few minutes before transferring to a wire rack to cool completely. Patience here pays off with cookies that aren’t too fragile and keep their perfect shape for assembling.
Step 6: Prepare the Filling
While your cookies cool, whip up the filling by beating softened cream cheese and powdered sugar on medium-high speed until it’s light, fluffy, and irresistibly creamy. Stir in the vanilla extract last to infuse your filling with that unmistakable warmth and depth of flavor.
Step 7: Assemble the Whoopie Pies
Once the cookies are cool, spread a generous layer of cream cheese filling on the flat side of one cookie and sandwich it with another cookie, flat side down. This tender duo is about to become the star of your dessert table.
Step 8: Decorate
Roll or sprinkle the edges of the filling with festive red, white, and blue sprinkles to add a celebratory crunch and a burst of color—even more inviting and fun! Repeat the process with the remaining cookies and filling.
Step 9: Store and Serve
Place your assembled Red, White and Blue Whoopie Pies in an airtight container and refrigerate until you’re ready to serve. For the best flavor and texture, let them come to room temperature before enjoying their perfect creaminess and softness.
How to Serve Red, White and Blue Whoopie Pies Recipe
Garnishes
Adding extra garnishes can elevate your whoopie pies even more. Try a few fresh blueberries for a burst of freshness or a light dusting of powdered sugar to mimic a gentle snowfall on your patriotic treats.
Side Dishes
These whoopie pies pair wonderfully with a scoop of vanilla ice cream or a tall glass of cold milk. For a brunch or picnic, offering fresh fruit salad alongside adds a crisp, refreshing balance.
Creative Ways to Present
For an extra dazzling display, stack your Red, White and Blue Whoopie Pies on a tiered cake stand or wrap each one individually in clear cellophane tied with a ribbon matching the theme. This not only looks gorgeous but makes for perfect handheld treats at any party.
Make Ahead and Storage
Storing Leftovers
Keep your whoopie pies fresh by storing them in a sealed container in the refrigerator. They’ll maintain their texture and flavor for up to 4 days, so no need to rush through all of them at once.
Freezing
You can freeze these assembled whoopie pies for up to 2 months. Wrap each pie individually in plastic wrap and then place them in a freezer-safe bag or container. When you’re ready to enjoy, thaw in the refrigerator overnight for best results.
Reheating
For a freshly baked feel, bring refrigerated or thawed whoopie pies to room temperature before serving. If you like them a little warmer, microwave for 10-15 seconds but watch carefully so the filling remains stable and the cookies don’t get soggy.
FAQs
Can I use homemade cake batter instead of box mix?
Absolutely! Homemade batter will add your signature touch and can make the cookies more customized, but using a box mix is a convenient way to guarantee consistent texture and flavor every time.
What if I don’t have red or blue food coloring?
You can get creative with natural alternatives like beet juice for red or blueberry juice for blue, but keep in mind the colors may be less vibrant and the dough slightly moister.
Can I make these whoopie pies gluten-free?
Yes, swap the white cake mix for a gluten-free version and make sure your pudding mix is gluten-free too. The rest of the ingredients are naturally gluten-free.
How long do these whoopie pies stay fresh at room temperature?
Because of the cream cheese filling, it’s best to keep them refrigerated and only leave them at room temperature for about two hours before serving.
Can I substitute the cream cheese filling with something else?
Definitely! Whipped marshmallow fluff or a classic buttercream frosting can work well, but the cream cheese filling is what gives this recipe its signature tangy richness.
Final Thoughts
There’s just something so joyful about making and sharing the Red, White and Blue Whoopie Pies Recipe—it’s a vibrant, tasty way to celebrate any occasion or simply treat yourself. Once you try these soft, colorful cookies paired with that dreamy cream cheese filling, you’ll understand why they quickly become a favorite. So go ahead, gather your ingredients, and bring this cheerful recipe to your kitchen soon. You’ll delight your friends, family, and yourself with every bite!
Print
Red, White and Blue Whoopie Pies Recipe
- Prep Time: 15 minutes
- Cook Time: 10 minutes
- Total Time: 35 minutes
- Yield: 12 servings
- Category: Dessert
- Method: Baking
- Cuisine: American
- Diet: Vegetarian
Description
Celebrate any festive occasion with these delightful Red, White and Blue Whoopie Pies featuring soft, colorful cookies sandwiched with a creamy vanilla cream cheese filling, finished with patriotic sprinkles. Perfectly balanced in sweetness and visually stunning, these treats are great for summer parties, holidays, or anytime you want a fun, patriotic dessert.
Ingredients
Cookie Dough:
- 1 box white cake mix
- 1 small (3.4 oz) box instant vanilla pudding mix
- 8 tablespoons (1/2 cup) unsalted butter, softened
- 2 large eggs, room temperature
- Red food coloring
- Blue food coloring
Filling and Decoration:
- 8 ounces cream cheese, softened
- 3 cups powdered sugar
- 4 teaspoons vanilla extract
- Red, white, and blue sprinkles
Instructions
- Preheat Oven and Prepare Baking Sheets: Position a rack in the center of the oven and preheat to 350°F (175°C). Line two baking sheets with parchment paper to prevent sticking and ensure even baking.
- Make the Cookie Dough: In the bowl of a stand mixer fitted with the paddle attachment, combine the white cake mix and instant vanilla pudding mix. Add softened butter and eggs, then beat on medium speed until everything is fully combined. The dough will be thick.
- Color the Dough: Divide the prepared dough evenly into two bowls. Add red food coloring to one half and blue food coloring to the other. Mix each until the color is uniform and there are no streaks.
- Shape the Cookies: Using a tablespoon or small cookie scoop, drop rounds of dough onto the prepared baking sheets, spacing them at least 2 inches apart to allow for spreading.
- Bake Cookies: Bake one sheet at a time in the preheated oven for about 10 minutes, or until the cookie rounds spring back when gently pressed. Remove from the oven and let them cool on the baking sheet for 3 minutes before transferring to a wire rack to cool completely.
- Prepare the Filling: While the cookies cool, make the filling. In the clean bowl of a stand mixer with the paddle attachment, beat the softened cream cheese and powdered sugar together on medium-high speed until light and fluffy, about 3-5 minutes. Add the vanilla extract and mix until fully incorporated.
- Assemble Whoopie Pies: Once cookies are completely cooled, use a knife or spoon to spread a generous layer of cream cheese filling onto the flat side of one cookie. Top with another cookie, flat side down, to form a sandwich.
- Decorate: Roll or sprinkle the filling edges with red, white, and blue sprinkles for a festive finish. Repeat with remaining cookies and filling.
- Store and Serve: Place assembled whoopie pies in an airtight container and refrigerate until ready to serve. Allow them to come to room temperature before serving for best flavor and texture.
Notes
- Ensure butter and cream cheese are softened to room temperature for smooth mixing.
- Do not overbake cookies; they should spring back when gently pressed.
- To keep colors vibrant, avoid mixing red and blue dough together.
- Assembled whoopie pies can be refrigerated for up to 3 days.
- Allow whoopie pies to sit at room temperature for about 15 minutes before serving for optimal texture.


