start with a layer of milk-dipped cookies, then spread a layer of the cheesecake mixture over top Recipe
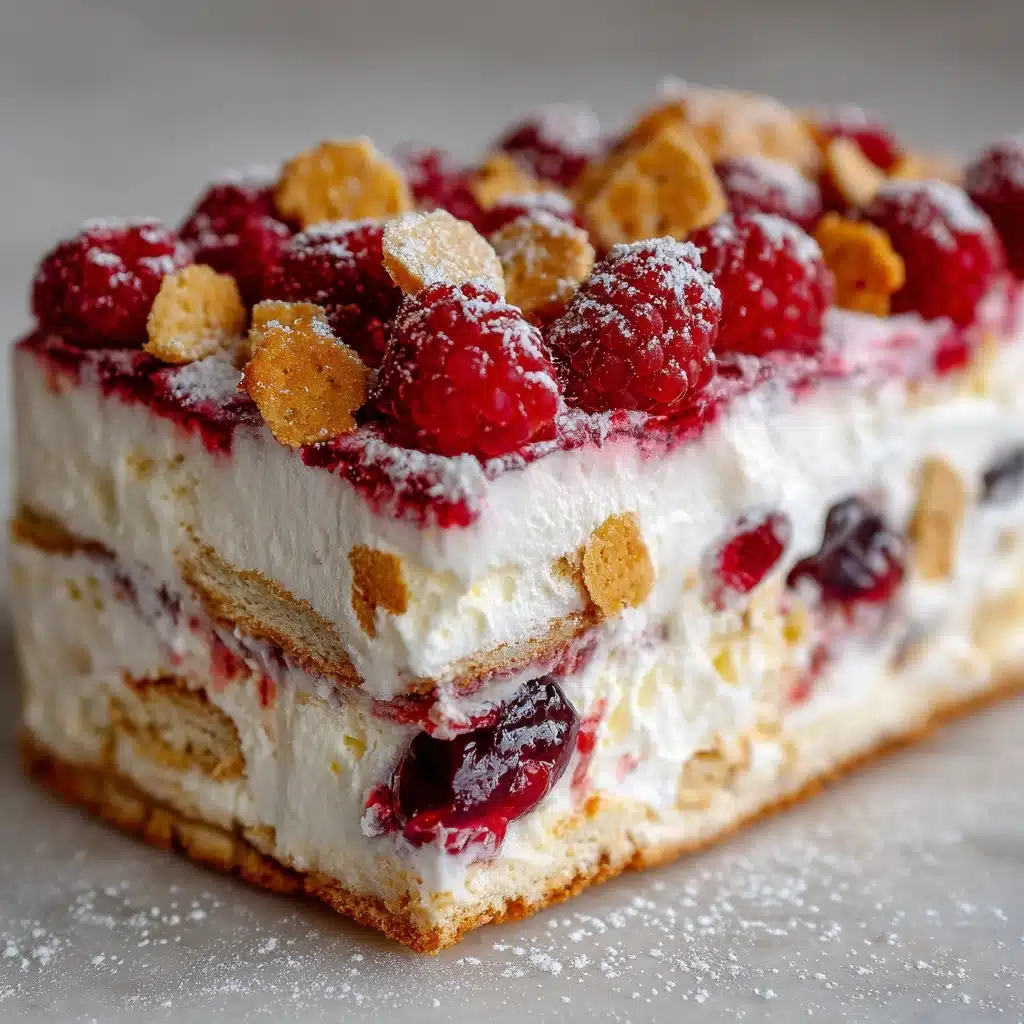
If you’re dreaming of a dessert that’s creamy, crunchy, chocolatey, and downright irresistible, stop right here: Frozen Cheesecake Cookie Icebox Cake is your new obsession. This treat is the answer to every summer sweet tooth — it’s no-bake, wildly easy, and guaranteed to turn any gathering into a celebration. Here’s the secret: you start with a layer of milk-dipped cookies, then spread a layer of the cheesecake mixture over top, repeating until you have a stack of pure bliss. Whether you’re planning ahead for a crowd or craving a midnight slice straight from the freezer, you’ll fall hard for every chilled, dreamy bite.
Ingredients You’ll Need
These ingredients are as simple as they come, but each one brings something important to the party. From the fluffy, luscious filling to the nostalgic cookies, every element works together to give this dessert its crave-worthy flavors and just-right texture.
- Heavy Whipping Cream: Whips up into a billowy cloud that gives the cheesecake filling irresistible lightness.
- Cream Cheese (softened): This is the heart of your cheesecake layer, bringing rich tang and silky smoothness.
- Powdered Sugar: Sweetens the filling without any graininess—perfect for a fluffy, creamy bite.
- Vanilla Extract: Adds that essential touch of warmth and coziness to balance the decadent creaminess.
- Chocolate Chip Cookies: Store-bought or homemade both work—either way, they soften into luscious layers.
- Milk (for dipping): Briefly soaking the cookies ensures they meld perfectly with the cheesecake layers.
- Mini Chocolate Chips or Crushed Cookies (for topping): Sprinkled on at the end for extra crunch and chocolate flair.
- Chocolate Syrup or Caramel Drizzle (optional): Take things over the top with a dramatic finish—totally optional, totally delicious.
How to Make start with a layer of milk-dipped cookies, then spread a layer of the cheesecake mixture over top
Step 1: Whip the Heavy Cream
Pour the heavy whipping cream into a large mixing bowl and beat it with an electric mixer until stiff peaks form. This will give you that fluffy texture that feels like a cloud when you take a bite. Don’t overbeat—once the peaks stand straight up, you’re all set!
Step 2: Make the Cheesecake Mixture
In another bowl, blend the softened cream cheese, powdered sugar, and vanilla extract until the mixture is completely smooth and creamy. Scrape down the sides of the bowl so every bit gets combined. The vanilla brings that signature cheesecake taste to life in this icebox cake.
Step 3: Fold and Fluff
Gently fold your newly whipped cream into the cheesecake mixture. Work slowly, using a spatula rather than a mixer, to keep the mixture light and airy. This is what makes your cheesecake layers so dreamy and far from dense or heavy.
Step 4: Prep the Cookies
Pour the milk into a shallow dish. Briefly dip each chocolate chip cookie into the milk—just a quick dunk so they soak up a little moisture but don’t fall apart. This step ensures your cookies soften beautifully while still offering just the right amount of texture throughout the cake.
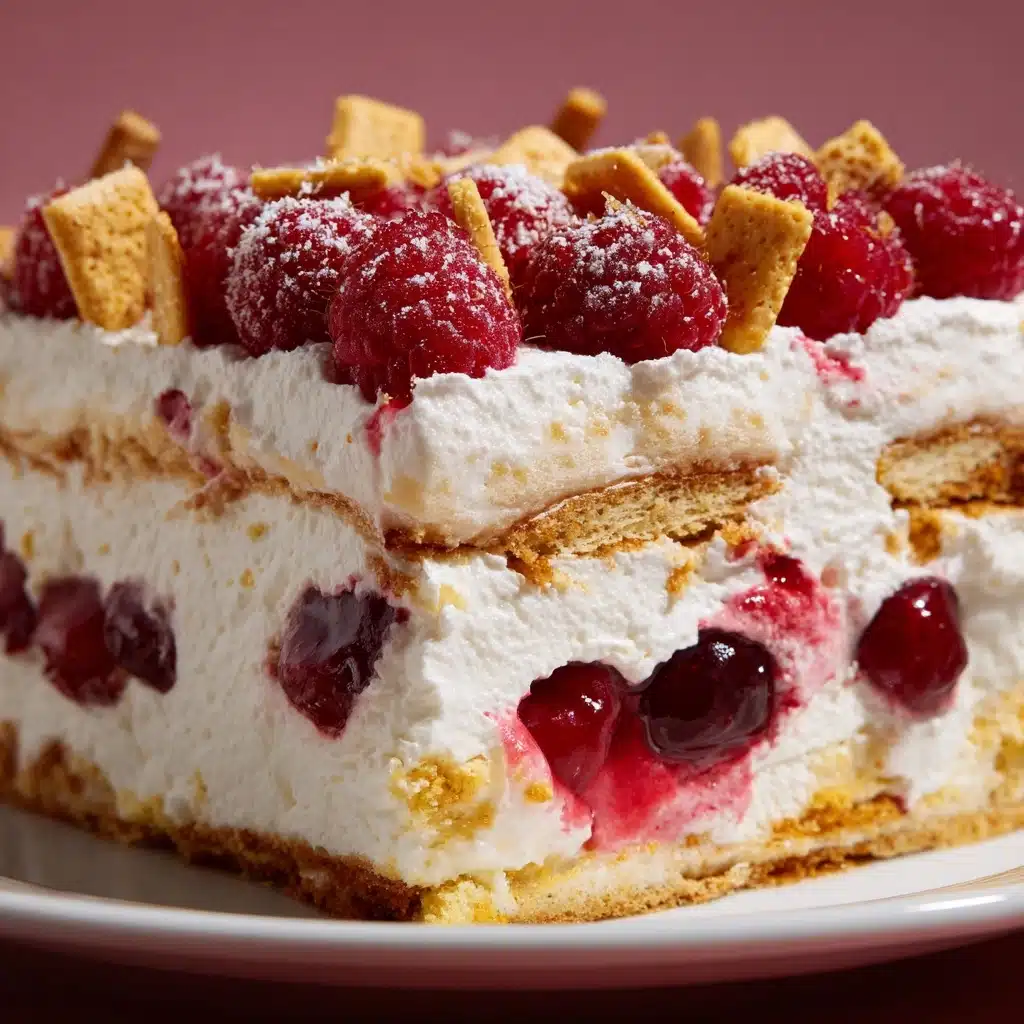
Step 5: Layer Up—Start with a layer of milk-dipped cookies, then spread a layer of the cheesecake mixture over top
In a 9×9-inch baking dish, start with a layer of milk-dipped cookies, then spread a layer of the cheesecake mixture over top. Don’t worry if the cookies don’t cover every inch; gaps will fill in as the cake sets. Continue to repeat: start with a layer of milk-dipped cookies, then spread a layer of the cheesecake mixture over top, until you’ve used everything, finishing with a thick cheesecake layer on top.
Step 6: Add Toppings and Freeze
Sprinkle the top layer generously with mini chocolate chips or crushed cookies. Cover the pan with plastic wrap and place in the freezer for at least four hours, or overnight for the most perfect, sliceable texture.
Step 7: Slice, Serve, and Enjoy
Let the cake sit at room temperature for about ten to fifteen minutes before slicing into squares. If you’re feeling extra, drizzle each piece with a little chocolate syrup or caramel just before serving. Every bite will showcase how genius it is to start with a layer of milk-dipped cookies, then spread a layer of the cheesecake mixture over top—simple, stunning, and always a crowd-pleaser.
How to Serve start with a layer of milk-dipped cookies, then spread a layer of the cheesecake mixture over top
Garnishes
This stunner of a dessert is gorgeous as-is, but a few extra flourishes can take it even higher. Try a scatter of mini chocolate chips, a swirl of chocolate or caramel sauce, or even a sprinkle of flaky sea salt to make the chocolate flavors pop. Fresh berries or a dollop of whipped cream also complement the creamy-crunchy layers beautifully.
Side Dishes
If you’re entertaining, pair this Frozen Cheesecake Cookie Icebox Cake with a big bowl of fresh strawberries or a light fruit salad. The brightness of the fruit balances the richness of the cake, and guests love having something refreshing alongside every cool, creamy forkful.
Creative Ways to Present
Don’t feel boxed in by a square pan! You can make individual parfaits in mason jars, build cute mini cakes in ramekins, or use a loaf pan for dramatic, tall slices. However you serve it, just remember to start with a layer of milk-dipped cookies, then spread a layer of the cheesecake mixture over top—no matter the shape, the magic stays the same.
Make Ahead and Storage
Storing Leftovers
Keep any leftovers covered tightly in the freezer. The cake stays delicious for up to a week—just let it soften at room temperature for 10-15 minutes before cutting. Pro tip: pre-slice and wrap squares individually for easy, instant treats.
Freezing
This cake was made for the freezer! After assembling and topping, cover your dish well with plastic wrap and foil. You can freeze the whole cake for up to a month. Individual portions can also be wrapped securely and stashed away for late-night cravings or emergency dessert needs.
Reheating
Since this is all about the frosty, cheesecake-ice cream vibe, you don’t need to reheat! Just leave your cake on the counter until it’s easy to slice, and you’re ready to enjoy its perfect, chilled texture. If you like it more on the creamy side, give it an extra five minutes to soften.
FAQs
Can I use homemade cookies instead of store-bought?
Absolutely! Homemade cookies bring a personal touch and can be made as thick or thin as you like. Just be sure not to over-soak them during the milk dip—keep the texture sturdy so they hold up as you start with a layer of milk-dipped cookies, then spread a layer of the cheesecake mixture over top.
What other cookies work well in this recipe?
The sky’s the limit! Chocolate or peanut butter cookies add a fun twist. Shortbread, oatmeal, or even graham crackers can work—just remember that the texture will change, so choose something that’s sturdy enough to soak and layer.
How long does this icebox cake need to freeze?
I recommend at least four hours, but overnight is best if you have time. This lets the layers meld and the cake set for clean, beautiful slicing. Patience pays off, especially when you start with a layer of milk-dipped cookies, then spread a layer of the cheesecake mixture over top in each round.
Can I make this ahead for a party?
Yes, that’s actually what makes it a perfect party dessert! Assemble the night before, freeze, and simply let soften for 10–15 minutes before serving. All the magic happens in the freezer, so you’re free to enjoy your guests instead of fussing with dessert at the last minute.
Is it possible to make a gluten-free version?
Definitely! Use your favorite gluten-free chocolate chip cookies and whip up the cheesecake layers just as described. The method doesn’t change: simply start with a layer of milk-dipped cookies, then spread a layer of the cheesecake mixture over top, adapting the recipe for your dietary needs.
Final Thoughts
If you’re searching for a knockout dessert that wows every time, you simply can’t go wrong when you start with a layer of milk-dipped cookies, then spread a layer of the cheesecake mixture over top. This Frozen Cheesecake Cookie Icebox Cake is as fun and fuss-free as it is delicious. Give it a try and get ready for your freezer to become everyone’s favorite kitchen destination!
Print
start with a layer of milk-dipped cookies, then spread a layer of the cheesecake mixture over top Recipe
- Total Time: 20 minutes (plus freezing time)
- Yield: 9 servings 1x
- Diet: Vegetarian
Description
Indulge in the creamy and decadent Frozen Cheesecake Cookie Icebox Cake, a delightful no-bake dessert perfect for any occasion. Layers of creamy cheesecake filling and chocolate chip cookies create a heavenly treat that’s sure to impress.
Ingredients
Cheesecake Filling:
- 2 cups heavy whipping cream
- 8 oz cream cheese (softened)
- ½ cup powdered sugar
- 1 teaspoon vanilla extract
Assembly:
- 1 package (14 oz) chocolate chip cookies (store-bought or homemade)
- ¾ cup milk (for dipping)
- 1 cup mini chocolate chips or crushed cookies for topping
- Optional: chocolate syrup or caramel drizzle
Instructions
- Prepare Cheesecake Filling: Beat heavy cream until stiff peaks form. In a separate bowl, beat cream cheese, powdered sugar, and vanilla until smooth. Fold in whipped cream.
- Assemble Cake: Dip cookies in milk, layer in a 9×9-inch dish alternating with cheesecake mixture. Top with chocolate chips or crushed cookies.
- Freeze: Cover and freeze for at least 4 hours or overnight.
- Serve: Let sit at room temperature before slicing. Drizzle with chocolate syrup or caramel.
Notes
- Experiment with different flavored cookies for a unique twist.
- Perfect for preparing ahead of time for parties or summertime enjoyment.
- Prep Time: 20 minutes
- Cook Time: 0 minutes
- Category: Dessert
- Method: No-Bake
- Cuisine: American
Nutrition
- Serving Size: 1 square
- Calories: 390
- Sugar: 22 g
- Sodium: 200 mg
- Fat: 27 g
- Saturated Fat: 16 g
- Unsaturated Fat: 9 g
- Trans Fat: 0 g
- Carbohydrates: 32 g
- Fiber: 1 g
- Protein: 4 g
- Cholesterol: 80 mg


